Lexmark X464de Service Manual - Page 113
Num Pad Job Assist, Format Fax Storage, Fax Storage Location, ADF Edge Erase, setting's current value]
 |
View all Lexmark X464de manuals
Add to My Manuals
Save this manual to your list of manuals |
Page 113 highlights
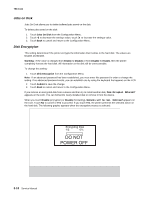
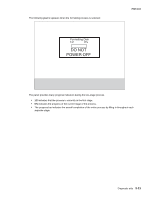
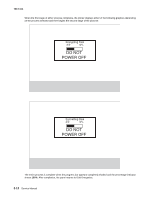
7014-xxx Num Pad Job Assist This setting determines if a user can configure and initiate a job using the panels hard buttons. To change this setting: 1. Touch Num Pad Job Assist from the Configuration Menu. touch-screen. 2. Touch or . The settings are On or Off. 3. Touch Submit to save the change. [setting's current value] appears on the Format Fax Storage This setting enables you to format the non-volatile storage used for storing faxes. To change this setting: 1. Touch Format Fax Storage from the Configuration Menu. Note: If an advanced password has been established, you must enter this password in order to change the setting. If no advanced password exists, you can establish one by using the keyboard that appears on the LCD. 2. Touch Submit to save the change. 3. Touch Back to cancel and return to the Configuration Menu. Formatting Fax Flash DO NOT POWER OFF appears on the LCD while the format operation is active. Fax Storage Location To change this setting: 1. Touch Fax Storage Location from the Configuration Menu. the touch-screen. 2. Touch or . The settings are Disk and NAND. 3. Touch Submit to save the change. [setting's current value] appears on ADF Edge Erase This menu item sets the size, in millimeters, of the no-print area around an ADF scan job.All copy jobs have a minimum of a two millimeter border. Copy jobs will use the setting or two millimeters, whichever is larger. To adjust the ADF edge erase setting, perform the following steps: 1. Touch ADF Edge Erase from the Configuration Menu. [setting's current value] touch-screen. 2. Touch to increase the value or to decrease the value. 3. Touch Submit to save the change. 4. Touch Back to cancel and return to the Configuration Menu. appears on the FB Edge Erase This menu item sets the size, in millimeters, of the no print area around a flatbed scan job. Copy jobs will use the setting or two millimeters, whichever is larger. Diagnostic aids 3-7
-
 1
1 -
2
-
3
-
4
-
5
-
6
-
7
-
8
-
9
-
10
-
11
-
12
-
13
-
14
-
15
-
16
-
17
-
18
-
19
-
20
-
21
-
22
-
23
-
24
-
25
-
26
-
27
-
28
-
29
-
30
-
31
-
32
-
33
-
34
-
35
-
36
-
37
-
38
-
39
-
40
-
41
-
42
-
43
-
44
-
45
-
46
-
47
-
48
-
49
-
50
-
51
-
52
-
53
-
54
-
55
-
56
-
57
-
58
-
59
-
60
-
61
-
62
-
63
-
64
-
65
-
66
-
67
-
68
-
69
-
70
-
71
-
72
-
73
-
74
-
75
-
76
-
77
-
78
-
79
-
80
-
81
-
82
-
83
-
84
-
85
-
86
-
87
-
88
-
89
-
90
-
91
-
92
-
93
-
94
-
95
-
96
-
97
-
98
-
99
-
100
-
101
-
102
-
103
-
104
-
105
-
106
-
107
-
 108
108 -
 109
109 -
 110
110 -
 111
111 -
 112
112 -
 113
113 -
 114
114 -
 115
115 -
 116
116 -
 117
117 -
 118
118 -
119
-
120
-
121
-
122
-
123
-
124
-
125
-
126
-
127
-
128
-
129
-
130
-
131
-
132
-
133
-
134
-
135
-
136
-
137
-
138
-
139
-
140
-
141
-
142
-
143
-
144
-
145
-
146
-
147
-
148
-
149
-
150
-
151
-
152
-
153
-
154
-
155
-
156
-
157
-
158
-
159
-
160
-
161
-
162
-
163
-
164
-
165
-
166
-
167
-
168
-
169
-
170
-
171
-
172
-
173
-
174
-
175
-
176
-
177
-
178
-
179
-
180
-
181
-
182
-
183
-
184
-
185
-
186
-
187
-
188
-
189
-
190
-
191
-
192
-
193
-
194
-
195
-
196
-
197
-
198
-
199
-
200
-
201
-
202
-
203
-
204
-
205
-
206
-
207
-
208
-
209
-
210
-
211
-
212
-
213
-
214
-
215
-
216
-
217
-
218
-
219
-
220
-
221
-
222
-
223
-
224
-
225
-
226
-
227
-
228
-
229
-
230
-
231
-
232
-
233
-
234
-
235
-
236
-
237
-
238
-
239
-
240
-
241
-
242
-
243
-
244
-
245
-
246
-
247
-
248
-
249
-
250
-
251
-
252
-
253
-
254
-
255
-
256
-
257
-
258
-
259
-
260
-
261
-
262
-
263
-
264
-
265
-
266
-
267
-
268
-
269
-
270
-
271
-
272
-
273
-
274
-
275
-
276
-
277
-
278
-
279
-
280
-
281
-
282
-
283
-
284
-
285
-
286
-
287
-
288
-
289
-
290
-
291
-
292
-
293
-
294
-
295
-
296
-
297
-
298
-
299
-
300
-
301
-
302
-
303
-
304
-
305
-
306
-
307
-
308
-
309
-
310
 |
 |