Netgear AC2100 User Manual - Page 103
Disable LED blinking or turn off LEDs, Return the router to its factory default settings
 |
View all Netgear AC2100 manuals
Add to My Manuals
Save this manual to your list of manuals |
Page 103 highlights
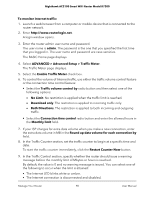
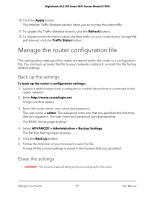
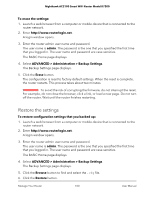
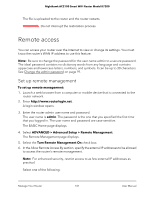
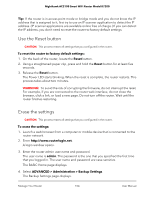
Nighthawk AC2100 Smart WiFi Router Model R7200 Disable LED blinking or turn off LEDs The LEDs on the top panel of the router indicate activities and behavior. You can disable LED blinking for network communications, or turn off all LEDs except the Power LED. To disable LED blinking or turn off the LEDs: 1. Launch a web browser from a computer or mobile device that is connected to the router network. 2. Enter http://www.routerlogin.net. A login window opens. 3. Enter the router admin user name and password. The user name is admin. The password is the one that you specified the first time that you logged in. The user name and password are case-sensitive. The BASIC Home page displays. 4. Select ADVANCED > Advanced Setup > LED Control Settings. The LED Control Settings page displays. 5. To disable blinking, select the Disable blinking on Internet LED, LAN LED, Wireless LED and USB LED when data traffic is detected radio button. 6. To turn off all LEDs except the Power LED, select the Turn off all LEDs except Power LED radio button. 7. Click the Apply button. Your settings are saved. Return the router to its factory default settings Under some circumstances (for example, if you lost track of the changes that you made to the router settings or you move the router to a different network), you might want to erase the configuration and reset the router to factory default settings. To reset the router to factory default settings, you can use either the Reset button on the back of the router or the Erase function. After you reset the router to factory default settings, the user name is admin, the password is password, the LAN IP address is 192.168.1.1 (which is the same as www.routerlogin.net), and the DHCP server is enabled. Manage Your Router 103 User Manual
-
 1
1 -
2
-
3
-
4
-
5
-
6
-
7
-
8
-
9
-
10
-
11
-
12
-
13
-
14
-
15
-
16
-
17
-
18
-
19
-
20
-
21
-
22
-
23
-
24
-
25
-
26
-
27
-
28
-
29
-
30
-
31
-
32
-
33
-
34
-
35
-
36
-
37
-
38
-
39
-
40
-
41
-
42
-
43
-
44
-
45
-
46
-
47
-
48
-
49
-
50
-
51
-
52
-
53
-
54
-
55
-
56
-
57
-
58
-
59
-
60
-
61
-
62
-
63
-
64
-
65
-
66
-
67
-
68
-
69
-
70
-
71
-
72
-
73
-
74
-
75
-
76
-
77
-
78
-
79
-
80
-
81
-
82
-
83
-
84
-
85
-
86
-
87
-
88
-
89
-
90
-
91
-
92
-
93
-
94
-
95
-
96
-
97
-
 98
98 -
 99
99 -
 100
100 -
 101
101 -
 102
102 -
 103
103 -
 104
104 -
 105
105 -
 106
106 -
 107
107 -
 108
108 -
109
-
110
-
111
-
112
-
113
-
114
-
115
-
116
-
117
-
118
-
119
-
120
-
121
-
122
-
123
-
124
-
125
-
126
-
127
-
128
-
129
-
130
-
131
-
132
-
133
-
134
-
135
-
136
-
137
-
138
-
139
-
140
-
141
-
142
-
143
-
144
-
145
-
146
-
147
-
148
-
149
-
150
-
151
-
152
-
153
-
154
-
155
-
156
-
157
-
158
-
159
-
160
-
161
-
162
-
163
 |
 |