Netgear AC2100 User Manual - Page 25
Specify an Internet connection that uses a login, Service Name if Required
 |
View all Netgear AC2100 manuals
Add to My Manuals
Save this manual to your list of manuals |
Page 25 highlights
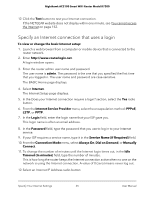
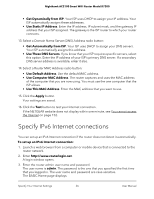
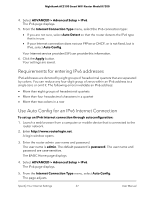
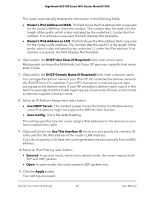
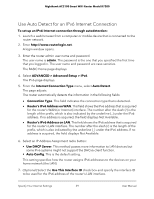
Nighthawk AC2100 Smart WiFi Router Model R7200 12. Click the Test button to test your Internet connection. If the NETGEAR website does not display within one minute, see You cannot access the Internet on page 152. Specify an Internet connection that uses a login To view or change the basic Internet setup: 1. Launch a web browser from a computer or mobile device that is connected to the router network. 2. Enter http://www.routerlogin.net. A login window opens. 3. Enter the router admin user name and password. The user name is admin. The password is the one that you specified the first time that you logged in. The user name and password are case-sensitive. The BASIC Home page displays. 4. Select Internet. The Internet Setup page displays. 5. In the Does your Internet connection require a login? section, select the Yes radio button. 6. From the Internet Service Provider menu, select the encapsulation method: PPPoE, L2TP, or PPTP. 7. In the Login field, enter the login name that your ISP gave you. This login name is often an email address. 8. In the Password field, type the password that you use to log in to your Internet service. 9. If your ISP requires a service name, type it in the Service Name (if Required) field. 10. From the Connection Mode menu, select Always On, Dial on Demand, or Manually Connect. 11. To change the number of minutes until the Internet login times out, in the Idle Timeout (In minutes) field, type the number of minutes. This is how long the router keeps the Internet connection active when no one on the network is using the Internet connection. A value of 0 (zero) means never log out. 12. Select an Internet IP Address radio button: Specify Your Internet Settings 25 User Manual
-
 1
1 -
2
-
3
-
4
-
5
-
6
-
7
-
8
-
9
-
10
-
11
-
12
-
13
-
14
-
15
-
16
-
17
-
18
-
19
-
 20
20 -
 21
21 -
 22
22 -
 23
23 -
 24
24 -
 25
25 -
 26
26 -
 27
27 -
 28
28 -
 29
29 -
 30
30 -
31
-
32
-
33
-
34
-
35
-
36
-
37
-
38
-
39
-
40
-
41
-
42
-
43
-
44
-
45
-
46
-
47
-
48
-
49
-
50
-
51
-
52
-
53
-
54
-
55
-
56
-
57
-
58
-
59
-
60
-
61
-
62
-
63
-
64
-
65
-
66
-
67
-
68
-
69
-
70
-
71
-
72
-
73
-
74
-
75
-
76
-
77
-
78
-
79
-
80
-
81
-
82
-
83
-
84
-
85
-
86
-
87
-
88
-
89
-
90
-
91
-
92
-
93
-
94
-
95
-
96
-
97
-
98
-
99
-
100
-
101
-
102
-
103
-
104
-
105
-
106
-
107
-
108
-
109
-
110
-
111
-
112
-
113
-
114
-
115
-
116
-
117
-
118
-
119
-
120
-
121
-
122
-
123
-
124
-
125
-
126
-
127
-
128
-
129
-
130
-
131
-
132
-
133
-
134
-
135
-
136
-
137
-
138
-
139
-
140
-
141
-
142
-
143
-
144
-
145
-
146
-
147
-
148
-
149
-
150
-
151
-
152
-
153
-
154
-
155
-
156
-
157
-
158
-
159
-
160
-
161
-
162
-
163
 |
 |
