Netgear AC2100 User Manual - Page 62
Change the WiFi Mbps Settings
 |
View all Netgear AC2100 manuals
Add to My Manuals
Save this manual to your list of manuals |
Page 62 highlights
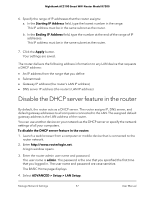
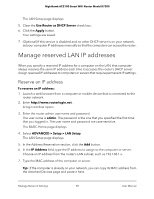
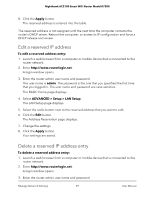
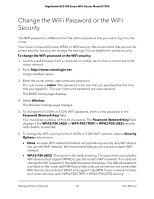
Nighthawk AC2100 Smart WiFi Router Model R7200 7. To change the network name (SSID), type a new name in the Name (SSID) field. The name can be up to 32 characters long and it is case-sensitive. The default SSID is randomly generated and is on the router label. If you change the name, make sure to write down the new name and keep it in a safe place. 8. To change the WiFi channel, select a number from the Channel menu. In some regions, not all channels are available. Do not change the channel unless you experience interference (shown by lost connections or slow data transfers). If this happens, experiment with different channels to see which is the best. When you use multiple access points, it is better if adjacent access points use different channels to reduce interference. The recommended channel spacing between adjacent access points is four channels (for example, use Channels 1 and 5, or 6 and 10). 9. Click the Apply button. Your settings are saved. If you connected wirelessly to the network and you changed the SSID, you are disconnected from the network. 10. Make sure that you can connect wirelessly to the network with its new settings. If you cannot connect wirelessly, check the following: • Is your computer or mobile device connected to another WiFi network in your area? Some WiFi devices automatically connect to the first open network without WiFi security that they discover. • Is your computer or mobile device trying to connect to your network with its old settings (before you changed the settings)? If so, update the WiFi network selection in your computer or mobile device to match the current settings for your network. Change the WiFi Mbps Settings The data rate for high-speed transmissions is commonly identified as megabits per second (Mbps). To change the WiFi Mbps settings: 1. Launch a web browser from a computer or mobile device that is connected to the router network. 2. Enter http://www.routerlogin.net. A login window opens. 3. Enter the router admin user name and password. Manage Network Settings 62 User Manual
-
 1
1 -
2
-
3
-
4
-
5
-
6
-
7
-
8
-
9
-
10
-
11
-
12
-
13
-
14
-
15
-
16
-
17
-
18
-
19
-
20
-
21
-
22
-
23
-
24
-
25
-
26
-
27
-
28
-
29
-
30
-
31
-
32
-
33
-
34
-
35
-
36
-
37
-
38
-
39
-
40
-
41
-
42
-
43
-
44
-
45
-
46
-
47
-
48
-
49
-
50
-
51
-
52
-
53
-
54
-
55
-
56
-
 57
57 -
 58
58 -
 59
59 -
 60
60 -
 61
61 -
 62
62 -
 63
63 -
 64
64 -
 65
65 -
 66
66 -
 67
67 -
68
-
69
-
70
-
71
-
72
-
73
-
74
-
75
-
76
-
77
-
78
-
79
-
80
-
81
-
82
-
83
-
84
-
85
-
86
-
87
-
88
-
89
-
90
-
91
-
92
-
93
-
94
-
95
-
96
-
97
-
98
-
99
-
100
-
101
-
102
-
103
-
104
-
105
-
106
-
107
-
108
-
109
-
110
-
111
-
112
-
113
-
114
-
115
-
116
-
117
-
118
-
119
-
120
-
121
-
122
-
123
-
124
-
125
-
126
-
127
-
128
-
129
-
130
-
131
-
132
-
133
-
134
-
135
-
136
-
137
-
138
-
139
-
140
-
141
-
142
-
143
-
144
-
145
-
146
-
147
-
148
-
149
-
150
-
151
-
152
-
153
-
154
-
155
-
156
-
157
-
158
-
159
-
160
-
161
-
162
-
163
 |
 |