Netgear AC2100 User Manual - Page 56
Specify the IP addresses that the router assigns
 |
View all Netgear AC2100 manuals
Add to My Manuals
Save this manual to your list of manuals |
Page 56 highlights
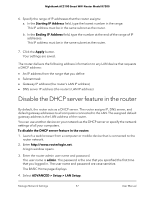
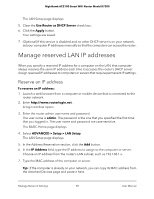
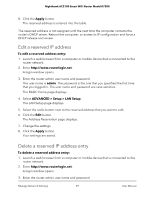
Nighthawk AC2100 Smart WiFi Router Model R7200 • RIP-2. This format carries more information. Both RIP-2B and RIP-2M send the routing data in RIP-2 format. RIP-2B uses subnet broadcasting. RIP-2M uses multicasting. 8. Click the Apply button. Your settings are saved. If you changed the LAN IP address of the router, you are disconnected when this change takes effect. 9. To reconnect, close your browser, relaunch it, and log in to the router. Specify the IP addresses that the router assigns By default, the router acts as a Dynamic Host Configuration Protocol (DHCP) server. The router assigns IP, DNS server, and default gateway addresses to all computers connected to the LAN. The assigned default gateway address is the LAN address of the router. These addresses must be part of the same IP address subnet as the router's LAN IP address. Using the default addressing scheme, define a range between 192.168.1.2 and 192.168.1.254, although you can save part of the range for devices with fixed addresses. To specify the pool of IP addresses that the router assigns: 1. Launch a web browser from a computer or mobile device that is connected to the router network. 2. Enter http://www.routerlogin.net. A login window opens. 3. Enter the router admin user name and password. The user name is admin. The password is the one that you specified the first time that you logged in. The user name and password are case-sensitive. The BASIC Home page displays. 4. Select ADVANCED > Setup > LAN Setup. The LAN Setup page displays. 5. Make sure that the Use Router as DHCP Server check box is selected. Manage Network Settings 56 User Manual
-
 1
1 -
2
-
3
-
4
-
5
-
6
-
7
-
8
-
9
-
10
-
11
-
12
-
13
-
14
-
15
-
16
-
17
-
18
-
19
-
20
-
21
-
22
-
23
-
24
-
25
-
26
-
27
-
28
-
29
-
30
-
31
-
32
-
33
-
34
-
35
-
36
-
37
-
38
-
39
-
40
-
41
-
42
-
43
-
44
-
45
-
46
-
47
-
48
-
49
-
50
-
 51
51 -
 52
52 -
 53
53 -
 54
54 -
 55
55 -
 56
56 -
 57
57 -
 58
58 -
 59
59 -
 60
60 -
 61
61 -
62
-
63
-
64
-
65
-
66
-
67
-
68
-
69
-
70
-
71
-
72
-
73
-
74
-
75
-
76
-
77
-
78
-
79
-
80
-
81
-
82
-
83
-
84
-
85
-
86
-
87
-
88
-
89
-
90
-
91
-
92
-
93
-
94
-
95
-
96
-
97
-
98
-
99
-
100
-
101
-
102
-
103
-
104
-
105
-
106
-
107
-
108
-
109
-
110
-
111
-
112
-
113
-
114
-
115
-
116
-
117
-
118
-
119
-
120
-
121
-
122
-
123
-
124
-
125
-
126
-
127
-
128
-
129
-
130
-
131
-
132
-
133
-
134
-
135
-
136
-
137
-
138
-
139
-
140
-
141
-
142
-
143
-
144
-
145
-
146
-
147
-
148
-
149
-
150
-
151
-
152
-
153
-
154
-
155
-
156
-
157
-
158
-
159
-
160
-
161
-
162
-
163
 |
 |