Netgear WG103 WG103 Reference Manual - Page 25
Connect the Wireless Access Point to a Computer, Power LED, Test LED, LAN LED - ip address
 |
UPC - 606449062038
View all Netgear WG103 manuals
Add to My Manuals
Save this manual to your list of manuals |
Page 25 highlights
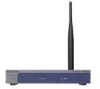
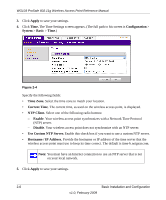
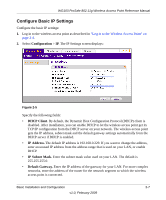
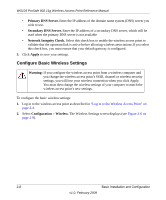
WG103 ProSafe 802.11g Wireless Access Point Reference Manual In order for this to work correctly, verify that you have met all of the system requirements, shown in "System Requirements" on page 1-4. Install and configure your wireless access point in this order: 1. Connect the Wireless Access Point to a Computer. 2. Log in to the Wireless Access Point. 3. Configure LAN Access and Set the Time. 4. Configure Basic IP Settings. 5. Configure Basic Wireless Settings. 6. Configure Basic QoS Settings. Connect the Wireless Access Point to a Computer Set up the wireless access point: Tip: Before mounting the wireless access point in a high location, first set up and test the wireless access point to verify wireless network connectivity. 1. Unpack the box and verify the contents. 2. Prepare a computer with an Ethernet adapter. If this computer is already part of your network, record its TCP/IP configuration settings. 3. Configure the computer with a static IP address of 192.168.0.210 and 255.255.255.0 as the subnet mask. 4. Connect an Ethernet cable from the wireless access point to the computer. 5. Turn on your computer, connect the power adapter to the wireless access point, and verify the following: • Power LED. The power LED (PWR) should be lit. If the power LED is not lit, check the connections and check to see if the power outlet is controlled by a wall switch that is turned off. • Test LED. The test LED (TEST) blinks when the wireless access point is first turned on. • LAN LED. The LAN LED (LAN) on the wireless access point should be lit (amber for a 10 Mbps connection and green for a 100 Mbps connection). If not, make sure the Ethernet cable is securely attached at both ends. Basic Installation and Configuration 2-3 v1.0, February 2009
-
 1
1 -
2
-
3
-
4
-
5
-
6
-
7
-
8
-
9
-
10
-
11
-
12
-
13
-
14
-
15
-
16
-
17
-
18
-
19
-
 20
20 -
 21
21 -
 22
22 -
 23
23 -
 24
24 -
 25
25 -
 26
26 -
 27
27 -
 28
28 -
 29
29 -
 30
30 -
31
-
32
-
33
-
34
-
35
-
36
-
37
-
38
-
39
-
40
-
41
-
42
-
43
-
44
-
45
-
46
-
47
-
48
-
49
-
50
-
51
-
52
-
53
-
54
-
55
-
56
-
57
-
58
-
59
-
60
-
61
-
62
-
63
-
64
-
65
-
66
-
67
-
68
-
69
-
70
-
71
-
72
-
73
-
74
-
75
-
76
-
77
-
78
-
79
-
80
-
81
-
82
-
83
-
84
-
85
-
86
-
87
-
88
-
89
-
90
-
91
-
92
-
93
-
94
-
95
-
96
-
97
-
98
-
99
-
100
-
101
-
102
-
103
-
104
-
105
-
106
-
107
-
108
-
109
-
110
-
111
-
112
-
113
-
114
-
115
-
116
-
117
-
118
-
119
-
120
 |
 |