Netgear WG103 WG103 Reference Manual - Page 46
Configuring WEP, Update Global Key Every Seconds
 |
UPC - 606449062038
View all Netgear WG103 manuals
Add to My Manuals
Save this manual to your list of manuals |
Page 46 highlights
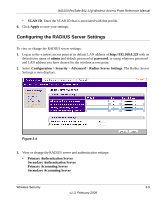
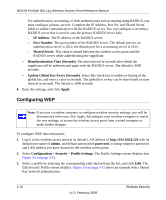
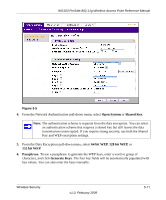
WG103 ProSafe 802.11g Wireless Access Point Reference Manual For authentication, accounting, or both authentication and accounting using RADIUS, you must configure primary servers. Complete the IP Address, Port No. and Shared Secret fields to enable communication with the RADIUS server. You can configure a secondary RADIUS server that is used in case the primary RADIUS server fails. - IP Address. The IP address of the RADIUS server. - Port Number. The port number of the RADIUS server. The default port for an authentication server is 1812; the default port for a accounting server is 1813. - Shared Secret. This value is shared between the wireless access point and the RADIUS server while authenticating the supplicant. • Reauthentication Time (Seconds). The time interval in seconds after which the supplicant will be authenticated again with the RADIUS server. The default is 3600 seconds. • Update Global Key Every (Seconds). Select this check box to enable re-keying of the global key, and enter a value in seconds. The global key re-key can be done based on time interval in seconds. The default is 1800 seconds. 4. Enter the settings, and click Apply. Configuring WEP Note: If you use a wireless computer to configure wireless security settings, you will be disconnected when you click Apply. Reconfigure your wireless computer to match the new settings, or access the wireless access point from a wired computer to make further changes. To configure WEP data encryption: 1. Log in to the wireless access point at its default LAN address of http://192.168.0.229 with its default user name of admin, and default password of password, or using whatever password and LAN address you have chosen for the wireless access point. 2. Select Configuration > Security > Profile Settings. The Profile Settings screen displays (see Figure 3-2 on page 3-5.) 3. Select a profile by selecting the corresponding radio button from the list, and click Edit. The Edit Security Profile screen displays. Figure 3-5 on page 3-11 shows an example with a Shared Key network authentication. 3-10 v1.0, February 2009 Wireless Security
-
 1
1 -
2
-
3
-
4
-
5
-
6
-
7
-
8
-
9
-
10
-
11
-
12
-
13
-
14
-
15
-
16
-
17
-
18
-
19
-
20
-
21
-
22
-
23
-
24
-
25
-
26
-
27
-
28
-
29
-
30
-
31
-
32
-
33
-
34
-
35
-
36
-
37
-
38
-
39
-
40
-
 41
41 -
 42
42 -
 43
43 -
 44
44 -
 45
45 -
 46
46 -
 47
47 -
 48
48 -
 49
49 -
 50
50 -
 51
51 -
52
-
53
-
54
-
55
-
56
-
57
-
58
-
59
-
60
-
61
-
62
-
63
-
64
-
65
-
66
-
67
-
68
-
69
-
70
-
71
-
72
-
73
-
74
-
75
-
76
-
77
-
78
-
79
-
80
-
81
-
82
-
83
-
84
-
85
-
86
-
87
-
88
-
89
-
90
-
91
-
92
-
93
-
94
-
95
-
96
-
97
-
98
-
99
-
100
-
101
-
102
-
103
-
104
-
105
-
106
-
107
-
108
-
109
-
110
-
111
-
112
-
113
-
114
-
115
-
116
-
117
-
118
-
119
-
120
 |
 |