Netgear WNDAP360 WNDAP360 Reference Manual - Page 97
Apply, Enable Wireless Bridging, Wireless Point-to-Multi-Point Bridge
 |
View all Netgear WNDAP360 manuals
Add to My Manuals
Save this manual to your list of manuals |
Page 97 highlights
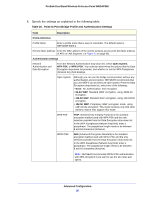
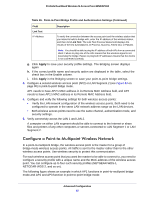
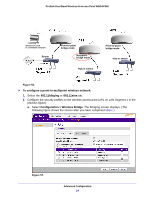
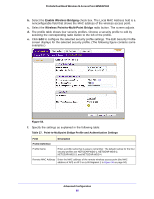
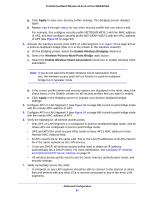
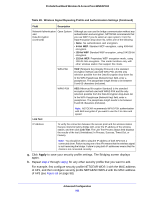
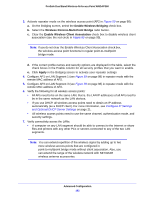
ProSafe Dual Band Wireless-N Access Point WNDAP360 g. Click Apply to save your security profile settings. The Bridging screen displays again. h. Repeat step b through step g for any other security profile that you want to edit. For example, first configure security profile NETGEAR-WDS-1 with the MAC address of AP2, and then configure security profile NETGEAR-WDS-2 with the MAC address of AP3 (see Figure 56 on page 94). 3. Activate the wireless access point (AP1 on LAN Segment 1 in Figure 56 on page 94) as a point-to-multipoint bridge (that is, it is the master in the wireless network): a. On the Bridging screen, select the Enable Wireless Bridging check box. b. Select the Wireless Point-to-Multi-Point Bridge radio button. c. Select the Enable Wireless Client Association check box to enable wireless client association. Note: If you do not select the Enable Wireless Client Association check box, the wireless access point will not function in point-to-multipoint bridge but in repeater mode. d. If the correct profile names and security options are displayed in the table, select the check boxes in the Enable column for all security profiles that you want to enable. e. Click Apply in the Bridging screen to activate your point-to-multipoint bridge settings. 4. Configure AP2 on LAN Segment 2 (see Figure 56 on page 94) in point-to-point bridge mode with the remote MAC address of AP1. 5. Configure AP3 on LAN Segment 3 (see Figure 56 on page 94) in point-to-point bridge mode with the remote MAC address of AP1. 6. Verify the following for all wireless access points: • Only AP1 on LAN Segment 1 is configured in point-to-multipoint bridge mode, and all others APs are configured in point-to-point bridge mode. • AP2 and AP3 (the point-to-point APs) needs to have AP1's MAC address in their Remote MAC Address field. • All APs need to be on the same LAN, that is, the LAN IP addresses of all APs need to be in the same network as the LAN devices. • If you use DHCP, all wireless access points need to obtain an IP address automatically (as a DHCP client). For more information, see Configure IP Settings and Optional DHCP Server Settings on page 21. • All wireless access points need to use the same channel, authentication mode, and security settings. 7. Verify connectivity across the LANs: • A computer on any LAN segment should be able to connect to the Internet or share files and printers with any other PCs or servers connected to any of the three LAN segments. Advanced Configuration 97
-
 1
1 -
2
-
3
-
4
-
5
-
6
-
7
-
8
-
9
-
10
-
11
-
12
-
13
-
14
-
15
-
16
-
17
-
18
-
19
-
20
-
21
-
22
-
23
-
24
-
25
-
26
-
27
-
28
-
29
-
30
-
31
-
32
-
33
-
34
-
35
-
36
-
37
-
38
-
39
-
40
-
41
-
42
-
43
-
44
-
45
-
46
-
47
-
48
-
49
-
50
-
51
-
52
-
53
-
54
-
55
-
56
-
57
-
58
-
59
-
60
-
61
-
62
-
63
-
64
-
65
-
66
-
67
-
68
-
69
-
70
-
71
-
72
-
73
-
74
-
75
-
76
-
77
-
78
-
79
-
80
-
81
-
82
-
83
-
84
-
85
-
86
-
87
-
88
-
89
-
90
-
91
-
 92
92 -
 93
93 -
 94
94 -
 95
95 -
 96
96 -
 97
97 -
 98
98 -
 99
99 -
 100
100 -
 101
101 -
 102
102 -
103
-
104
-
105
-
106
-
107
-
108
-
109
-
110
-
111
-
112
-
113
-
114
-
115
-
116
-
117
-
118
-
119
-
120
-
121
-
122
-
123
-
124
-
125
-
126
-
127
-
128
-
129
-
130
-
131
-
132
-
133
-
134
-
135
-
136
-
137
 |
 |