Panasonic KXTVA200 KXTVA200 User Guide - Page 53
Personal Caller Name Announcement, Assigning Caller ID Numbers and, Recording Names
 |
UPC - 037988851430
View all Panasonic KXTVA200 manuals
Add to My Manuals
Save this manual to your list of manuals |
Page 53 highlights
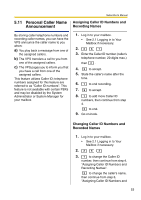
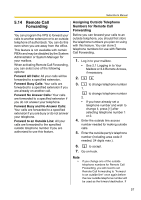
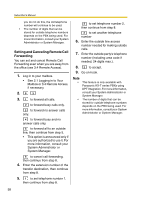
5.11 Personal Caller Name Announcement Subscriber's Manual Assigning Caller ID Numbers and Recording Names By storing caller telephone numbers and recording caller names, you can have the VPS announce the caller name to you when: a) You play back a message from one of the assigned callers. b) The VPS transfers a call to you from one of the assigned callers. c) The VPS pages you to inform you that you have a call from one of the assigned callers. This feature utilizes Caller ID; telephone numbers assigned for this feature are referred to as "Caller ID numbers". This feature is not available with certain PBXs and may be disabled by the System Administrator or System Manager for your mailbox. 1. Log in to your mailbox. • See 2.1 Logging in to Your Mailbox if necessary. 2. 3 5 1 3. Enter the Caller ID number (caller's telephone number, 20 digits max.) then # . 4. 2 to accept. 5. State the caller's name after the tone. 6. 1 to end recording. 7. 2 to accept. 8. 1 to add more Caller ID numbers, then continue from step 4. 2 to end. 9. Go on-hook. Changing Caller ID Numbers and Recorded Names 1. Log in to your mailbox. • See 2.1 Logging in to Your Mailbox if necessary. 2. 3 5 2 3. 1 to change the Caller ID number, then continue from step 4, "Assigning Caller ID Numbers and Recording Names". 2 to change the caller's name, then continue from step 6, "Assigning Caller ID Numbers and 53
-
 1
1 -
2
-
3
-
4
-
5
-
6
-
7
-
8
-
9
-
10
-
11
-
12
-
13
-
14
-
15
-
16
-
17
-
18
-
19
-
20
-
21
-
22
-
23
-
24
-
25
-
26
-
27
-
28
-
29
-
30
-
31
-
32
-
33
-
34
-
35
-
36
-
37
-
38
-
39
-
40
-
41
-
42
-
43
-
44
-
45
-
46
-
47
-
 48
48 -
 49
49 -
 50
50 -
 51
51 -
 52
52 -
 53
53 -
 54
54 -
 55
55 -
 56
56 -
 57
57 -
 58
58 -
59
-
60
-
61
-
62
-
63
-
64
-
65
-
66
-
67
-
68
-
69
-
70
-
71
-
72
-
73
-
74
-
75
-
76
-
77
-
78
-
79
-
80
-
81
-
82
-
83
-
84
-
85
-
86
-
87
-
88
-
89
-
90
-
91
-
92
-
93
-
94
-
95
-
96
-
97
-
98
-
99
-
100
-
101
-
102
-
103
-
104
-
105
-
106
-
107
-
108
-
109
-
110
-
111
-
112
-
113
-
114
-
115
-
116
-
117
-
118
-
119
-
120
-
121
-
122
-
123
-
124
-
125
-
126
-
127
-
128
-
129
-
130
-
131
-
132
-
133
-
134
-
135
-
136
-
137
-
138
-
139
-
140
-
141
-
142
-
143
-
144
-
145
-
146
-
147
-
148
-
149
-
150
-
151
-
152
-
153
-
154
-
155
-
156
-
157
-
158
-
159
-
160
-
161
-
162
-
163
-
164
-
165
-
166
-
167
-
168
-
169
-
170
-
171
-
172
 |
 |