Panasonic KXTVA200 KXTVA200 User Guide - Page 58
Setting and Canceling Remote Call, Forwarding
 |
UPC - 037988851430
View all Panasonic KXTVA200 manuals
Add to My Manuals
Save this manual to your list of manuals |
Page 58 highlights
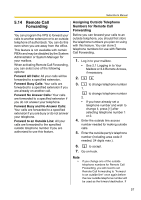
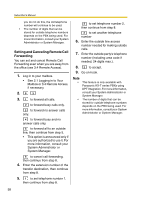
Subscriber's Manual you do not do this, the old telephone number will continue to be used. • The number of digits that can be stored for outside telephone numbers depends on the PBX being used. For more information, consult your System Administrator or System Manager. Setting and Canceling Remote Call Forwarding You can set and cancel Remote Call Forwarding even when you are away from the office (see 3.4 Remote Access). 1. Log in to your mailbox. • See 2.1 Logging in to Your Mailbox or 3.4 Remote Access, if necessary. 2. 6 3 3. 1 to forward all calls. 2 to forward busy calls only. 3 to forward no answer calls only. 4 to forward busy and no answer calls only. 5 to forward all to an outside line, then continue from step 5. • This option is announced only if you are authorized to use it. For more information, consult your System Administrator or System Manager. 6 to cancel call forwarding, then continue from step 8. 4. Enter the extension number of the transfer destination, then continue from step 8. 5. 1 to set telephone number 1, then continue from step 8. 2 to set telephone number 2, then continue from step 8. 3 to set another telephone number 6. Enter the outside line access number needed for making outside calls. 7. Enter the outside party's telephone number (including area code if needed, 24 digits max.). 8. 2 to accept. 9. Go on-hook. Note • • This feature is only available with Panasonic KX-T series PBXs using DPT Integration. For more information, consult your System Administrator or System Manager. The number of digits that can be stored for outside telephone numbers depends on the PBX being used. For more information, consult your System Administrator or System Manager. 58
-
 1
1 -
2
-
3
-
4
-
5
-
6
-
7
-
8
-
9
-
10
-
11
-
12
-
13
-
14
-
15
-
16
-
17
-
18
-
19
-
20
-
21
-
22
-
23
-
24
-
25
-
26
-
27
-
28
-
29
-
30
-
31
-
32
-
33
-
34
-
35
-
36
-
37
-
38
-
39
-
40
-
41
-
42
-
43
-
44
-
45
-
46
-
47
-
48
-
49
-
50
-
51
-
52
-
 53
53 -
 54
54 -
 55
55 -
 56
56 -
 57
57 -
 58
58 -
 59
59 -
 60
60 -
 61
61 -
 62
62 -
 63
63 -
64
-
65
-
66
-
67
-
68
-
69
-
70
-
71
-
72
-
73
-
74
-
75
-
76
-
77
-
78
-
79
-
80
-
81
-
82
-
83
-
84
-
85
-
86
-
87
-
88
-
89
-
90
-
91
-
92
-
93
-
94
-
95
-
96
-
97
-
98
-
99
-
100
-
101
-
102
-
103
-
104
-
105
-
106
-
107
-
108
-
109
-
110
-
111
-
112
-
113
-
114
-
115
-
116
-
117
-
118
-
119
-
120
-
121
-
122
-
123
-
124
-
125
-
126
-
127
-
128
-
129
-
130
-
131
-
132
-
133
-
134
-
135
-
136
-
137
-
138
-
139
-
140
-
141
-
142
-
143
-
144
-
145
-
146
-
147
-
148
-
149
-
150
-
151
-
152
-
153
-
154
-
155
-
156
-
157
-
158
-
159
-
160
-
161
-
162
-
163
-
164
-
165
-
166
-
167
-
168
-
169
-
170
-
171
-
172
 |
 |