Panasonic KXTVA200 KXTVA200 User Guide - Page 93
Assigning Notification Numbers, and the Beeper Callback Number Display
 |
UPC - 037988851430
View all Panasonic KXTVA200 manuals
Add to My Manuals
Save this manual to your list of manuals |
Page 93 highlights
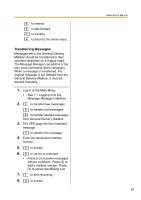
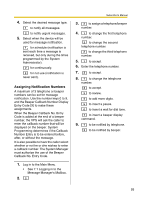
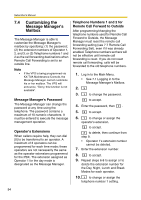
4. Select the desired message type. 1 to notify all messages. 2 to notify urgent messages. 5. Select when the device will be used for message notification. 1 for schedule (notification is sent each time a message is received, but only during the times programmed by the System Administrator). 2 for continuously. 3 for not use (notification is never sent). Assigning Notification Numbers A maximum of 3 telephone or beeper numbers can be set for message notification. Use the number keys 0 to 9, and the Beeper Callback Number Display Entry Code [X] to make these assignments. When the Beeper Callback No. Entry Code is added at the end of a beeper number, the VPS will ask the caller to enter the callback number that will be displayed on the beeper. System Programming determines if the Callback Number Entry is to be entered before, after, or without the message. It is also possible to have the caller select whether or not he or she wishes to enter a callback number. The System Manager must authorize the use of the Beeper Callback No. Entry Code. 1. Log in to the Main Menu. • See 7.1 Logging in to the Message Manager's Mailbox. 2. 2 Subscriber's Manual 3. 3 to assign a telephone/beeper number. 4. 1 to change the first telephone number. 2 to change the second telephone number. 3 to change the third telephone number. 5. 1 to accept. 6. Enter the telephone number. 7. 2 to accept. 8. 1 to change the telephone number. 2 to accept. 3 to review. 4 to add more digits. 5 to insert a pause. 6 to insert a wait for dial tone. 7 to insert a beeper display command. 9. 1 to be notified by telephone. 2 to be notified by beeper. 93
-
 1
1 -
2
-
3
-
4
-
5
-
6
-
7
-
8
-
9
-
10
-
11
-
12
-
13
-
14
-
15
-
16
-
17
-
18
-
19
-
20
-
21
-
22
-
23
-
24
-
25
-
26
-
27
-
28
-
29
-
30
-
31
-
32
-
33
-
34
-
35
-
36
-
37
-
38
-
39
-
40
-
41
-
42
-
43
-
44
-
45
-
46
-
47
-
48
-
49
-
50
-
51
-
52
-
53
-
54
-
55
-
56
-
57
-
58
-
59
-
60
-
61
-
62
-
63
-
64
-
65
-
66
-
67
-
68
-
69
-
70
-
71
-
72
-
73
-
74
-
75
-
76
-
77
-
78
-
79
-
80
-
81
-
82
-
83
-
84
-
85
-
86
-
87
-
 88
88 -
 89
89 -
 90
90 -
 91
91 -
 92
92 -
 93
93 -
 94
94 -
 95
95 -
 96
96 -
 97
97 -
 98
98 -
99
-
100
-
101
-
102
-
103
-
104
-
105
-
106
-
107
-
108
-
109
-
110
-
111
-
112
-
113
-
114
-
115
-
116
-
117
-
118
-
119
-
120
-
121
-
122
-
123
-
124
-
125
-
126
-
127
-
128
-
129
-
130
-
131
-
132
-
133
-
134
-
135
-
136
-
137
-
138
-
139
-
140
-
141
-
142
-
143
-
144
-
145
-
146
-
147
-
148
-
149
-
150
-
151
-
152
-
153
-
154
-
155
-
156
-
157
-
158
-
159
-
160
-
161
-
162
-
163
-
164
-
165
-
166
-
167
-
168
-
169
-
170
-
171
-
172
 |
 |