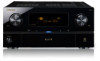
Pioneer SC-35 Owner's Manual
Pioneer SC-35 Manual
 |
UPC - 884938108751
View all Pioneer SC-35 manuals
Add to My Manuals
Save this manual to your list of manuals |
Pioneer SC-35 manual content summary:
- Pioneer SC-35 | Owner's Manual - Page 1
Operating Instructions audio/video multi-channel receiver 37 SC35 SC- - Pioneer SC-35 | Owner's Manual - Page 2
to the presence of important operating and maintenance (servicing) instructions in the literature accompanying the appliance. D3-4-2-1-1_A1_En 1) Read these instructions. 2) Keep these instructions. 3) Heed all warnings. 4) Follow all instructions. 5) Do not use this apparatus near water. 6) Clean - Pioneer SC-35 | Owner's Manual - Page 3
CHANNEL RECEIVER Model Number: SC-37 / SC-35 Responsible Party Name: PIONEER ELECTRONICS (USA) INC. SERVICE SUPPORT with the instructions, may cause ON YOUR ENCLOSED WARRANTY CARD AND KEEP IN A SAFE PLACE FOR FUTURE not completely shut off all power from the AC outlet. Since the power cord serves as - Pioneer SC-35 | Owner's Manual - Page 4
which requires repair will be charged for even during the warranty period. K041_A1_En SC-37 only This device complies with Part 15 of the FCC Rules. Operation is : This equipment complies with FCC radiation exposure limits set forth for an uncontrolled environment. This equipment should be - Pioneer SC-35 | Owner's Manual - Page 5
batteries 10 Operating range of remote control unit 11 Flow for operating the receiver with RF two-way communications (SC-37 only 11 02 Controls and displays Remote control (In case of SC-37 12 Remote control display 13 RF adapter 14 Remote control (In case of SC-35 15 Display 16 Front panel - Pioneer SC-35 | Owner's Manual - Page 6
channel presets 55 Using the SIRIUS Menu 55 Listening to Internet radio stations (SC-35 settings 81 Resetting the system 82 Default system settings 82 10 Controlling the rest of your system (In case of SC-37) About the Remote Setup menu 83 Operating multiple receivers 84 Setting the remote - Pioneer SC-35 | Owner's Manual - Page 7
Reduction Setup 120 RF Remote Setup (SC-37 only 120 EXTENSION Setup (SC-35 only 120 Multi Channel Input Setup 120 11 The Advanced MCACC menu Making receiver settings from the Advanced MCACC menu 104 Automatic MCACC (Expert 104 Manual MCACC setup 106 Fine Channel Level 107 Fine Speaker - Pioneer SC-35 | Owner's Manual - Page 8
MCACC menu (page 104) • The System Setup and Other Setup menus (page 114) 13 Making maximum use of the remote control SC-37: • Operating multiple receivers (page 84) • Setting the remote to control other components (page 84) • Using the RF communications function (page 91) SC-35: • Operating - Pioneer SC-35 | Owner's Manual - Page 9
without worrying about obstacles or the direction in which the remote control is pointing. Note 1 The PQLS functions supported for the different models are as shown below. SC-37: PQLS Bit-stream/PQLS Multi Surround/PQLS 2ch Audio. SC-35: PQLS Multi Surround/PQLS 2ch Audio. 2 Home Media Gallery is - Pioneer SC-35 | Owner's Manual - Page 10
instructions In case of SC-35 • Setup microphone (cable: 5 m (16.4 ft.)) • Remote control unit • AAA size IEC R03 dry cell batteries (to confirm system operation) x2 • AM loop antenna • FM wire antenna • iPod cable • Power cord • Warranty card • These operating instructions Installing the receiver - Pioneer SC-35 | Owner's Manual - Page 11
MAIN' to 'RF MODE' for the remote control unit's 'IR/RF SELECT' setting. • Operating this receiver by RF communications on page 92 Note 1 The RF adapter and CU-RF100 omni-directional remote control are included with the SC-37, sold separately with the SC-35. 2 The maximum line-of-sight distance - Pioneer SC-35 | Owner's Manual - Page 12
(In case of SC-37) This section explains how to operate the remote control for the receiver. 1 RECEIVER MAIN SOURCE 2 ZONE2 3 3 MULTI OPERATION BDR BD DVD DVR HDMI NET RADIO TV CD HMG ADAPTER 4 USB OPTION iPod TUNER 1 2 MULTI CH PHONO IN VIDEO CD-R INPUT SELECT LIGHT AUX 11 - Pioneer SC-35 | Owner's Manual - Page 13
Two-way communications are established and the receiver's power is on. Note 1 Press and hold in the LIGHT button for 5 seconds to change the illumination mode 1 or 2. When set to LIGHT MODE 2 (default), the illumination only lights when the remote control LIGHT button is pressed. When switched to - Pioneer SC-35 | Owner's Manual - Page 14
control's status 7 Nothing displayed Nothing is displayed here when the remote control code sending mode is set to IR. 8 Scroll indicators Light when there are more selectable items when making the various settings. 9 Receiver input indicator This indicates the input function currently selected for - Pioneer SC-35 | Owner's Manual - Page 15
control (In case of SC-35) This section explains how to operate the remote control for the receiver. RECEIVER MULTI OPERATION SOURCE 1 R.SETUP 2 BD DVD DVR/BDR HDMI 10 TV CD NET RADIO ADAPTER 3 iPod USB TUNER SIRIUS XM INPUT SELECT TV CTRL RECEIVER 4 11 MASTER INPUT VOLUME TV - Pioneer SC-35 | Owner's Manual - Page 16
15 16 17 18 19 dB 20 1 SIGNAL indicators Light to indicate the currently selected input signal. AUTO lights when the receiver is set to select the input signal automatically (page 62). 2 Program format indicators Light to indicate the channels to which digital signals are being input. L/R - Left - Pioneer SC-35 | Owner's Manual - Page 17
function is active (page 76). 19 Character display Displays various system information. 20 Remote control mode indicator Lights to indicate the receiver's remote control mode setting. (Not displayed when set to 1.) (SC-37: page 84, SC-35: page 96) Note 1 Full Band Phase Control is only apply to the - Pioneer SC-35 | Owner's Manual - Page 18
/ON Switches the receiver between on and standby. 2 INPUT SELECTOR dial Use to select an input function. 7 Front panel controls To access the front panel controls, push gently on the lower third portion of the panel with your finger. 3 Indicators ADVANCED MCACC - Lights when EQ is set to ON in - Pioneer SC-35 | Owner's Manual - Page 19
controls If you've made MULTI-ZONE connections (see MULTIZONE setup on page 37) use these controls to control the sub zone from the main zone (see or connect a USB device for audio and photo playback (page 40). 20 MCACC SETUP MIC jack Use to connect the supplied microphone (page 43). 21 PHONES jack - Pioneer SC-35 | Owner's Manual - Page 20
12 V 1 TRIGGER (OUTPUT 12 V 2 TOTAL 150 mA MAX) SELECTABLE SEE INSTRUCTION MANUAL SELECTABLE VOIR LE MODE D'EMPLOI CAUTION: SPEAKER IMPEDANCE 6 Ω - 16 Ω . ATTENTION: ENCEINTE D'IMPEDANCE DE 6 Ω - 16 Ω . FRONT R CENTER L SC-35 AC IN A HDMI BD IN IN 1 IN 2 IN 3 IN 4 OUT 1 (CONTROL - Pioneer SC-35 | Owner's Manual - Page 21
-5) CD CD-R/TAPE COAX-2 COAX-3a a.SC-37 only. • SC-35 only: The CU-RF100 omni-directional remote control (separately sold) can be connected to the RS232C and EXTENSION terminals. Using the CURF100 lets you display the receiver's display information on the remote control display in your hands and - Pioneer SC-35 | Owner's Manual - Page 22
to only connect one of the surround back speakers (SB) or neither. Choose one from Plans [A] to [E] below. [A] 7.1 channel surround system (Front height) *Default setting • Speaker System setting: Normal(SB/FH) FHL FHR R L C SR SW SBR SL SBL A 7.1 ch surround system connects the left and - Pioneer SC-35 | Owner's Manual - Page 23
channel. (The subwoofer's low frequency component is played from the front speakers, so the speakers could be damaged.) • After connecting, be sure to conduct the Full Auto MCACC (speaker environment setting on a wall is not recommended. • For the best stereo effect, place the front speakers 2 m to - Pioneer SC-35 | Owner's Manual - Page 24
the center channel is right speakers. • It is best to angle the speakers towards connection on the receiver comprises a positive back panel it may cause the power to cut off as a safety shut, then plug the banana plug into the end of the speaker terminal. Important • Please refer to the manual - Pioneer SC-35 | Owner's Manual - Page 25
setting Front height right Front height left Front wide setting Front wide right Front wide left Speaker B setting 12 V 1 TRIGGER (OUTPUT 12 V 2 TOTAL 150 mA MAX) SELECTABLE SEE INSTRUCTION MANUAL SELECTABLE VOIR LE MODE D'EMPLOI CAUTION: SPEAKER IMPEDANCE 6 Ω - 16 Ω . ATTENTION - Pioneer SC-35 | Owner's Manual - Page 26
V 2 TOTAL 150 mA MAX) SELECTABLE SEE INSTRUCTION MANUAL SELECTABLE VOIR LE MODE D'EMPLOI CAUTION: SPEAKER IMPEDANCE support biamping. • With these connections, the Speaker System setting makes no difference. • To bi-wire a speaker, connect two speaker cords to the speaker terminal on the receiver - Pioneer SC-35 | Owner's Manual - Page 27
menu. See Speaker system setting on page 115 to do this. ZONE 2 setup With these connections you can simultaneously enjoy 5.1-channel surround sound in the cannot be downsampled, you must connect your monitor/TV to the receiver's HDMI video outputs when connecting this video source.1 Note 1 • - Pioneer SC-35 | Owner's Manual - Page 28
, THX recommends switching Digital Video Conversion (in Setting the Video options on page 78) OFF. problem with displaying video this is not a malfunction. • Depending on the component you have connected, using a DVI connection may result in unreliable signal transfers. • This receiver supports - Pioneer SC-35 | Owner's Manual - Page 29
MAX) SELECTABLE SEE INSTRUCTION MANUAL SELECTABLE VOIR LE MODE receiver are connected by HDMI connections, if the TV supports the HDMI Audio Return Channel function, the sound of the TV is input to the receiver via the HDMI terminal, so there is no need to connect an audio cable. In this case, set - Pioneer SC-35 | Owner's Manual - Page 30
2 TOTAL 150 mA MAX) SELECTABLE SEE INSTRUCTION MANUAL SELECTABLE VOIR LE MODE D'EMPLOI CAUTION: SPEAKER IMPEDANCE 6 Ω - 16 Ω . ATTENTION: ENCEINTE D'IMPEDANCE DE 6 Ω - 16 Ω . • If you want to listen to the sound of the TV over the receiver, connect the receiver and TV with audio cables (page 29 - Pioneer SC-35 | Owner's Manual - Page 31
methods simultaneously, and it may be necessary to make output settings. Please refer to the operating instructions supplied with your component for more information. • If you want to listen to the sound of the TV over the receiver, connect the receiver and TV with audio cables (page 29). • If you - Pioneer SC-35 | Owner's Manual - Page 32
/DVD recorders and BD recorders. When you set up the receiver you'll need to tell the receiver which input you connected the recorder to ( 12 V 1 TRIGGER (OUTPUT 12 V 2 TOTAL 150 mA MAX) SELECTABLE SEE INSTRUCTION MANUAL SELECTABLE VOIR LE MODE D'EMPLOI CAUTION: SPEAKER IMPEDANCE 6 Ω - 16 Ω . - Pioneer SC-35 | Owner's Manual - Page 33
mA MAX) SELECTABLE SEE INSTRUCTION MANUAL SELECTABLE VOIR LE MODE D'EMPLOI CAUTION: SPEAKER IMPEDANCE 6 Ω - 16 Ω . ATTENTION: ENCEINTE D'IMPEDANCE DE 6 Ω - 16 Ω . • If your set-top box is equipped with an HDMI output terminal, we recommend connecting it to the receiver's HDMI IN terminal. When - Pioneer SC-35 | Owner's Manual - Page 34
SELECTABLE SEE INSTRUCTION MANUAL SELECTABLE VOIR LE MODE D'EMPLOI CAUTION: SPEAKER IMPEDANCE 6 Ω - 16 Ω . ATTENTION: ENCEINTE D'IMPEDANCE DE 6 Ω - 16 Ω . • If there is a single surround back output, connect it to the SURROUND BACK L jack on this receiver. • To use a 5.1-channel speaker set, use - Pioneer SC-35 | Owner's Manual - Page 35
set up the receiver you'll need to tell the receiver 2 TOTAL 150 mA MAX) SELECTABLE SEE INSTRUCTION MANUAL SELECTABLE VOIR LE MODE D'EMPLOI CAUTION: SPEAKER the ground terminal on this receiver. • If your turntable , the connected DVD player, set-top box, etc. must problems may occur depending on - Pioneer SC-35 | Owner's Manual - Page 36
your equipment Connecting additional amplifiers This receiver has more than enough power for any home use, but it's possible to add additional amplifiers to every channel of your system using the pre-outs. Make the connections shown below to add amplifiers to power your speakers. Connecting AM/FM - Pioneer SC-35 | Owner's Manual - Page 37
. Choose whichever works best for you. MULTI-ZONE listening options The following table shows the signals that can be output to ZONE 2 and ZONE 31: Sub Zone ZONE 2 ZONE 3 Input functions available DVD, TV/SAT, DVR/BDR, VIDEO, HOME MEDIA GALLERY (SC-37 only), INTERNET RADIO (SC-35 only), iPod/USB - Pioneer SC-35 | Owner's Manual - Page 38
this receiver to the network via the LAN terminal, you can listen to Internet radio stations.2 SC-37 only: function, it is necessary to set up the network manually. For details, see Network you must sign a contract with an ISP (Internet Service Provider) beforehand. 3 • Photo or video files cannot - Pioneer SC-35 | Owner's Manual - Page 39
also need to activate the XM Radio service to begin receiving broadcasts. LAN (10/100) XM MCACC SETUP MIC PHONES Connecting a SiriusConnect™ tuner To receive adapter to the SiriusConnect™ tuner. For instructions on playing the SIRIUS Radio, see must support A2DP profiles. • Pioneer does not - Pioneer SC-35 | Owner's Manual - Page 40
, the data is imported via the MCACC software in the computer. The MCACC software to output the results is available from the support area of the Pioneer website (http:// www.pioneerelectronics.com/PUSA/ Home+Entertainment+Custom+Install). Instructions for using the software are also available - Pioneer SC-35 | Owner's Manual - Page 41
on the front panel. 2 • If you want to control all your components using this receiver's remote control, see Setting the remote to control other components on page 84 (SC-37)/page 97 (SC-35). • If you have connected a remote control to the CONTROL IN jack (using a mini-plug cable), you won't be able - Pioneer SC-35 | Owner's Manual - Page 42
in regular use, e.g., when on vacation. • Make sure the blue STANDBY/ON light has gone out before unplugging. • If you have connected speakers with a 6 Ω impedance, change the impedance setting before turning on the power. Note 1 After this receiver is connected to an AC outlet, a 2 second to 10 - Pioneer SC-35 | Owner's Manual - Page 43
remote controls included with the SC-37 and SC-35. For the SC-37's remote control, set the remote control operation selector switch to RECEIVER. For the SC-35's remote control, press the RECEIVER button. When "set the remote control to the receiver operation mode" is indicated in these instructions - Pioneer SC-35 | Owner's Manual - Page 44
set all speakers to SMALL), otherwise leave it set to NO. 4 Set the remote control to the receiver operation mode, then select START. 5 Follow the instructions 't seem to be a problem, you can simply select GO NEXT and continue. 1a.Full Auto MCACC A/V RECEIVER Now Analyzing... 2/10 Environment - Pioneer SC-35 | Owner's Manual - Page 45
settings manually using The Advanced MCACC menu on page 104 or The System Setup and Other Setup menus on page 114.2 Problems when using the Auto MCACC the buttons on the remote control correspond to the components you've connected. 1 Set the remote control to the receiver operation mode, then press - Pioneer SC-35 | Owner's Manual - Page 46
below, see The Input Setup menu on page 45 to tell the receiver how you've connected up. The dots () indicate possible assignments. set to ON, assignments cannot be made (see Control with HDMI function on page 72). b.SC-37 only. c.SC-35 only. d.SC-37 only. (assignment possible) for the SC-35 - Pioneer SC-35 | Owner's Manual - Page 47
remote controls included with the SC-37 and SC-35. For the SC-37's remote control, set the remote control operation selector switch to RECEIVER. For the SC-35's remote control, press the RECEIVER button. When "set the remote control to the receiver operation mode" is indicated in these instructions - Pioneer SC-35 | Owner's Manual - Page 48
SEL SLEEP DIMMER AUDIO A.ATT SBch MCACC INFO DISP HDMI OUT D.ACCESS CLR CLASS CH ENTER SC-35: • Press iPod USB to switch the remote control to the iPod/USB operation mode. AUDIO PARAMETER LIST VIDEO PARAMETER TUNE TOOLS TOP MENU BAND T.EDIT GUIDE PRESET ENTER PRESET CATEGORY HOME MENU - Pioneer SC-35 | Owner's Manual - Page 49
/32. • Pioneer cannot guarantee compatibility (operation and/or bus power) with all USB mass storage devices and assumes no responsibility for any loss of data that may occur when connected to this receiver. 3 Make sure the receiver is in standby when disconnecting the USB device. 4 SC-35 only: The - Pioneer SC-35 | Owner's Manual - Page 50
SEL SLEEP DIMMER AUDIO A.ATT SBch MCACC INFO DISP HDMI OUT D.ACCESS CLR CLASS CH ENTER SC-35: • Press iPod USB to switch the remote control to the iPod/USB operation mode. AUDIO PARAMETER LIST VIDEO PARAMETER TUNE TOOLS TOP MENU BAND T.EDIT GUIDE PRESET ENTER PRESET CATEGORY HOME MENU - Pioneer SC-35 | Owner's Manual - Page 51
file formats The USB function of this receiver supports the following file formats. Note that some 2 ch, Monaural 8 kHz to 48 kHz 16 bit 2 ch 8 kbps to 320 kbps Supported/Supported a."MPEG Layer-3 audio decoding technology licensed from Fraunhofer IIS and Thomson multimedia." b.Files encoded using - Pioneer SC-35 | Owner's Manual - Page 52
a station preset. 4 Press ENTER. After pressing ENTER, the preset class and number stop blinking and the receiver stores the station. Listening to station presets 1 SC-37 only: Set the remote control operation selector switch to SOURCE. 2 Press TUNER to select the tuner. 3 Press CLASS to select the - Pioneer SC-35 | Owner's Manual - Page 53
com (US) or siriuscanada.ca (Canada). Listening to XM Radio For details on XM Radio, see About SIRIUS and XM on page 137. 1 SC-37 only: Set the remote control operation selector switch to SOURCE. 2 Press OPTION 2 (SC-37)/XM (SC-35) to switch to the XM RADIO input. For best reception, you may need to - Pioneer SC-35 | Owner's Manual - Page 54
XM on page 137. 1 SC-37 only: Set the remote control operation selector switch to SOURCE. 2 Press OPTION 1 (SC-37)/SIRIUS (SC-35) to switch to the SIRIUS input. For best reception, you may need to move the SiriusConnect™ tuner antenna near a window (refer to the manual for the SiriusConnect™ Home - Pioneer SC-35 | Owner's Manual - Page 55
stop blinking and the receiver stores the SIRIUS channel. Using the SIRIUS Menu remote control to recall the channel preset. Note 1 You can reset the Channel presets and memory in Resetting the system on page 82. 2 You can reset the Channel Skip/Add, Parental Lock and Password settings in Resetting - Pioneer SC-35 | Owner's Manual - Page 56
SC-35. On the SC-37, Internet radio is operated with Home Media Gallery. For details, see Playback with HOME MEDIA GALLERY inputs (SC-37 only) on page 64. Internet radio is an audio broadcasting service in this receiver before it leaves the factory, the . Check the firewall settings. • Broadcasts may - Pioneer SC-35 | Owner's Manual - Page 57
receiver is set to the Internet radio function. • When entering the title and URL of Internet radio station, do not press 'Update receiver Bluetooth® ADAPTER Remote control operation Wireless music play When the Bluetooth ADAPTER (Pioneer device supports AVRCP profiles. • Remote control operations - Pioneer SC-35 | Owner's Manual - Page 58
device. This receiver's remote control buttons can be used for basic playback of files stored on Bluetooth wireless technology devices.5 SC-37: SOURCE TV RECEIVER CH VOL VOL STATUS PHASE CTRL CH LEVEL THX MPX PQLS MEMORY AUTO/ALC/ DIRECT STEREO STANDARD ADV SURR PGM MENU SC-35: DIRECT - Pioneer SC-35 | Owner's Manual - Page 59
remote controls included with the SC-37 and SC-35. For the SC-37's remote control, set the remote control operation selector switch to RECEIVER. For the SC-35's remote control, press the RECEIVER button. When "set the remote control to the receiver operation mode" is indicated in these instructions - Pioneer SC-35 | Owner's Manual - Page 60
Setting the Audio options on page 76). 4 Neural Surround can be selected for 2-channel signals for which the input signal is PCM (48 kHz or less), Dolby Digital, DTS or analog 2- channel sources. 5 XM HD Surround can be selected only with the XM input. 6 • ULTRA2 for the SC-37, SELECT2 for the SC-35 - Pioneer SC-35 | Owner's Manual - Page 61
Surround Advance function allows you to create natural surround sound effects using just the front speakers and the subwoofer. 1 Set the remote control to the receiver operation mode. 2 While listening to a source, press STEREO to select Front Stage Surround Advance modes. • STEREO - See Listening - Pioneer SC-35 | Owner's Manual - Page 62
OPTIMUM SURR (SC-37 only) - Listening in Optimum Surround mode (page 59). Selecting MCACC presets • Default setting: MEMORY 1 If instruction manual supplied with your DVD player. 3 When the HDMI audio output parameter is set to THROUGH, the sound will be heard through your TV, not from this receiver - Pioneer SC-35 | Owner's Manual - Page 63
sound sources. 1 Set the remote control to the receiver operation mode. • Press PHASE CTRL (PHASE CONTROL) to switch on phase correction. The PHASE CONTROL indicator on the front panel lights. Better sound using Phase Control and Full Band Phase Control (SC-37 only) This receiver is equipped with - Pioneer SC-35 | Owner's Manual - Page 64
inputs (SC-37 only) Chapter 7: Playback with HOME MEDIA GALLERY inputs (SC-37 only) Enjoying the Home Media Gallery This receiver's please authorize this receiver manually on Note 1 • To listen to Internet radio stations, you must sign a contract with an ISP (Internet Service Provider) beforehand - Pioneer SC-35 | Owner's Manual - Page 65
SC-37 only) 07 the PC. The authorization (or permission) method for access varies depending on the type of server currently being connected. For more information on authorizing this receiver, refer to the instruction manual be correctly displayed. 1 Set the remote control operation selector switch - Pioneer SC-35 | Owner's Manual - Page 66
on the receiver as favorite broadcast stations and can be played. Listening to Rhapsody Rhapsody is a paid digital music broadcast service provided by RealNetworks. Rhapsody offers 30-day free trial. Access the website in order to set up a trial account: http://www.rhapsody.com/pioneer/signup • You - Pioneer SC-35 | Owner's Manual - Page 67
Playback with HOME MEDIA GALLERY inputs (SC-37 only) 07 Listening to Sirius Internet receiver can remember the Internet radio stations that you often listen to in seven classes (A to G) with up to nine stations in each class to make the total of 63 stations at its maximum capacity. 1 Set the remote - Pioneer SC-35 | Owner's Manual - Page 68
(SC-37 only be played on media servers supporting WMDRM. Content owners use WMDRM technology setting changes of software or other devices may be required. Please refer to the operating instructions for the software or device for more information. DLNA and DLNA CERTIFIED are trademarks and/or service - Pioneer SC-35 | Owner's Manual - Page 69
The Home Media Gallery software can be updated over the Internet. 1 Set the remote control operation selector switch to SOURCE. 2 Press HMG to select Home Media Gallery as the input function. 3 Select 'Setup' then press ENTER. 4 Select 'Firmware Update' then press ENTER. 5 Use / to select 'Yes - Pioneer SC-35 | Owner's Manual - Page 70
07 Playback with HOME MEDIA GALLERY inputs (SC-37 only) About playable file formats The Home Media Gallery feature of this receiver supports the following file formats. Note that some file formats are not available for playback although they are listed as playable file formats. Also, the - Pioneer SC-35 | Owner's Manual - Page 71
with HOME MEDIA GALLERY inputs (SC-37 only) 07 Glossary aacPlus AAC more detail about vTuner, visit the following website: http://www.radio-pioneer.com "This product is protected by certain intellectual property rights of NEMS played back on a component supporting the WMDRM service. 71 En - Pioneer SC-35 | Owner's Manual - Page 72
remote controls included with the SC-37 and SC-35. For the SC-37's remote control, set the remote control operation selector switch to RECEIVER. For the SC-35's remote control, press the RECEIVER button. When "set the remote control to the receiver operation mode" is indicated in these instructions - Pioneer SC-35 | Owner's Manual - Page 73
. • Normal - Regular setting. Power-up time from standby is short. • Eco - Conserves energy while standby. Power-up time is longer than when set to Normal. 9 Select the 'TV Audio' setting you want. When a TV supporting the HDMI Audio Return Channel function is connected to the receiver, the sound of - Pioneer SC-35 | Owner's Manual - Page 74
is connected to a TV of a brand other than Pioneer that supports the Control with HDMI function. (Depending on the TV, however, some of the Control with HDMI functions may not work.) • When the TV's power is set to standby, the receiver's power is also set to standby. (Only when the input for - Pioneer SC-35 | Owner's Manual - Page 75
the power and HDMI indicators light. Note 1 • If a listening mode other than AUTO SURROUND, ALC, DIRECT, PURE DIRECT, OPTIMUM SURR (SC-37 only) or STEREO is selected while the PQLS effect is enabled, the PQLS effect is disabled. • When this receiver is connected by HDMI cable to a Pioneer player - Pioneer SC-35 | Owner's Manual - Page 76
remote controls included with the SC-37 and SC-35. For the SC-37's remote control, set the remote control operation selector switch to RECEIVER. For the SC-35's remote control, press the RECEIVER button. When "set the remote control to the receiver operation mode" is indicated in these instructions - Pioneer SC-35 | Owner's Manual - Page 77
out of this receiver (amp) or through to a TV. When THROUGH is selected, no sound is output from this receiver. AMP THROUGH channel through your front speakers.k a.The adjustment can be made only when TONE is set to ON. b.With the iPod/USB, HOME MEDIA GALLERY (SC-37 only), INTERNET RADIO (SC-35 - Pioneer SC-35 | Owner's Manual - Page 78
the TV with the receiver's power in the standby mode. See About synchronized operations on page 74. g.This feature is only available when the connected display supports the automatic audio/video synchronizing capability ('lipsync') for HDMI. If you find the automatically set delay time unsuitable - Pioneer SC-35 | Owner's Manual - Page 79
will be downmixed to 2 channels). • SP (off) and select sources. See MULTIZONE remote controls on page 80. 1 MULTI-ZONE feature off The MULTI-ZONE indicator lights when the MULTI-ZONE control has been switched output depends on the settings you made in Manual speaker setup on page 114. However - Pioneer SC-35 | Owner's Manual - Page 80
+/- (SC-35) Use to set the listening volume in the sub zone.a VOL +/- (SC-37) MUTE Mutes set the audio recording level automatically-check the component's instruction manual indicator lights often or you can hear distortion in the sound.5 • Set the remote control to the receiver operation - Pioneer SC-35 | Owner's Manual - Page 81
Web Control Main ZONE ZONE 2 Top Menu ZONE 3 POWER ON OFF VOLUME -60.0dB MUTE INPUT SELECT DVD settings for features such as surround back channel processing and your current MCACC preset. 1 Set the remote control to the receiver operation mode, then press STATUS to check the system settings - Pioneer SC-35 | Owner's Manual - Page 82
to confirm. OK appears in the display to indicate that the receiver has been reset to the factory default settings. • Note that all settings will be saved, even if the receiver is unplugged. Default system settings Setting Default Digital Video Conversion ON SPEAKERS A Speaker System Normal - Pioneer SC-35 | Owner's Manual - Page 83
(In case of SC-37) Important • This section includes explanations for the SC-37's remote control. For instructions for the SC-35's remote control, see Controlling the rest of your system (In case of SC-35) on page 96. About the Remote Setup menu The Remote Setup mode is set by pressing the HOME - Pioneer SC-35 | Owner's Manual - Page 84
of SC-37) Operating multiple receivers The remote control included with this receiver can be used to operate up to three other receivers (of the same model as this receiver) in addition to this receiver. The receiver to be operated is switched by inputting the preset code to set the remote control - Pioneer SC-35 | Owner's Manual - Page 85
1 2 MULTI CH PHONO IN VIDEO CD-R INPUT SELECT LIGHT AUX SOURCE TV RECEIVER CH VOL VOL Erasing one of the remote control button settings This erases one of the buttons you have programmed and restores the button to the factory default. 1 While pressing MULTI OPERATION, press HOME MENU - Pioneer SC-35 | Owner's Manual - Page 86
NAME RESET above. Resetting the remote control settings Use this procedure to reset all the remote control's settings to the factory default.1 1 While pressing MULTI OPERATION, press HOME MENU. The remote display shows SETUP MENU. 2 Use / to select 'ALL RESET', then press ENTER. ALL RESET flashes - Pioneer SC-35 | Owner's Manual - Page 87
Controlling the rest of your system (In case of SC-37) 10 remote control to set up and listen to a CD on the receiver, and then use the remote control to rewind a tape in your VCR while you continue to listen to your CD player. When direct function is on, any component you select ( - Pioneer SC-35 | Owner's Manual - Page 88
2 MULTI CH 1 Press MULTI OPERATION. MULTI OPERATE flashes in the display. 2 Press SOURCE. The command sequence you programmed will run, then all Pioneer components will switch off2, followed by this receiver.3 Controlling components This remote control can control components after entering the - Pioneer SC-35 | Owner's Manual - Page 89
system (In case of SC-37) 10 Button(s) SOURCE Number buttons • (dot) ENTER (CLASS) TV TV (Monitor) BD/DVD POWER ON/OFF POWER ON/OFF POWER ON/OFF numerics numerics numerics • (dot) KURO LINK CLEAR CH ENTER CH ENTER ENTER EXIT/INFO EXIT TOP MENU TOOLS/GUIDE USER MENU TOOLSa HDD - Pioneer SC-35 | Owner's Manual - Page 90
10 Controlling the rest of your system (In case of SC-37) Button(s) SOURCE Number buttons • (dot) ENTER (CLASS) LD CD/CD-R/SACD MD/DAT TAPE POWER ON/OFF POWER ON/OFF POWER ON/OFF POWER ON/OFF numerics +10 numerics >10/CLEAR numerics CLEARa - CLEAR ENTER DISC/ENTER - ENTER TOP MENU - Pioneer SC-35 | Owner's Manual - Page 91
RS-232C and CU-RF100 terminals. For instructions on connecting the RF adapter, see Connecting the RF adapter (SC-37 only) on page 21. Two-way communications allow you to use the following functions: • The receiver can be operated by pointing the remote control in any direction (360°) (maximum line - Pioneer SC-35 | Owner's Manual - Page 92
select 'RF MODE', then press ENTER.1 Select IR MODE to return to operation by infrared signal. 2 Set the RF Remote Setup on this receiver's Other Setup menu to ON. For details, see RF Remote Setup (SC-37 only) on page 120 5 If you want to operate other zones with RF twoway communications, repeat - Pioneer SC-35 | Owner's Manual - Page 93
shows SETUP MENU. 2 Use / to select 'SYNC RENAMING', then press ENTER. MANUAL flashes in the remote display.1 3 Use / to select 'AUTO' or 'MANUAL', then press ENTER. If you selected AUTO, this completes the setting. The receiver's input names are acquired automatically in synchrony with the - Pioneer SC-35 | Owner's Manual - Page 94
10 Controlling the rest of your system (In case of SC-37) Setting the remote control operation mode • Default setting: ON When the remote control operation mode is turned on and the receiver's input is switched, the remote control display and operation mode switch automatically to that input. - Pioneer SC-35 | Owner's Manual - Page 95
Controlling the rest of your system (In case of SC-37) 10 Usable range • Designed for use only within private homes (signal transmission distance may be reduced due to room design or conditions). In the following cases, this remote control cannot operate due to poor or erratic radio wave - Pioneer SC-35 | Owner's Manual - Page 96
(In case of SC-35) Important • This section includes explanations for the SC-35's remote control. For instructions for the SC-37's remote control, see Controlling the rest of your system (In case of SC-37) on page 83. About the Remote Setup menu The Remote Setup mode is set by pressing the number - Pioneer SC-35 | Owner's Manual - Page 97
flashes continuously. 3 Use the number buttons to enter the 4-digit preset code. See Preset code list (SC-35 only) on page 139. If the LED lights for one second, the setting be learned from other remote controls. The buttons available are shown below: RECEIVER MULTI OPERATION SOURCE R.SETUP - Pioneer SC-35 | Owner's Manual - Page 98
the rest of your system (In case of SC-35) 3 Point the two remote controls towards each other, then press the button that will be doing the learning on this receiver's remote control. The LED blinks once and flashes continuously. • The remote controls should be 3 cm (1 inch) apart. This - Pioneer SC-35 | Owner's Manual - Page 99
case of SC-35) 10 Setting the backlight mode • Default setting: 1 (normal mode) The backlight lighting pattern can be selected from among four modes, in consideration of convenience and battery service life. 1 Press and hold R.SETUP, then press "6" for three seconds. The LED flashes continuously - Pioneer SC-35 | Owner's Manual - Page 100
The command sequence you programmed will run, then all Pioneer components will switch off2, followed by this receiver (switch of all the zones becomes off). Erasing the settings for the multi-operation This erases all the settings programmed in the remote control for the multi-operation. 1 Press and - Pioneer SC-35 | Owner's Manual - Page 101
SC-35) 10 Resetting the remote control settings Use this procedure to reset all the remote control's settings to the factory default.1 1 Press and hold R.SETUP, then press "0" for three seconds. The LED flashes continuously. 2 Press and hold the ENTER button for three seconds. If the LED lights - Pioneer SC-35 | Owner's Manual - Page 102
10 Controlling the rest of your system (In case of SC-35) Button(s) SOURCE Number buttons • (dot) ENTER (CLASS) TV TV (Monitor) POWER ON/OFF POWER ON/OFF numerics numerics • (dot) KURO LINK ENTER CH ENTER EXIT/INFO EXIT BD/DVD POWER ON/OFF numerics CLEAR ENTER TOP MENU HDD/DVR VCR - Pioneer SC-35 | Owner's Manual - Page 103
of your system (In case of SC-35) 10 Button(s) SOURCE Number buttons • (dot) ENTER (CLASS) LD POWER ON/OFF numerics +10 ENTER TOP MENU CD/CD-R/SACD MD/DAT POWER ON/OFF POWER ON/OFF numerics >10/CLEAR DISC/ENTER numerics CLEARb OPEN/CLOSEb - - TAPE POWER ON/OFF CLEAR ENTER MS - LEGATO - Pioneer SC-35 | Owner's Manual - Page 104
RECEIVER. For the SC-35's remote control, press the RECEIVER button. When "set the remote control to the receiver operation mode" is indicated in these instructions, use the respective procedure described above. Making receiver settings from the Advanced MCACC menu The Advanced MCACC (Multi Channel - Pioneer SC-35 | Owner's Manual - Page 105
the microphone.3 4 When you're finished setting the options, select START then press ENTER. 5 Follow the instructions on-screen. 6 Wait for the Auto MCACC Setup to finish outputting test tones. A progress report is displayed on-screen while the receiver outputs test tones to determine the speakers - Pioneer SC-35 | Owner's Manual - Page 106
power and check the speaker connections. If there doesn't seem to be a problem, you can simply use / to select the speaker and / to change the setting from this receiver upon completion of the Auto MCACC Setup. Manual MCACC setup You can use the settings in the Manual MCACC setup menu - Pioneer SC-35 | Owner's Manual - Page 107
settings according to your room's reverb characteristics (see Acoustic Calibration EQ Professional on page 108). • Precision Distance (SC-37 only return to the Manual MCACC setup menu. When it sounds like the delay settings are matched up, press to confirm and continue to the next channel. • For - Pioneer SC-35 | Owner's Manual - Page 108
channels seem to exhibit different reverb characteristics (when Type A or Type B shown on the diagrams on the following applies), select EQ Pro. & SWave (or ALL) for the Auto MCACC setting in Automatic MCACC (Expert) on page 104 to calibrate the room automatically. • Type A: Reverberance of high vs - Pioneer SC-35 | Owner's Manual - Page 109
by this receiver (before troubleshooting information. 4 If you selected 'Reverb View', you can check the reverb characteristics for each channel MCACC or Reverb Measurement measurements are conducted.4 Use / to select the channel, frequency and calibration setting MCACC or Auto MCACC (ALL or KEEP - Pioneer SC-35 | Owner's Manual - Page 110
or after fine-adjusting at Manual MCACC setup on page 106, you can check your calibrated settings using the GUI screen. The data can be transferred to a computer using a USB device to check it on the computer's screen as well. 1 Set the remote control to the receiver operation mode, then press HOME - Pioneer SC-35 | Owner's Manual - Page 111
results. See Better sound using Phase Control and Full Band Phase Control (SC-37 only) on page 63 for more on this. 1 Select 'Group Delay' from the MCACC Data Check menu. 2 When 'Channel' is highlighted, use / to select the channel you want to check. The result of group delay calibration for the - Pioneer SC-35 | Owner's Manual - Page 112
don't need. 1 Set the remote control to the receiver operation mode, then MCACC output on page 40 for more on this. 2 Only for the SC-37, since this function is supported by the display of the group delay characteristics' 3D graphs. 3 Only one set of reverb characteristics is stored on the receiver - Pioneer SC-35 | Owner's Manual - Page 113
to copy. • All Data - Copies all the settings of the selected MCACC preset memory. • Level & Distance - Copies only the channel level and speaker distance settings of the selected MCACC preset memory. 3 Select the MCACC preset you'll be copying the settings 'From', then specify where you want to - Pioneer SC-35 | Owner's Manual - Page 114
remote controls included with the SC-37 and SC-35. For the SC-37's remote control, set the remote control operation selector switch to RECEIVER. For the SC-35's remote control, press the RECEIVER button. When "set the remote control to the receiver operation mode" is indicated in these instructions - Pioneer SC-35 | Owner's Manual - Page 115
from the Manual SP Setup menu. See Making receiver settings from the setting applies to all MCACC presets, and cannot be set independently. 1 Select 'Speaker Setting' from the Manual SP Setup menu. 2 Choose the set of speakers that you want to set NO (the front wide channel is sent to the front - Pioneer SC-35 | Owner's Manual - Page 116
you're finished, press RETURN. You will return to the Manual SP Setup menu. Tip • You can change the channel levels by set the remote control to the receiver operation mode, then press CH LEVEL, and then using / on the remote control. Speaker Distance For good sound depth and separation from your - Pioneer SC-35 | Owner's Manual - Page 117
. 7 When you're finished, press RETURN. You will return to the Manual SP Setup menu. Network Setup menu Setting up the network to listen to Internet radio on this receiver. 1 Set the remote control to the receiver operation mode, then press HOME MENU. A Graphical User Interface (GUI) screen appears - Pioneer SC-35 | Owner's Manual - Page 118
the DHCP server function, and you will not need to set up the network manually. You must set up the network as described below only when you have connected this receiver to a broadband router without a DHCP server function. Before you set up the network, consult with your ISP or the network manager - Pioneer SC-35 | Owner's Manual - Page 119
Setup menu. 2 Select the Remote Control Mode setting you want. 3 Select "OK" to change the remote control mode. 4 Follow the instructions on the screen to change the remote control's setting. See Operating multiple receivers on page 84 (SC-37)/ page 96 (SC-35). 5 When you're finished, press - Pioneer SC-35 | Owner's Manual - Page 120
menu. 2 Select the RF Remote setting you want. 3 When you're finished, press RETURN. You will return to the Other Setup menu. EXTENSION Setup (SC-35 only) • Default setting: OFF The CU-RF100 can be used to operate the receiver by RF communications. To do so, set the EXTENSION setting to ON. When ON - Pioneer SC-35 | Owner's Manual - Page 121
not possible to achieve this environment. For the distance, on this receiver it is possible to automatically correct the speaker distance electrically to a precision of 1/2 inch using the Full Auto MCACC Setup function (page 43). SC-37 only: For the volume and sound quality as well, accurate sound - Pioneer SC-35 | Owner's Manual - Page 122
in to an active power outlet. • Try disconnecting from the power outlet, then plugging back in. SC-37 only: • When remote control operation is set to RF two-way communications, the receiver's power cannot be turned on unless RF Remote Setup is set to ON (see RF Remote Setup (SC-37 only) on page 120 - Pioneer SC-35 | Owner's Manual - Page 123
from the wall and call a Pioneer authorized independent service company. switches off. The ADVANCED MCACC blinks and the power does not turn on. The PQLS flashes and power turns off. • There is a problem with the receiver's power unit or fan. Try turning on the power after 1 minute. If the same - Pioneer SC-35 | Owner's Manual - Page 124
Setting on page 115). • Check that the LFE channel is not set to OFF, or to a very quiet setting (see Setting the Audio options on page 76). • Check the speaker level settings (see Channel (see page 37). • Noise may be caused by interference from other equipment, such as a fluorescent light, motor, - Pioneer SC-35 | Owner's Manual - Page 125
you think it has the best overall effect on the sound). • Make sure the speaker distance setting is correct for all speakers (see Speaker Distance on page 116). SC-37 only: Full Band Phase Control cannot be selected. • Perform Full Auto MCACC measurements (see Automatically conducting optimum - Pioneer SC-35 | Owner's Manual - Page 126
, etc.) this may occur in some cases. Change the speaker setting manually in Speaker Setting on page 115, and use the ALL (Keep SP System) option for the Auto MCACC menu in Automatic MCACC (Expert) on page 104 if this is a recurring problem. Can't adjust the Fine Speaker • Check that the speakers - Pioneer SC-35 | Owner's Manual - Page 127
or if there are problems after the procedure has been performed repeatedly, re-calibrate the distance using the Full Auto MCACC procedure, then without moving the microphone redo the Precision Distance adjustment. The various system settings are • Make sure the blue STANDBY/ON light has gone out - Pioneer SC-35 | Owner's Manual - Page 128
flashes, or some indicator flashes and the power does not turn on. Remote control Symptom Remedy Cannot be remote controlled. • Set the remote control unit's remote control mode so that it matches the setting on the main unit (see Operating multiple receivers on page 84 (SC-37)/page 96 (SC-35 - Pioneer SC-35 | Owner's Manual - Page 129
and receiver. • If the problem still persists when connecting your HDMI component directly to your monitor, please consult the component or monitor manual or contact the manufacturer for support. • If video images do not appear on your TV, try adjusting the resolution, DeepColor or other setting for - Pioneer SC-35 | Owner's Manual - Page 130
recommended) for sending audio to the receiver. See the operating instructions for more on audio connections. Set the display volume to minimum when using be played back (page 49). The USB memory device does not support the mass storage class specifications. Try using a USB memory device compatible - Pioneer SC-35 | Owner's Manual - Page 131
be entered. Internet radio (SC-35 only) Symptoms Causes Remedies Cannot access the network. The LAN cable is not firmly connected. ("Connection Error" shows in The router is not switched on. the display.) The network device was switched on when this receiver was already on. Firmly connect - Pioneer SC-35 | Owner's Manual - Page 132
channel that is blocked or cannot be received with your XM subscription package. Consult the latest channel guide at www.xmradio.com for the current list of channels. For information on receiving this channel with the antenna or antenna cable. Switch the power off, then back on again. SIRIUS radio - Pioneer SC-35 | Owner's Manual - Page 133
. Unit is updating the channel information. Wait until the channel information has been updated. Selected channel is not available/does not Select another channel. exist. The SiriusConnect™ tuner's firmware is being updated. Wait for updating to finish. HOME MEDIA GALLERY (SC-37 only) Symptoms - Pioneer SC-35 | Owner's Manual - Page 134
on this receiver (page 66). The Home Media Gallery The remote control is not currently set to the cannot be operated with the Home Media Gallery mode. buttons on the remote control. Press HMG to set the remote control to the Home Media Gallery mode (page 65). About status messages (SC-37 only - Pioneer SC-35 | Owner's Manual - Page 135
problem is not solved after the troubleshooting above, if the screen freezes unexpectedly or if the buttons on the remote power will turn off. (In this case, the various settings made on the receiver detailed information. In case of SC-37 In case of SC-35 Manufactured under license under U.S. Patent - Pioneer SC-35 | Owner's Manual - Page 136
preamplifier and power amplifier performance and channel levels and frequency response. This enables users to experience the true impact of soundtracks regardless of the volume setting giving you the best possible movie watching experience Surround EX, you can manually select the THX Surround EX - Pioneer SC-35 | Owner's Manual - Page 137
a one-time activation fee may apply. XM tuners and home docks or SIRIUS tuners (each sold separately) are required to receive the SIRIUS or XM satellite radio service. All programming and fees subject to change. It is prohibited to copy, decompile, disassemble, reverse engineer, hack, manipulate or - Pioneer SC-35 | Owner's Manual - Page 138
different input signal formats, depending on the Stream Direct mode (see Using Stream Direct on page 62) you have selected. Stereo (2 channel) signal formats Input signal format Surround Back speaker(s): Connected Dolby Digital Surround DTS Surround Other stereo sources Analog sources PCM sources - Pioneer SC-35 | Owner's Manual - Page 139
information 13 Preset code list (SC-35 only) You should have no problem controlling a component if you remote individual commands from another remote control (see Programming signals from other remote controls on page 97). example: TV Pioneer 0004 Category Preset code Manufacturer TV Pioneer - Pioneer SC-35 | Owner's Manual - Page 140
2068 Sansui 2066 Sanyo 2066, 2083 Sharp 2035 Sherwood 2063 Shinsonic 2086 Sonic Blue 2087 Sony 2003, 2004, 2010, 2012, 2027, 2046, 2047, 2048 you may be able to conduct operations with the preset codes for the DVD, BD. Pioneer 2103, 2150, 2151, 2152, 2153, 2154, 2155, 2156, 2157 Panasonic 2100, - Pioneer SC-35 | Owner's Manual - Page 141
, 1002 Sears 1001, 1003, 1004 Sharp 1012 Shogun 1002 Singer 1004 Sonic Blue 1026 Sony 1006, 1009, 1017, 1021 Stack 1017 STS 1004 Sylvania 1004, 1000 1004, 1005 Yamaha 1000, 1001 Zenith 1013, 1018 ZT Group 1017 Satellite Set Top Box Pioneer 0126, 6097, 6098, 6145 ADB 6035, 6001 Akai 6102 Alba 6005, - Pioneer SC-35 | Owner's Manual - Page 142
6003 Motorola 6032 Philips 6113, 6114 Proscan 6110 Samsung 6114 Sonicview 6055, 6107 Sony 6062 Star Choice 6032 Tivo 6113, 6114, 6115, 6116 Cable Set Top Box Pioneer 6028, 6029, 6095, 6099 ABC 6122 Accuphase 6122 Amino 6077, 6078 Auna 6082 BCC 6072 Bell & Howell 6122 Bright House 6074, 6029 Cable - Pioneer SC-35 | Owner's Manual - Page 143
, from 20 Hz to 20 000 Hz with no more than 0.08 %** total harmonic distortion. Multi channel simultaneous power output (1 kHz, 1 %, 8 Ω) 7 ch total 770 W (SC-37)/700 W (SC-35) Continuous Power Output (20 Hz to 20 kHz, 8 Ω, 0.08 %) Front 140 W + 140 W Center 140 W Surround 140 W + 140 W Surround - Pioneer SC-35 | Owner's Manual - Page 144
(ADF7007 2 AA/LR6 dry cell batteries 4 iPod cable 1 AM loop antenna 1 FM wire antenna 1 Power cord 1 Warranty card 1 These operating instructions Incase of SC-35: MCACC Setup microphone (APM7009 1 Remote control unit (AXD7591 1 AAA size IEC R03 dry cell batteries 2 iPod cable 1 AM loop - Pioneer SC-35 | Owner's Manual - Page 145
Additional information 13 145 En - Pioneer SC-35 | Owner's Manual - Page 146
13 Additional information 146 En - Pioneer SC-35 | Owner's Manual - Page 147
Additional information 13 147 En - Pioneer SC-35 | Owner's Manual - Page 148
le service après-vente agréé le plus proche et pour acheter des pièces de rechange, des modes d'emploi ou des accessoires, reportez-vous aux URL suivantes : In the USA/Aux Etats-Unis http://www.pioneerelectronics.com In Canada/Aux Canada http://www.pioneerelectronics.ca S018_B1_EnFr PIONEER
-
 1
1 -
 2
2 -
 3
3 -
 4
4 -
 5
5 -
 6
6 -
 7
7 -
8
-
9
-
10
-
11
-
12
-
13
-
14
-
15
-
16
-
17
-
18
-
19
-
20
-
21
-
22
-
23
-
24
-
25
-
26
-
27
-
28
-
29
-
30
-
31
-
32
-
33
-
34
-
35
-
36
-
37
-
38
-
39
-
40
-
41
-
42
-
43
-
44
-
45
-
46
-
47
-
48
-
49
-
50
-
51
-
52
-
53
-
54
-
55
-
56
-
57
-
58
-
59
-
60
-
61
-
62
-
63
-
64
-
65
-
66
-
67
-
68
-
69
-
70
-
71
-
72
-
73
-
74
-
75
-
76
-
77
-
78
-
79
-
80
-
81
-
82
-
83
-
84
-
85
-
86
-
87
-
88
-
89
-
90
-
91
-
92
-
93
-
94
-
95
-
96
-
97
-
98
-
99
-
100
-
101
-
102
-
103
-
104
-
105
-
106
-
107
-
108
-
109
-
110
-
111
-
112
-
113
-
114
-
115
-
116
-
117
-
118
-
119
-
120
-
121
-
122
-
123
-
124
-
125
-
126
-
127
-
128
-
129
-
130
-
131
-
132
-
133
-
134
-
135
-
136
-
137
-
138
-
139
-
140
-
141
-
142
-
143
-
144
-
145
-
146
-
147
-
148
 |
 |

Operating Instructions
audio/video multi-channel receiver
SC-
37
SC-
35