Pioneer SC-35 Owner's Manual - Page 98
Erasing one of the remote control button settings, Erasing all learnt settings that are in one input
 |
UPC - 884938108751
View all Pioneer SC-35 manuals
Add to My Manuals
Save this manual to your list of manuals |
Page 98 highlights
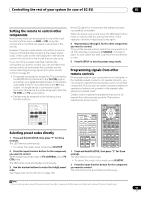
10 Controlling the rest of your system (In case of SC-35) 3 Point the two remote controls towards each other, then press the button that will be doing the learning on this receiver's remote control. The LED blinks once and flashes continuously. • The remote controls should be 3 cm (1 inch) apart. This receiver's remote control 3 cm (1 inch) Other remote control 4 Press the corresponding button on the other remote control that is sending (teaching) the signal to this receiver's remote control. If the LED lights for one second, the setting has been successfully completed.1 5 To program additional signals for the current component repeat steps 3 and 4. To program signals for another component, exit and repeat steps 2 through 4. 6 Press R.SETUP to exit the programming mode. Erasing one of the remote control button settings This erases one of the buttons you have programmed and restores the button to the factory default. 1 Press and hold R.SETUP, then press "7" for three seconds. The LED flashes continuously. • To cancel the preset setup mode press R.SETUP. 2 Press the input function button corresponding to the command to be erased, then press ENTER. The LED flashes once. 3 Press and hold the button to be erased for three seconds. If the LED lights for one second, the erasing has been successfully completed. 4 Repeat step 3 to erase other buttons. 5 Press R.SETUP to exit the erasing mode. Erasing all learnt settings that are in one input function This operation erases all the operational settings of other devices that have been programmed in one input function, and restores the factory default. This function is handy for erasing all data programmed for devices no longer being used. 1 Press and hold R.SETUP, then press "9" for three seconds. The LED flashes continuously. • To cancel the preset setup mode press R.SETUP. 2 Press and hold the input function button corresponding to the command to be erased for three seconds. If the LED lights for one second, the erasing has been successfully completed. Direct function • Default setting: On You can use the direct function feature to control one component using the remote control while at the same time using your receiver to play a different component. This could let you, for example, use the remote control to set up and listen to a CD on the receiver, and then use the remote control to rewind a tape in your VCR while you continue to listen to your CD player. When direct function is on, any component you select (using the input function buttons) will be selected by both the receiver and the remote control. When you turn direct function off, you can operate the remote control without affecting the receiver. 1 Press and hold R.SETUP, then press "5" for three seconds. The LED flashes continuously. • To cancel the preset setup mode press R.SETUP. 2 Press the input function button for the component you want to control. 3 Press "1" (On) or "0" (Off) to switch the direct function mode. If the LED lights for one second, the setting has been successfully completed. If the LED flashes three times, the setting has failed. 4 Press R.SETUP to exit the setup. Note 1 • Note that interference from TVs or other devices will sometimes result in the remote control learning the wrong signal. • Some commands from other remote controls cannot be learned, but in most cases the remotes just need to be moved closer together or farther apart. • If the LED flashes for five seconds, it means the memory is full. See Erasing all learnt settings that are in one input function on page 98 to erase a programmed button you're not using to free up more memory (note that some signals may take more memory than others). 98 En
-
 1
1 -
2
-
3
-
4
-
5
-
6
-
7
-
8
-
9
-
10
-
11
-
12
-
13
-
14
-
15
-
16
-
17
-
18
-
19
-
20
-
21
-
22
-
23
-
24
-
25
-
26
-
27
-
28
-
29
-
30
-
31
-
32
-
33
-
34
-
35
-
36
-
37
-
38
-
39
-
40
-
41
-
42
-
43
-
44
-
45
-
46
-
47
-
48
-
49
-
50
-
51
-
52
-
53
-
54
-
55
-
56
-
57
-
58
-
59
-
60
-
61
-
62
-
63
-
64
-
65
-
66
-
67
-
68
-
69
-
70
-
71
-
72
-
73
-
74
-
75
-
76
-
77
-
78
-
79
-
80
-
81
-
82
-
83
-
84
-
85
-
86
-
87
-
88
-
89
-
90
-
91
-
92
-
 93
93 -
 94
94 -
 95
95 -
 96
96 -
 97
97 -
 98
98 -
 99
99 -
 100
100 -
 101
101 -
 102
102 -
 103
103 -
104
-
105
-
106
-
107
-
108
-
109
-
110
-
111
-
112
-
113
-
114
-
115
-
116
-
117
-
118
-
119
-
120
-
121
-
122
-
123
-
124
-
125
-
126
-
127
-
128
-
129
-
130
-
131
-
132
-
133
-
134
-
135
-
136
-
137
-
138
-
139
-
140
-
141
-
142
-
143
-
144
-
145
-
146
-
147
-
148
 |
 |
