Pioneer SC-35 Owner's Manual - Page 19
Mcacc Setup Mic, Advanced Surround
 |
UPC - 884938108751
View all Pioneer SC-35 manuals
Add to My Manuals
Save this manual to your list of manuals |
Page 19 highlights
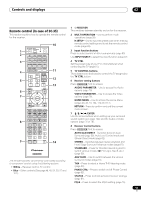
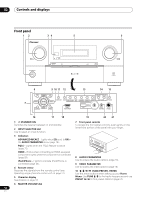
Controls and displays 02 11 TUNER EDIT Use with ENTER to memorize and name stations for recall (page 52). 12 BAND Switches between AM and FM radio bands (page 52). 13 Listening mode buttons AUTO SURR/ALC/STREAM DIRECT - Switches between Auto Surround (page 59), Auto Level Control, Optimum Surround1 mode and Stream Direct mode (page 62). HOME THX - Press to select a Home THX listening mode (page 60). STANDARD SURROUND - Press for Standard decoding and to switch various modes (2 Pro Logic, Neo:6, etc.) (page 59). ADVANCED SURROUND - Use to switch between the various surround modes (page 61). STEREO - Switches between stereo playback and Front Stage Surround Advance modes (page 61). 14 MULTI-ZONE controls If you've made MULTI-ZONE connections (see MULTIZONE setup on page 37) use these controls to control the sub zone from the main zone (see Using the MULTI-ZONE controls on page 79). 15 SPEAKERS Use to change the speaker terminal (page 79). 16 HOME MENU Press to access the Home Menu (pages 43, 45, 73, 104, 114 and 117). 17 RETURN Press to confirm and exit the current menu screen. 18 HDMI input connector Use for connection to a compatible HDMI device (Video camera, etc.) (page 39). 19 iPod/iPhone/USB terminals Use to connect your Apple iPod as an audio and video source, or connect a USB device for audio and photo playback (page 40). 20 MCACC SETUP MIC jack Use to connect the supplied microphone (page 43). 21 PHONES jack Use to connect headphones. When the headphones are connected, there is no sound output from the speakers. Note 1 Optimum Surround mode is only apply to the SC-37. 19 En
-
 1
1 -
2
-
3
-
4
-
5
-
6
-
7
-
8
-
9
-
10
-
11
-
12
-
13
-
 14
14 -
 15
15 -
 16
16 -
 17
17 -
 18
18 -
 19
19 -
 20
20 -
 21
21 -
 22
22 -
 23
23 -
 24
24 -
25
-
26
-
27
-
28
-
29
-
30
-
31
-
32
-
33
-
34
-
35
-
36
-
37
-
38
-
39
-
40
-
41
-
42
-
43
-
44
-
45
-
46
-
47
-
48
-
49
-
50
-
51
-
52
-
53
-
54
-
55
-
56
-
57
-
58
-
59
-
60
-
61
-
62
-
63
-
64
-
65
-
66
-
67
-
68
-
69
-
70
-
71
-
72
-
73
-
74
-
75
-
76
-
77
-
78
-
79
-
80
-
81
-
82
-
83
-
84
-
85
-
86
-
87
-
88
-
89
-
90
-
91
-
92
-
93
-
94
-
95
-
96
-
97
-
98
-
99
-
100
-
101
-
102
-
103
-
104
-
105
-
106
-
107
-
108
-
109
-
110
-
111
-
112
-
113
-
114
-
115
-
116
-
117
-
118
-
119
-
120
-
121
-
122
-
123
-
124
-
125
-
126
-
127
-
128
-
129
-
130
-
131
-
132
-
133
-
134
-
135
-
136
-
137
-
138
-
139
-
140
-
141
-
142
-
143
-
144
-
145
-
146
-
147
-
148
 |
 |
