Pioneer SC-35 Owner's Manual - Page 79
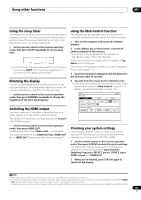
Switching the speaker terminals, Using the MULTI-ZONE controls, BRIGHT, CONTRAST, CHROMA, BLK SETUP
 |
UPC - 884938108751
View all Pioneer SC-35 manuals
Add to My Manuals
Save this manual to your list of manuals |
Page 79 highlights
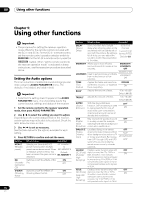
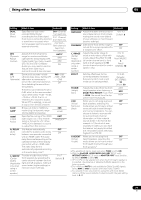
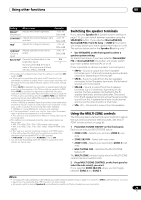
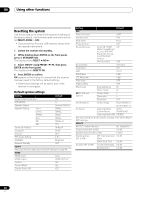
Using other functions 09 Setting What it does Option(s) BRIGHTd Adjusts the overall brightness. (Brightness) -6 to +6 Default: 0 CONTRASTd Adjusts the contrast between light -6 to +6 and dark. Default: 0 HUEd Adjusts the red/green balance. -6 to +6 Default: 0 CHROMAd (Chroma Level) Adjusts saturation from dull to bright. -6 to +6 Default: 0 BLK SETUPf Corrects the black depth in the 7.5 brightness signal. 0 Normally select 7.5. If the dark parts of the picture are all black with this setting, select 0. a.If the video picture deteriorates when this settings is switched ON, switch it OFF. b.• When set to a resolution with which the TV (monitor) is not compatible, no picture is output. Also, in some cases no picture will be output due to copyright protection signals. In this case, change the setting. • When AUTO is selected, the resolution is selected automatically according to the capacity of the TV (monitor) connected by HDMI. When PURE is selected, the signals are output with the same resolution as when input (see About the video converter on page 27). • If this is set to something other than AUTO, PURE and 480i/576i analog signals are input, 480p/576p signals are output from the component output terminals. • When 1080/24p is selected, depending on the source material the movement may be unnatural or the picture may not be clear. In this case, set the resolution to something other than 1080/24p. • 1080/24p is mainly effective for movie source materials. c.• If the image doesn't match your monitor type, adjust the aspect ratio on the source component or on the monitor. • This setting is only displayed when 480i/p or 576i/p video signals are being input. d.This setting is only displayed when the video signals below are being input: • 480i, 576i, 480p, 576p, 720p, 1080i analog video signals • 480i, 576i, 480p, 576p, 720p, 1080i, 1080p, 1080p24 HDMI video signals e.• This setting is valid for component outputs and HDMI output. • This setting have the effect only for pictures recorded in the interlaced scan format (480i/576i or 1080i signals). • P.MOTION is disabled when PCINEMA is set to ON. f. You can't use this setting when the HDMI or component video signals are being input. Switching the speaker terminals If you selected Speaker B at Speaker system setting on page 115, you can switch between speakers using the SPEAKERS button. If you selected Normal(SB/FH), Normal(SB/FW), Front Bi-Amp or ZONE 2, the button will simply switch your main speaker terminals on or off. The options below are for the Speaker B setting only.1 • Use SPEAKERS on the front panel to select a speaker system setting. As mentioned above, if you have selected Normal(SB/ FH) or Normal(SB/FW), the button will simply switch your main speaker terminal (A) on or off. Press repeatedly to choose a speaker terminal option: • SPA - Sound is output from the A-speaker terminals (up to 7 channels (including surround back channels), depending on the source). • SPB - Sound is output from the two speakers connected to the B-speaker terminals. Multichannel sources will not be heard. • SPAB - Sound is output from the A-speaker terminals (up to 5 channels, depending on the source), the two speakers connected to the Bspeaker terminals, and the subwoofer. The sound from the B-speaker terminals will be the same as the sound from the A-speaker terminals (multichannel sources will be downmixed to 2 channels). • SP (off) - No sound is output from the speakers. Using the MULTI-ZONE controls The following steps use the front panel controls to adjust the sub zone volume and select sources. See MULTIZONE remote controls on page 80. 1 Press MULTI-ZONE ON/OFF on the front panel. Each press selects a MULTI-ZONE option: • ZONE 2 ON - Selects your primary (ZONE 2) sub zone • ZONE 2&3 ON - Select both sub zones • ZONE 3 ON - Selects your secondary (ZONE 3) sub zone • MULTI ZONE OFF - Switches the MULTI-ZONE feature off The MULTI-ZONE indicator lights when the MULTI-ZONE control has been switched ON. 2 Press MULTI-ZONE CONTROL on the front panel to select the sub zone(s) you want. If you selected ZONE 2&3 ON above, you can toggle between ZONE 2 and ZONE 3. Note 1 • The subwoofer output depends on the settings you made in Manual speaker setup on page 114. However, if SPB is selected above, no sound is heard from the subwoofer (the LFE channel is not downmixed). • All speaker systems (except Speaker B connections) are switched off when headphones are connected. 79 En
-
 1
1 -
2
-
3
-
4
-
5
-
6
-
7
-
8
-
9
-
10
-
11
-
12
-
13
-
14
-
15
-
16
-
17
-
18
-
19
-
20
-
21
-
22
-
23
-
24
-
25
-
26
-
27
-
28
-
29
-
30
-
31
-
32
-
33
-
34
-
35
-
36
-
37
-
38
-
39
-
40
-
41
-
42
-
43
-
44
-
45
-
46
-
47
-
48
-
49
-
50
-
51
-
52
-
53
-
54
-
55
-
56
-
57
-
58
-
59
-
60
-
61
-
62
-
63
-
64
-
65
-
66
-
67
-
68
-
69
-
70
-
71
-
72
-
73
-
 74
74 -
 75
75 -
 76
76 -
 77
77 -
 78
78 -
 79
79 -
 80
80 -
 81
81 -
 82
82 -
 83
83 -
 84
84 -
85
-
86
-
87
-
88
-
89
-
90
-
91
-
92
-
93
-
94
-
95
-
96
-
97
-
98
-
99
-
100
-
101
-
102
-
103
-
104
-
105
-
106
-
107
-
108
-
109
-
110
-
111
-
112
-
113
-
114
-
115
-
116
-
117
-
118
-
119
-
120
-
121
-
122
-
123
-
124
-
125
-
126
-
127
-
128
-
129
-
130
-
131
-
132
-
133
-
134
-
135
-
136
-
137
-
138
-
139
-
140
-
141
-
142
-
143
-
144
-
145
-
146
-
147
-
148
 |
 |