Pioneer SC-35 Owner's Manual - Page 5
Contents - mcacc settings
 |
UPC - 884938108751
View all Pioneer SC-35 manuals
Add to My Manuals
Save this manual to your list of manuals |
Page 5 highlights
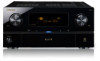
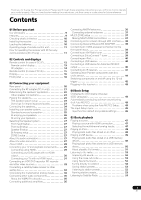
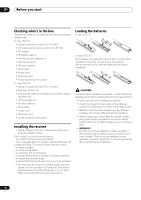
Thank you for buying this Pioneer product. Please read through these operating instructions so you will know how to operate your model properly. After you have finished reading the instructions, put them away in a safe place for future reference. Contents 01 Before you start Our philosophy 9 Features 9 Checking what's in the box 10 Installing the receiver 10 Loading the batteries 10 Operating range of remote control unit 11 Flow for operating the receiver with RF two-way communications (SC-37 only 11 02 Controls and displays Remote control (In case of SC-37 12 Remote control display 13 RF adapter 14 Remote control (In case of SC-35 15 Display 16 Front panel 18 03 Connecting your equipment Rear panel 20 Connecting the RF adapter (SC-37 only 21 Determining the speakers' application 22 Other speaker connections 23 Placing the speakers 23 THX speaker system setup 23 Some tips for improving sound quality 23 Connecting the speakers 24 Installing your speaker system 25 Standard surround connection 25 Bi-amping your speakers 26 Bi-wiring your speakers 26 Selecting the Speaker system 27 Front height setup 27 Front wide setup 27 Speaker B setup 27 Bi-Amping setup 27 ZONE 2 setup 27 About the audio connection 27 About the video converter 27 About HDMI 28 Connecting your TV and playback components . . . . . 29 Connecting using HDMI 29 Connecting your DVD player with no HDMI output 30 Connecting your TV with no HDMI input 31 Connecting an HDD/DVD recorder, BD recorder and other video sources 32 Connecting a satellite/cable receiver or other set-top box 33 Connecting the multichannel analog inputs 34 Connecting other audio components 35 About the WMA9 Pro decoder 35 Connecting additional amplifiers 36 Connecting AM/FM antennas 36 Connecting external antennas 37 MULTI-ZONE setup 37 Making MULTI-ZONE connections 37 Connecting to the network through LAN interface. . . 38 Connecting Optional Bluetooth® ADAPTER 39 Connecting an HDMI-equipped component to the front panel input 39 Connecting an XM Radio tuner 39 Connecting a SiriusConnect™ tuner 39 Connecting an iPod 40 Connecting a USB device 40 Connecting a USB device for Advanced MCACC output 40 Connecting an IR receiver 41 Operating other Pioneer components with this unit's sensor 41 Switching components on and off using the 12 volt trigger 42 Plugging in the receiver 42 04 Basic Setup Changing the OSD display language (OSD Language 43 Automatically conducting optimum sound tuning (Full Auto MCACC 43 Problems when using the Auto MCACC Setup . . . . 45 The Input Setup menu 45 Input function default and possible settings 46 05 Basic playback Playing a source 47 Playing a source with HDMI connection 47 Selecting the multichannel analog inputs 47 Playing an iPod 48 Playing back audio files stored on an iPod 48 Playing a USB device 49 Playing back audio files stored on a USB memory device 49 Playing back photo files stored on a USB memory device 50 About playable file formats 51 Listening to the radio 52 Improving FM sound 52 Using the noise cut mode 52 Using Neural Surround 52 Tuning directly to a station 52 Saving station presets 52 Listening to station presets 52 Naming station presets 53 Listening to Satellite Radio 53 5 En
-
 1
1 -
 2
2 -
 3
3 -
 4
4 -
 5
5 -
 6
6 -
 7
7 -
 8
8 -
 9
9 -
 10
10 -
 11
11 -
12
-
13
-
14
-
15
-
16
-
17
-
18
-
19
-
20
-
21
-
22
-
23
-
24
-
25
-
26
-
27
-
28
-
29
-
30
-
31
-
32
-
33
-
34
-
35
-
36
-
37
-
38
-
39
-
40
-
41
-
42
-
43
-
44
-
45
-
46
-
47
-
48
-
49
-
50
-
51
-
52
-
53
-
54
-
55
-
56
-
57
-
58
-
59
-
60
-
61
-
62
-
63
-
64
-
65
-
66
-
67
-
68
-
69
-
70
-
71
-
72
-
73
-
74
-
75
-
76
-
77
-
78
-
79
-
80
-
81
-
82
-
83
-
84
-
85
-
86
-
87
-
88
-
89
-
90
-
91
-
92
-
93
-
94
-
95
-
96
-
97
-
98
-
99
-
100
-
101
-
102
-
103
-
104
-
105
-
106
-
107
-
108
-
109
-
110
-
111
-
112
-
113
-
114
-
115
-
116
-
117
-
118
-
119
-
120
-
121
-
122
-
123
-
124
-
125
-
126
-
127
-
128
-
129
-
130
-
131
-
132
-
133
-
134
-
135
-
136
-
137
-
138
-
139
-
140
-
141
-
142
-
143
-
144
-
145
-
146
-
147
-
148
 |
 |