Sony GC89 User Guide - Page 14
Create a EDGE/GPRS or CSD Connection, GSM/GPRS Connection - review
 |
UPC - 095673179566
View all Sony GC89 manuals
Add to My Manuals
Save this manual to your list of manuals |
Page 14 highlights
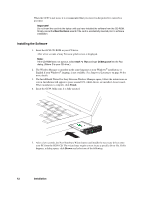
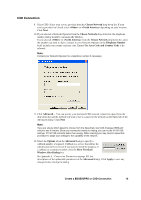
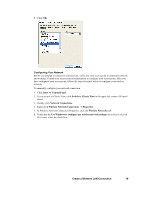
Create a EDGE/GPRS or CSD Connection Predefined customised connection settings may have already been entered by your mobile operator or IT Manager. Check the connection drop-down menu for any existing entries, if they are available go to Using your Connection on page 16. If no predefined customised connections exist, the Network Connection Wizard automatically starts when the Wireless Manager is opened for the first time. 1. Click or select View Connection Wizard. The Connection Wizard opens. 2. Select the radio button next to Create a new connection. Enter a name, for example 'My Connection'. Click Next. Note: Your connection name should not exceed 16 characters for it to be fully visible in Wireless Manager. 3. The Type of Connection screen opens. Select the type of connection you require: • For EDGE/GPRS see steps 4 to 8 • For CSD see steps 9 to 12 GSM/GPRS Connection 4. Select GSM/GPRS. Select your Network Operator from the Choose Network drop down list. If your Network Operator is not listed, select . Click Next. See Network and Subscription on page 9 for more information on GPRS. 5. If the Access Point Name dialog opens, check the APN displayed (for some operators it is deliberately blank). If you selected enter the APN for your operator. Contact your Network Operator if necessary to find out the correct APN. 6. To modify the selected APN's settings, Click Advanced.... See Appendix A - Connection Parameters on page 103, for descriptions of the updateable parameters in the Advanced dialog. The Secondary APN information is only used in special customised cases where the information will be filled in for you. Otherwise the tick-box must be left un-ticked and secondary APN name blank. Click Apply to save any changes before closing the dialog. Click Next. Note: Your connection will automatically switch to EDGE when the network is available, allowing your PC Card to work at faster speeds. 7. If the operator you have selected in step 4 does not require a User ID and Password leave this dialog blank if it is displayed. If you have to logon to your service provider, enter your User ID and Password into the specific fields. If you want to enter your User ID and Password every time you connect, de-select the Save Password box. Click Next. Note: Some versions of Windows® deliberately change the number of asterisks that represent a password and place asterisks in the password field when the password is blank in order to make the display secure. 8. Click Finish to create your connection or Back to review your settings. 14 Create a EDGE/GPRS or CSD Connection
-
 1
1 -
2
-
3
-
4
-
5
-
6
-
7
-
8
-
 9
9 -
 10
10 -
 11
11 -
 12
12 -
 13
13 -
 14
14 -
 15
15 -
 16
16 -
 17
17 -
 18
18 -
 19
19 -
20
-
21
-
22
-
23
-
24
-
25
-
26
-
27
-
28
-
29
-
30
-
31
-
32
-
33
-
34
-
35
-
36
-
37
-
38
-
39
-
40
-
41
-
42
-
43
-
44
-
45
-
46
-
47
-
48
-
49
-
50
-
51
-
52
-
53
-
54
-
55
-
56
-
57
-
58
-
59
-
60
-
61
-
62
-
63
-
64
-
65
-
66
-
67
-
68
-
69
-
70
-
71
-
72
-
73
-
74
-
75
-
76
-
77
-
78
-
79
-
80
-
81
-
82
-
83
-
84
-
85
-
86
-
87
-
88
-
89
-
90
-
91
-
92
-
93
-
94
-
95
-
96
-
97
-
98
-
99
-
100
-
101
-
102
-
103
-
104
-
105
-
106
-
107
-
108
-
109
-
110
-
111
-
112
-
113
 |
 |