Sony GC89 User Guide - Page 75
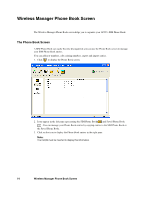
Phone Book Functionality, Wireless Manager Phone Book Screen, To Add a Number, To Find Entries
 |
UPC - 095673179566
View all Sony GC89 manuals
Add to My Manuals
Save this manual to your list of manuals |
Page 75 highlights
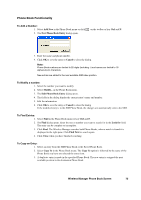
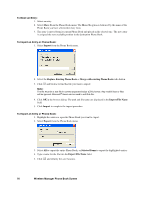
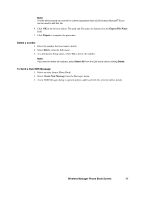
Phone Book Functionality To Add a Number: 1. Select Add New in the Phone Book menu or click 2. The New Phone Book Entry dialog opens. on the toolbar or key Ctrl and N. 3. Enter the name and phone number. 4. Click OK to save the entry or Cancel to close the dialog. Note: Phone Book numbers are limited to 20 digits (including +) and names are limited to 18 alphanumeric characters. New entries are added to the next available SIM index position. To Modify a number: 1. Select the number you want to modify. 2. Select Modify... in the Phone Book menu. 3. The Edit Phone Book Entry dialog opens. 4. The fields in the dialog display the current entry's name and number. 5. Edit the information. 6. Click OK to save the entry or Cancel to close the dialog If the modified entry is in the SIM Phone Book, the changes are automatically sent to the SIM. To Find Entries: 1. Select Find in the Phone Book menu or key Ctrl and F. 2. The Find dialog opens. Enter the text or number you want to search for in the Look for field. The entry can be complete or incomplete. 3. Click Find. The Wireless Manager searches both Phone Books; when a match is found it is displayed in the right pane. Click Find Next to search again. 4. Click Close when you have finished searching. To Copy an Entry: 1. Select an entry from the SIM Phone Book or the Saved Phone Book. 2. Select Copy To in the Phone Book menu. The Copy To option is followed by the name of the Phone Book you have not selected the entry from. 3. A duplicate entry is made in the specified Phone Book. The new entry is assigned the next available position in the destination Phone Book. Wireless Manager Phone Book Screen 75
-
 1
1 -
2
-
3
-
4
-
5
-
6
-
7
-
8
-
9
-
10
-
11
-
12
-
13
-
14
-
15
-
16
-
17
-
18
-
19
-
20
-
21
-
22
-
23
-
24
-
25
-
26
-
27
-
28
-
29
-
30
-
31
-
32
-
33
-
34
-
35
-
36
-
37
-
38
-
39
-
40
-
41
-
42
-
43
-
44
-
45
-
46
-
47
-
48
-
49
-
50
-
51
-
52
-
53
-
54
-
55
-
56
-
57
-
58
-
59
-
60
-
61
-
62
-
63
-
64
-
65
-
66
-
67
-
68
-
69
-
 70
70 -
 71
71 -
 72
72 -
 73
73 -
 74
74 -
 75
75 -
 76
76 -
 77
77 -
 78
78 -
 79
79 -
 80
80 -
81
-
82
-
83
-
84
-
85
-
86
-
87
-
88
-
89
-
90
-
91
-
92
-
93
-
94
-
95
-
96
-
97
-
98
-
99
-
100
-
101
-
102
-
103
-
104
-
105
-
106
-
107
-
108
-
109
-
110
-
111
-
112
-
113
 |
 |
