Sony STR-DN1070 Help Guide Printable PDF - Page 12
Front panel lower Power indicator, Indicators on the display panel - bluetooth headphones
 |
View all Sony STR-DN1070 manuals
Add to My Manuals
Save this manual to your list of manuals |
Page 12 highlights
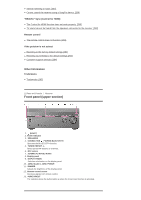
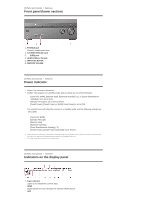
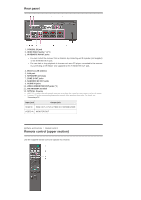
[2] Parts and Controls Receiver Front panel (lower section) 1. PHONES jack Connect headphones here. 2. CALIBRATION MIC jack 3. (USB) port 4. HDMI (VIDEO 2 IN) jack 5. INPUT SELECTOR 6. MASTER VOLUME [3] Parts and Controls Receiver Power indicator Green: The receiver is turned on. Amber: The receiver is in standby mode, and you have set one of the following: [Control for HDMI], [Remote Start], [Bluetooth Standby] (*1), or [Quick Start/Network Standby] (*2) is set to [On]. [Standby Through] is set to [On] or [Auto]. [Zone2 Power], [Zone3 Power] or [HDMI Zone Power] is set to [On]. The indicator turns off when the receiver is in standby mode, and the following settings are set to [Off]: [Control for HDMI] [Standby Through] [Remote Start] [Bluetooth Standby] [Quick Start/Network Standby] (*2) [Zone2 Power], [Zone3 Power] and [HDMI Zone Power] *1 When [Bluetooth Standby] is activated, the indicator lights up in amber only if a device has been paired with the receiver. If no devices are paired with the receiver, the indicator turns off. *2 For USA, Canadian and Oceanian models only. [4] Parts and Controls Receiver Indicators on the display panel 1. Input indicator Lights up to indicate the current input. HDMI Digital signals are input through the selected HDMI IN jack. ARC
-
 1
1 -
2
-
3
-
4
-
5
-
6
-
 7
7 -
 8
8 -
 9
9 -
 10
10 -
 11
11 -
 12
12 -
 13
13 -
 14
14 -
 15
15 -
 16
16 -
 17
17 -
18
-
19
-
20
-
21
-
22
-
23
-
24
-
25
-
26
-
27
-
28
-
29
-
30
-
31
-
32
-
33
-
34
-
35
-
36
-
37
-
38
-
39
-
40
-
41
-
42
-
43
-
44
-
45
-
46
-
47
-
48
-
49
-
50
-
51
-
52
-
53
-
54
-
55
-
56
-
57
-
58
-
59
-
60
-
61
-
62
-
63
-
64
-
65
-
66
-
67
-
68
-
69
-
70
-
71
-
72
-
73
-
74
-
75
-
76
-
77
-
78
-
79
-
80
-
81
-
82
-
83
-
84
-
85
-
86
-
87
-
88
-
89
-
90
-
91
-
92
-
93
-
94
-
95
-
96
-
97
-
98
-
99
-
100
-
101
-
102
-
103
-
104
-
105
-
106
-
107
-
108
-
109
-
110
-
111
-
112
-
113
-
114
-
115
-
116
-
117
-
118
-
119
-
120
-
121
-
122
-
123
-
124
-
125
-
126
-
127
-
128
-
129
-
130
-
131
-
132
-
133
-
134
-
135
-
136
-
137
-
138
-
139
-
140
-
141
-
142
-
143
-
144
-
145
-
146
-
147
-
148
-
149
-
150
-
151
-
152
-
153
-
154
-
155
-
156
-
157
-
158
-
159
-
160
-
161
-
162
-
163
-
164
-
165
-
166
-
167
-
168
-
169
 |
 |
