Yamaha MU100R MU100R Owners Manual - Page 28
Connecting to MIDI Devices
 |
View all Yamaha MU100R manuals
Add to My Manuals
Save this manual to your list of manuals |
Page 28 highlights
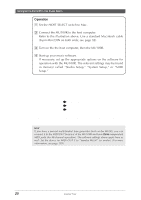
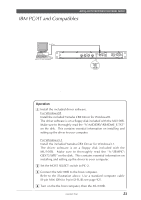
Setting Up the MU100R in Your Music System Setting Up the MU100R in Your Music System As you learned in the section The MU100R - What It Is and What It Can Do on page 4, the MU100R can be integrated into a variety of setups. It would be impossible to cover all connection possibilities in a short manual as this; however, the section below will help in quickly setting up the MU100R and using it in your system. Connecting to MIDI Devices The MU100R is equipped with MIDI IN, OUT, and THRU terminals, allowing you to use it in any MIDI system. Moreover, the two MIDI IN terminals are independent 16-channel ports, effectively giving you two tone generators in one. Here are some common connection examples using the built-in MIDI interface. Refer to the example that most closely matches your setup, then read the Operation steps at the end of this section. • MIDI keyboard In this setup, you can play the sounds of the MU100R from the connected keyboard. MIDI CABLE PITCH SHIFT MIDI OUT ASSIGNABLE CONTROLLER NUMBER LIST CONTROL CHANGE 1 MODULATION DEPTH 2 BREATH CONTROL 4 FOOT CONTROL 5 PORTAMENTO TIME 6 DATA ENTRY 7 MAIN VOLUME 8 BALANCE CONTROL 10 PANPOT 11 EXPRESSION 64 HOLD1(DAMPER) 65 PORTAMENTO 66 SOSTENUTO(CHORD HOLD) 67 SOFT PEDAL 69 HOLD2 (FREEZE) 71 HARMONIC CONTENT 72 RELEASE TIME 73 ATTACK TIME 74 BRIGHTNESS 84 PORTAMENTO CONTROL 91 REVERB DEPTH 92 TREMOLO DEPTH 93 CHORUS DEPTH 94 VARIATION DEPTH 95 PHASER DEPTH (RPN) 120 PITCH BEND SENSITIVITY 121 FINE TUNING 122 COARSE TUNING (NRPN) 123 VIBRATO RATE 124 VIBRATO DEPTH 125 VIBRATO DELAY IN MIDI OUT DC IN POWER ON OFF 126 FILTER CUTOFF FREQUENCY 127 FILTER RESONANCE 128 EG ATTACK TIME 129 EG DECAY TIME 130 EG RELEASE TIME 131 DRUM FILTER CUTOFF FREQUENCY 132 DRUM FILTER RESONANCE 133 DRUM EG ATTACK RATE 134 DRUM EG DECAY RATE 135 DRUM PITCH COARSE 136 DRUM PITCH FINE 137 DRUM LEVEL 138 DRUM PAN 139 DRUM REVERB DEPTH 140 DRUM CHORUS DEPTH 141 DRUM VARIATION DEPTH OTHERS 142 CHANNEL PRESSURE 143 POLYPHONIC KEY PRESSURE 144 MASTER VOLUME 145 MASTER BALANCE 146 MASTER TUNING 147 VELOCITY 148 TEMPO SEQUENCER PROGRAM RESET BANK PROGRAM GM SOUND XG STOP CONTINUE START TEMPO SELECT CHANGE ON OFF ON SYSTEM WHEEL ASSIGN MERGE MIDI FIXED DRUM ON/OFF CH VELOCITY RPN CONTROLLER NRPN NUMBER TRANSPOSE 1 2 3 4 5 6 7 8 9 A B C D E MIDI KEYBOARD CBX-K1 ENTER HEXA F 0 DECIMAL DECIMAL OCTAVE OCTAVE SHIFT OCTAVE RESET MIDI Keyboard MIDI IN-A or B • Hardware sequencer In this setup, a hardware sequencer (such as the Yamaha QY700) is used. The main advantage of such a setup is its portability. MIDI OUT L/MONO R OUTPUT FOOT SW IN A IN B OUT A OUT B MIDI PITCH ASSIGNABLE MUSIC SEQUENCER IN A IN B OUT A OUT B MIDI SONG PATTERN UTILITY VOICE EFFECT DISK MAX VOLUME SHIFT F1 F2 F3 F4 F5 F6 SHIFT EXIT REC PLAY CONTRAST EDIT JOB TRACK TRACK -1 +1 7 DOWN UP NO YES LOC 1 LOC 2 MUTE SOLO 4 REST TIE 1 CAPS OCT DOWN ON BASS SHIFT AF OCT UP G ORG BASS BG A CA B ( DC D c ) ED E F 7( 5) G 7( 9) H 7( 13) 7( 5) 7( 9) 7(13) a SPACE DEL I 7sus4 J m7(11) 0 sus4 7( 11) 3 OCT DOWN OCT UP 3 c _ ! ? # S % & _ / K L M N O P Q R S T U V W X Y Z E F G A B C D add9 M M7(9) M7 6(9) 6 7(9) add9 m7(9) mM7 dim 7 m m7 m6 m7( 5) aug SECTION A B C D E F G H 8 9 5 6 2 3 - MIDI CABLE MIDI IN-A Guided Tour 17
-
 1
1 -
2
-
3
-
4
-
5
-
6
-
7
-
8
-
9
-
10
-
11
-
12
-
13
-
14
-
15
-
16
-
17
-
18
-
19
-
20
-
21
-
22
-
 23
23 -
 24
24 -
 25
25 -
 26
26 -
 27
27 -
 28
28 -
 29
29 -
 30
30 -
 31
31 -
 32
32 -
 33
33 -
34
-
35
-
36
-
37
-
38
-
39
-
40
-
41
-
42
-
43
-
44
-
45
-
46
-
47
-
48
-
49
-
50
-
51
-
52
-
53
-
54
-
55
-
56
-
57
-
58
-
59
-
60
-
61
-
62
-
63
-
64
-
65
-
66
-
67
-
68
-
69
-
70
-
71
-
72
-
73
-
74
-
75
-
76
-
77
-
78
-
79
-
80
-
81
-
82
-
83
-
84
-
85
-
86
-
87
-
88
-
89
-
90
-
91
-
92
-
93
-
94
-
95
-
96
-
97
-
98
-
99
-
100
-
101
-
102
-
103
-
104
-
105
-
106
-
107
-
108
-
109
-
110
-
111
-
112
-
113
-
114
-
115
-
116
-
117
-
118
-
119
-
120
-
121
-
122
-
123
-
124
-
125
-
126
-
127
-
128
-
129
-
130
-
131
-
132
-
133
-
134
-
135
-
136
-
137
-
138
-
139
-
140
-
141
-
142
-
143
-
144
-
145
-
146
-
147
-
148
-
149
-
150
-
151
-
152
-
153
-
154
-
155
-
156
-
157
-
158
-
159
-
160
-
161
-
162
-
163
-
164
-
165
-
166
-
167
-
168
-
169
-
170
-
171
-
172
-
173
-
174
-
175
-
176
-
177
-
178
-
179
-
180
-
181
-
182
-
183
-
184
-
185
-
186
-
187
-
188
-
189
-
190
-
191
-
192
-
193
-
194
-
195
-
196
-
197
-
198
-
199
-
200
 |
 |
