Yamaha MU100R MU100R Owners Manual - Page 48
Select, Exit], Enter]
 |
View all Yamaha MU100R manuals
Add to My Manuals
Save this manual to your list of manuals |
Page 48 highlights
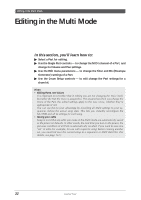
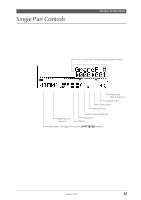
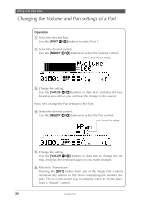
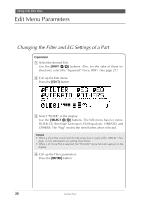
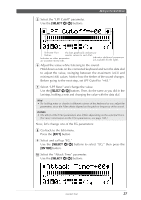
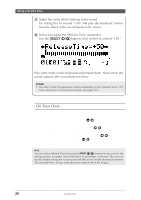
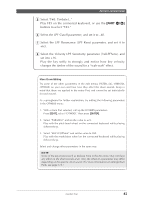
5 Select the "LPF Cutoff" parameter. Use the [SELECT ] buttons. Editing in the Multi Mode Selected Part The bars graphically indicate pa- flashes. rameter values for each Part. Indicates no other parameters are available (to the left). Indicates additional parameters are available (to the right). 6 Adjust the value while listening to the sound. Hold down a note on the connected keyboard and turn the data dial to adjust the value, swinging between the maximum (+63) and minimum (-64) values. Notice how the timbre of the sound changes. Before going to the next step, set LPF Cutoff to "+63." 7 Select "LPF Reso" and change the value. Use the [SELECT ] buttons. Then, do the same as you did in the last step, holding a note and changing the value with the data dial. Hint • Try holding notes or chords in different octaves of the keyboard as you adjust the parameters, since the Filter effects depend on the pitch or frequency of the sound. Details • The effect of the Filter parameters also differs depending on the selected Voice. (For more information on the Filter parameters, see page 100.) Now, let's change one of the EG parameters: 8 Go back to the Edit menu. Press the [EXIT] button. 9 Select and call up "EG." Use the [SELECT ] buttons to select "EG," then press the [ENTER] button. ; Select the "Attack Time" parameter. Use the [SELECT ] buttons. Guided Tour 37
-
 1
1 -
2
-
3
-
4
-
5
-
6
-
7
-
8
-
9
-
10
-
11
-
12
-
13
-
14
-
15
-
16
-
17
-
18
-
19
-
20
-
21
-
22
-
23
-
24
-
25
-
26
-
27
-
28
-
29
-
30
-
31
-
32
-
33
-
34
-
35
-
36
-
37
-
38
-
39
-
40
-
41
-
42
-
 43
43 -
 44
44 -
 45
45 -
 46
46 -
 47
47 -
 48
48 -
 49
49 -
 50
50 -
 51
51 -
 52
52 -
 53
53 -
54
-
55
-
56
-
57
-
58
-
59
-
60
-
61
-
62
-
63
-
64
-
65
-
66
-
67
-
68
-
69
-
70
-
71
-
72
-
73
-
74
-
75
-
76
-
77
-
78
-
79
-
80
-
81
-
82
-
83
-
84
-
85
-
86
-
87
-
88
-
89
-
90
-
91
-
92
-
93
-
94
-
95
-
96
-
97
-
98
-
99
-
100
-
101
-
102
-
103
-
104
-
105
-
106
-
107
-
108
-
109
-
110
-
111
-
112
-
113
-
114
-
115
-
116
-
117
-
118
-
119
-
120
-
121
-
122
-
123
-
124
-
125
-
126
-
127
-
128
-
129
-
130
-
131
-
132
-
133
-
134
-
135
-
136
-
137
-
138
-
139
-
140
-
141
-
142
-
143
-
144
-
145
-
146
-
147
-
148
-
149
-
150
-
151
-
152
-
153
-
154
-
155
-
156
-
157
-
158
-
159
-
160
-
161
-
162
-
163
-
164
-
165
-
166
-
167
-
168
-
169
-
170
-
171
-
172
-
173
-
174
-
175
-
176
-
177
-
178
-
179
-
180
-
181
-
182
-
183
-
184
-
185
-
186
-
187
-
188
-
189
-
190
-
191
-
192
-
193
-
194
-
195
-
196
-
197
-
198
-
199
-
200
 |
 |
