Yamaha MU100R MU100R Owners Manual - Page 94
Using the Individual Outputs
 |
View all Yamaha MU100R manuals
Add to My Manuals
Save this manual to your list of manuals |
Page 94 highlights
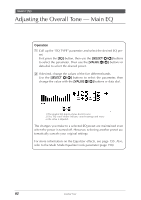
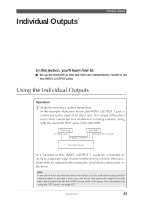
Individual Outputs Individual Outputs This convenient feature allows you to send the output of a selected Part or Parts to the INDIV. OUTPUT jacks. For Drum Parts, you can even select specific drum sounds to be output through these jacks. In general, the extensive built-in effects and other Part controls of the MU100R provide all you need for processing and mixing complex multiPart songs. However, there may be times (in studio recording, for instance) when you want to "sweeten" or process a certain Voice or sound with a favorite outboard effect unit, or record a Part to a separate track of a tape recorder. The individual outputs are designed just for these kinds of applications. In this section, you'll learn how to: ᮣ Set up the MU100R so that two Parts are independently routed to the two INDIV. OUTPUT jacks. Using the Individual Outputs Operation 1 Make the necessary audio connections. In the example illustration below, the INDIV. OUTPUT 1 jack is connected to the input of an effect unit. The output of the effect unit is then connected to a channel on a mixing console, along with the main OUTPUT jacks of the MU100R. Effect unit MU100R (1) Out (2) In (4) OUTPUT L and R (3) INDIV. OUTPUT Mixing Console In a variation of this, INDIV. OUTPUT 1 could be connected directly to a separate input channel on the mixing console, then processed with an outboard effect using the send/return connections on the mixer. Hint If you don't have an external mixer yet want to use the individual output and an external effect to process a Part, you can do so and return the output from the effect device back into the MU100R via one of the A/D inputs. (For information on using the A/D inputs, see page 87.) Guided Tour 83
-
 1
1 -
2
-
3
-
4
-
5
-
6
-
7
-
8
-
9
-
10
-
11
-
12
-
13
-
14
-
15
-
16
-
17
-
18
-
19
-
20
-
21
-
22
-
23
-
24
-
25
-
26
-
27
-
28
-
29
-
30
-
31
-
32
-
33
-
34
-
35
-
36
-
37
-
38
-
39
-
40
-
41
-
42
-
43
-
44
-
45
-
46
-
47
-
48
-
49
-
50
-
51
-
52
-
53
-
54
-
55
-
56
-
57
-
58
-
59
-
60
-
61
-
62
-
63
-
64
-
65
-
66
-
67
-
68
-
69
-
70
-
71
-
72
-
73
-
74
-
75
-
76
-
77
-
78
-
79
-
80
-
81
-
82
-
83
-
84
-
85
-
86
-
87
-
88
-
 89
89 -
 90
90 -
 91
91 -
 92
92 -
 93
93 -
 94
94 -
 95
95 -
 96
96 -
 97
97 -
 98
98 -
 99
99 -
100
-
101
-
102
-
103
-
104
-
105
-
106
-
107
-
108
-
109
-
110
-
111
-
112
-
113
-
114
-
115
-
116
-
117
-
118
-
119
-
120
-
121
-
122
-
123
-
124
-
125
-
126
-
127
-
128
-
129
-
130
-
131
-
132
-
133
-
134
-
135
-
136
-
137
-
138
-
139
-
140
-
141
-
142
-
143
-
144
-
145
-
146
-
147
-
148
-
149
-
150
-
151
-
152
-
153
-
154
-
155
-
156
-
157
-
158
-
159
-
160
-
161
-
162
-
163
-
164
-
165
-
166
-
167
-
168
-
169
-
170
-
171
-
172
-
173
-
174
-
175
-
176
-
177
-
178
-
179
-
180
-
181
-
182
-
183
-
184
-
185
-
186
-
187
-
188
-
189
-
190
-
191
-
192
-
193
-
194
-
195
-
196
-
197
-
198
-
199
-
200
 |
 |
