Yamaha MU100R MU100R Owners Manual - Page 87
Drive and OutputLvl Output Level.
 |
View all Yamaha MU100R manuals
Add to My Manuals
Save this manual to your list of manuals |
Page 87 highlights
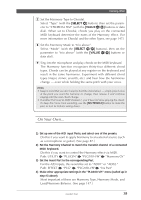
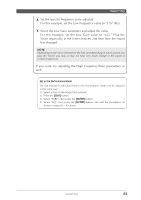
Effects 4) If you cannot hear the Distortion effect clearly, select the "Dry/Wet" parameter (with the [SELECT ] buttons) and adjust it (with the [VALUE -/+] buttons or data dial) until the sound is appropriate. 5) Using the same method (as in step #4), select and adjust other important Distortion parameters as needed, such as "Drive" and "OutputLvl" (Output Level). Now, play the Part and hear how Distortion affects the sound. Select other Types and play with them as well. The Variation parameters differ depending on the selected Variation Type. For a list of Variation Types and other information on Variation, see page 144. For a list of the available parameters for each Variation Type, refer to the "Sound List & MIDI Data" booklet. Details • When Variation is set for use with a single Part (Insertion), only Variation Send is available. (The Dry/Wet parameter in Variation Edit effectively performs the same function as Variation Return in this case; see page 145.) Also, Variation Send can be set to "on" for only one Part. • When Variation is set for use with all Parts (System), both Variation Send and Return must be set to appropriate values. (The operation is the same as step #1 in "Using Reverb" and "Using Chorus" above.) For more information, refer to "About the Effect Connections - System and Insertion" on page 152. Insertion 1 and 2 Effect Sections The Insertion 1 and 2 sections provide additional signal processing power. Each of the Insertion sections can be applied to a single selected Part, and each features 43 effect Types. For a list of Insertion Types and other information on Insertion, see page 146. For a list of the available parameters for each Insertion Type, refer to the "Sound List & MIDI Data" booklet. 76 Guided Tour
-
 1
1 -
2
-
3
-
4
-
5
-
6
-
7
-
8
-
9
-
10
-
11
-
12
-
13
-
14
-
15
-
16
-
17
-
18
-
19
-
20
-
21
-
22
-
23
-
24
-
25
-
26
-
27
-
28
-
29
-
30
-
31
-
32
-
33
-
34
-
35
-
36
-
37
-
38
-
39
-
40
-
41
-
42
-
43
-
44
-
45
-
46
-
47
-
48
-
49
-
50
-
51
-
52
-
53
-
54
-
55
-
56
-
57
-
58
-
59
-
60
-
61
-
62
-
63
-
64
-
65
-
66
-
67
-
68
-
69
-
70
-
71
-
72
-
73
-
74
-
75
-
76
-
77
-
78
-
79
-
80
-
81
-
 82
82 -
 83
83 -
 84
84 -
 85
85 -
 86
86 -
 87
87 -
 88
88 -
 89
89 -
 90
90 -
 91
91 -
 92
92 -
93
-
94
-
95
-
96
-
97
-
98
-
99
-
100
-
101
-
102
-
103
-
104
-
105
-
106
-
107
-
108
-
109
-
110
-
111
-
112
-
113
-
114
-
115
-
116
-
117
-
118
-
119
-
120
-
121
-
122
-
123
-
124
-
125
-
126
-
127
-
128
-
129
-
130
-
131
-
132
-
133
-
134
-
135
-
136
-
137
-
138
-
139
-
140
-
141
-
142
-
143
-
144
-
145
-
146
-
147
-
148
-
149
-
150
-
151
-
152
-
153
-
154
-
155
-
156
-
157
-
158
-
159
-
160
-
161
-
162
-
163
-
164
-
165
-
166
-
167
-
168
-
169
-
170
-
171
-
172
-
173
-
174
-
175
-
176
-
177
-
178
-
179
-
180
-
181
-
182
-
183
-
184
-
185
-
186
-
187
-
188
-
189
-
190
-
191
-
192
-
193
-
194
-
195
-
196
-
197
-
198
-
199
-
200
 |
 |
