Yamaha MU100R MU100R Owners Manual - Page 57
Single Part Controls - Selecting Different, Voices for the Performance
 |
View all Yamaha MU100R manuals
Add to My Manuals
Save this manual to your list of manuals |
Page 57 highlights
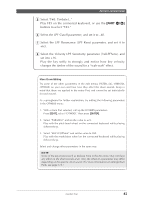
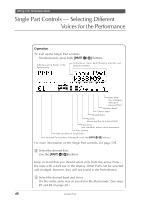
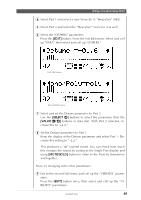
Editing in the Performance Mode Single Part Controls - Selecting Different Voices for the Performance In this next section, you'll use the Single Part controls to change the Voice settings of the Performance. Operation 1 Call up the Single Part controls. Simultaneously press both [PART -/+] buttons. Indicates active Part(s) of the Performance. Performance name, bank (Preset or Internal), and program number. PART MIDI BANK/PGM# VOL EXP PAN REV CHO VAR KEY Note Shift (key transpose setting for selected Part). Variation Send. Chorus Send. Reverb Send. Part Pan (stereo position of selected Part). Expression (not available; always set to maximum). Part Volume. (Not available in Single Part.) Selected Part number. (Change this with the [PART -/+] buttons.) For more information on the Single Part controls, see page 129. 2 Select the desired Part. Use the [PART -/+] buttons. Keep in mind that you should select only from the active Parts - the ones with a dark bar in the display. Other Parts can be selected and changed; however, they will not sound in the Performance. 3 Select the desired bank and Voice. Do this in the same way as you did in the Multi mode. (See steps #2 and #3 on page 28.) 46 Guided Tour
-
 1
1 -
2
-
3
-
4
-
5
-
6
-
7
-
8
-
9
-
10
-
11
-
12
-
13
-
14
-
15
-
16
-
17
-
18
-
19
-
20
-
21
-
22
-
23
-
24
-
25
-
26
-
27
-
28
-
29
-
30
-
31
-
32
-
33
-
34
-
35
-
36
-
37
-
38
-
39
-
40
-
41
-
42
-
43
-
44
-
45
-
46
-
47
-
48
-
49
-
50
-
51
-
 52
52 -
 53
53 -
 54
54 -
 55
55 -
 56
56 -
 57
57 -
 58
58 -
 59
59 -
 60
60 -
 61
61 -
 62
62 -
63
-
64
-
65
-
66
-
67
-
68
-
69
-
70
-
71
-
72
-
73
-
74
-
75
-
76
-
77
-
78
-
79
-
80
-
81
-
82
-
83
-
84
-
85
-
86
-
87
-
88
-
89
-
90
-
91
-
92
-
93
-
94
-
95
-
96
-
97
-
98
-
99
-
100
-
101
-
102
-
103
-
104
-
105
-
106
-
107
-
108
-
109
-
110
-
111
-
112
-
113
-
114
-
115
-
116
-
117
-
118
-
119
-
120
-
121
-
122
-
123
-
124
-
125
-
126
-
127
-
128
-
129
-
130
-
131
-
132
-
133
-
134
-
135
-
136
-
137
-
138
-
139
-
140
-
141
-
142
-
143
-
144
-
145
-
146
-
147
-
148
-
149
-
150
-
151
-
152
-
153
-
154
-
155
-
156
-
157
-
158
-
159
-
160
-
161
-
162
-
163
-
164
-
165
-
166
-
167
-
168
-
169
-
170
-
171
-
172
-
173
-
174
-
175
-
176
-
177
-
178
-
179
-
180
-
181
-
182
-
183
-
184
-
185
-
186
-
187
-
188
-
189
-
190
-
191
-
192
-
193
-
194
-
195
-
196
-
197
-
198
-
199
-
200
 |
 |
