Yamaha MU100R MU100R Owners Manual - Page 31
in menus called Studio Setup, System Setup, or MIDI
 |
View all Yamaha MU100R manuals
Add to My Manuals
Save this manual to your list of manuals |
Page 31 highlights
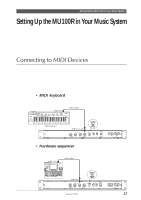
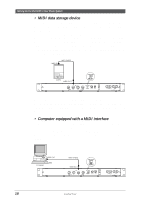
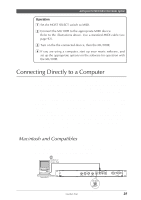
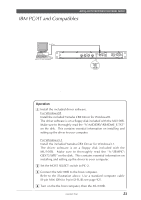
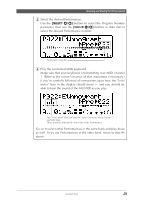
Setting Up the MU100R in Your Music System Operation 1 Set the HOST SELECT switch to Mac. 2 Connect the MU100R to the host computer. Refer to the illustration above. Use a standard Macintosh cable (8-pin Mini DIN on both ends; see page 92). 3 Turn on the the host computer, then the MU100R. 4 Start up your music software. If necessary, set up the appropriate options on the software for operation with the MU100R. The relevant settings may be found in menu(s) called "Studio Setup," "System Setup," or "MIDI Setup." In this menu, you should be able to set separate MIDI outputs to access the two MIDI ports on the MU100R. For example, the device for MIDI OUT 1 should be set to "Yamaha MU100" (or "MU80," if "MU100" is not available). Other options you may have to set include: MIDI Interface Type Ł Standard MIDI Interface MIDI Time Piece Ł On (for controlling all 32 Parts of the MU100R) Clock Ł 1 MHz (The specific menu/parameter names may differ depending on your particu- lar music software. For detailed instructions, refer to the owner's manual or on-line help of the software.) Hint If you have a second multi-timbral tone generator (such as the MU50), you can connect it to the MIDI OUT terminal of the MU100R and have three independent MIDI ports (for 48-channel operation). The software settings above apply here as well: Set the device for MIDI OUT 3 to "Yamaha MU50" (or similar). (For more information, see page 159.) 20 Guided Tour
-
 1
1 -
2
-
3
-
4
-
5
-
6
-
7
-
8
-
9
-
10
-
11
-
12
-
13
-
14
-
15
-
16
-
17
-
18
-
19
-
20
-
21
-
22
-
23
-
24
-
25
-
 26
26 -
 27
27 -
 28
28 -
 29
29 -
 30
30 -
 31
31 -
 32
32 -
 33
33 -
 34
34 -
 35
35 -
 36
36 -
37
-
38
-
39
-
40
-
41
-
42
-
43
-
44
-
45
-
46
-
47
-
48
-
49
-
50
-
51
-
52
-
53
-
54
-
55
-
56
-
57
-
58
-
59
-
60
-
61
-
62
-
63
-
64
-
65
-
66
-
67
-
68
-
69
-
70
-
71
-
72
-
73
-
74
-
75
-
76
-
77
-
78
-
79
-
80
-
81
-
82
-
83
-
84
-
85
-
86
-
87
-
88
-
89
-
90
-
91
-
92
-
93
-
94
-
95
-
96
-
97
-
98
-
99
-
100
-
101
-
102
-
103
-
104
-
105
-
106
-
107
-
108
-
109
-
110
-
111
-
112
-
113
-
114
-
115
-
116
-
117
-
118
-
119
-
120
-
121
-
122
-
123
-
124
-
125
-
126
-
127
-
128
-
129
-
130
-
131
-
132
-
133
-
134
-
135
-
136
-
137
-
138
-
139
-
140
-
141
-
142
-
143
-
144
-
145
-
146
-
147
-
148
-
149
-
150
-
151
-
152
-
153
-
154
-
155
-
156
-
157
-
158
-
159
-
160
-
161
-
162
-
163
-
164
-
165
-
166
-
167
-
168
-
169
-
170
-
171
-
172
-
173
-
174
-
175
-
176
-
177
-
178
-
179
-
180
-
181
-
182
-
183
-
184
-
185
-
186
-
187
-
188
-
189
-
190
-
191
-
192
-
193
-
194
-
195
-
196
-
197
-
198
-
199
-
200
 |
 |
