Yamaha MU100R MU100R Owners Manual - Page 50
Editing Drum Kits - with the Drum Setup Controls
 |
View all Yamaha MU100R manuals
Add to My Manuals
Save this manual to your list of manuals |
Page 50 highlights
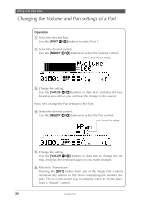
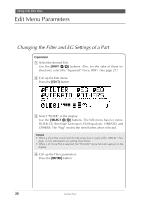
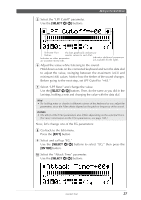
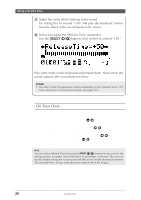
Editing in the Multi Mode Editing Drum Kits - with the Drum Setup Controls The Drum Setup controls provide a comprehensive set of tools for controlling and changing the drum kit Voices. Many of these parameters can be set individually for each sound in a Drum Part. Up to four of your original editing setups can be permanently stored. Unless you've set them otherwise, Parts 10 and 26 are automatically set to play a Drum Part and the MIDI channel for both is set to 10. (General MIDI song data is standardized for playing drum/percussion sounds over channel 10.) For the sake of these instructions, we'll simply select Part 10 and edit the existing Drum Part. However, you can set up additional Drum Parts on any of the Part numbers; refer to the box section below. Remember that once a Part is assigned a Drum Part, different drum kit Voices can be selected. (Refer to the "Sound List & MIDI Data" booklet.) Assigning a Drum Part This operation allows you to assign a Drum Part to any of the Part numbers - letting you use two or more different drum kits within the same song. 1. Select the desired Part. Use the [PART -/+] buttons. 2. Call up the Edit menu. Press the [EDIT] button. 3. Select and call up the OTHERS menu. Use the [SELECT ] buttons, then press [ENTER]. 4. Select the Part Mode parameter. Use the [SELECT ] buttons. 5. Set the parameter to "drumS1." Use the [VALUE -/+] buttons or data dial. As long as you select one of the "drum sets" (drumS1 - drumS4), any edits you make will automatically be saved to the selected set. Details • The "normal" setting is for normal Voices; the "drum" setting selects the Drum Part, but cannot be edited. (For more information on the Part Mode, see page 108.) 6. Press the [EXIT] button. Press it once to return to the Edit menus, twice to return to the Play display. Guided Tour 39
-
 1
1 -
2
-
3
-
4
-
5
-
6
-
7
-
8
-
9
-
10
-
11
-
12
-
13
-
14
-
15
-
16
-
17
-
18
-
19
-
20
-
21
-
22
-
23
-
24
-
25
-
26
-
27
-
28
-
29
-
30
-
31
-
32
-
33
-
34
-
35
-
36
-
37
-
38
-
39
-
40
-
41
-
42
-
43
-
44
-
 45
45 -
 46
46 -
 47
47 -
 48
48 -
 49
49 -
 50
50 -
 51
51 -
 52
52 -
 53
53 -
 54
54 -
 55
55 -
56
-
57
-
58
-
59
-
60
-
61
-
62
-
63
-
64
-
65
-
66
-
67
-
68
-
69
-
70
-
71
-
72
-
73
-
74
-
75
-
76
-
77
-
78
-
79
-
80
-
81
-
82
-
83
-
84
-
85
-
86
-
87
-
88
-
89
-
90
-
91
-
92
-
93
-
94
-
95
-
96
-
97
-
98
-
99
-
100
-
101
-
102
-
103
-
104
-
105
-
106
-
107
-
108
-
109
-
110
-
111
-
112
-
113
-
114
-
115
-
116
-
117
-
118
-
119
-
120
-
121
-
122
-
123
-
124
-
125
-
126
-
127
-
128
-
129
-
130
-
131
-
132
-
133
-
134
-
135
-
136
-
137
-
138
-
139
-
140
-
141
-
142
-
143
-
144
-
145
-
146
-
147
-
148
-
149
-
150
-
151
-
152
-
153
-
154
-
155
-
156
-
157
-
158
-
159
-
160
-
161
-
162
-
163
-
164
-
165
-
166
-
167
-
168
-
169
-
170
-
171
-
172
-
173
-
174
-
175
-
176
-
177
-
178
-
179
-
180
-
181
-
182
-
183
-
184
-
185
-
186
-
187
-
188
-
189
-
190
-
191
-
192
-
193
-
194
-
195
-
196
-
197
-
198
-
199
-
200
 |
 |