Yamaha MU100R MU100R Owners Manual - Page 70
Expressive Volume Control of a Part, Expressive Control of Individual Drum Sounds
 |
View all Yamaha MU100R manuals
Add to My Manuals
Save this manual to your list of manuals |
Page 70 highlights
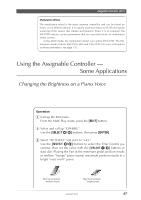
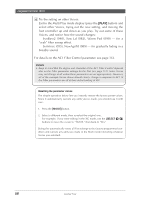
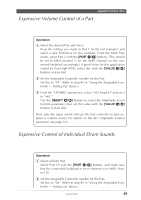
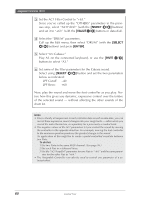
Assignable Controller (AC1) Expressive Volume Control of a Part This example shows you how to use the foot controller as an expression pedal. This may come in handy when use of MIDI Volume (#7) or Expression (#11) is unavailable. Operation 1 Select the desired Part and Voice. Keep the settings you made to Part 1 (in the last example), and select a new Part/Voice for this example. From the Multi Play mode, select Part 2 with the [PART -/+] buttons. (This should be set to MIDI channel 2; set the MIDI channel on the connected keyboard accordingly.) A good Voice for this application would be PercOrg# (018); select this with the [VALUE -/+] buttons or data dial. 2 Set the Assignable Controller number for the Part. Set this to "04." (Refer to step #3 in "Using the Assignable Controller - Setting Up" above.) 3 From the "OTHERS" parameters, select "AC1AmpCtrl" and set it to "+63." Use the [SELECT ] buttons to select the Amplitude (level) Control parameter, then set the value with the [VALUE -/+] buttons or data dial. Now, play the organ sound and use the foot controller to play expressive volume swells. For details on the AC1 Amplitude Control parameter, see page 113. Expressive Control of Individual Drum Sounds In this example, the foot controller is used to produce expressive timbre changes and filter sweeps on selected drum sounds, using the Filter Control parameter. Operation 1 Select a Drum Part. Select Part 10 with the [PART -/+] buttons, and make sure that the connected keyboard is set to transmit over MIDI channel 10. 2 Set the Assignable Controller number for the Part. Set this to "04." (Refer to step #3 in "Using the Assignable Controller - Setting Up" above.) Guided Tour 59
-
 1
1 -
2
-
3
-
4
-
5
-
6
-
7
-
8
-
9
-
10
-
11
-
12
-
13
-
14
-
15
-
16
-
17
-
18
-
19
-
20
-
21
-
22
-
23
-
24
-
25
-
26
-
27
-
28
-
29
-
30
-
31
-
32
-
33
-
34
-
35
-
36
-
37
-
38
-
39
-
40
-
41
-
42
-
43
-
44
-
45
-
46
-
47
-
48
-
49
-
50
-
51
-
52
-
53
-
54
-
55
-
56
-
57
-
58
-
59
-
60
-
61
-
62
-
63
-
64
-
 65
65 -
 66
66 -
 67
67 -
 68
68 -
 69
69 -
 70
70 -
 71
71 -
 72
72 -
 73
73 -
 74
74 -
 75
75 -
76
-
77
-
78
-
79
-
80
-
81
-
82
-
83
-
84
-
85
-
86
-
87
-
88
-
89
-
90
-
91
-
92
-
93
-
94
-
95
-
96
-
97
-
98
-
99
-
100
-
101
-
102
-
103
-
104
-
105
-
106
-
107
-
108
-
109
-
110
-
111
-
112
-
113
-
114
-
115
-
116
-
117
-
118
-
119
-
120
-
121
-
122
-
123
-
124
-
125
-
126
-
127
-
128
-
129
-
130
-
131
-
132
-
133
-
134
-
135
-
136
-
137
-
138
-
139
-
140
-
141
-
142
-
143
-
144
-
145
-
146
-
147
-
148
-
149
-
150
-
151
-
152
-
153
-
154
-
155
-
156
-
157
-
158
-
159
-
160
-
161
-
162
-
163
-
164
-
165
-
166
-
167
-
168
-
169
-
170
-
171
-
172
-
173
-
174
-
175
-
176
-
177
-
178
-
179
-
180
-
181
-
182
-
183
-
184
-
185
-
186
-
187
-
188
-
189
-
190
-
191
-
192
-
193
-
194
-
195
-
196
-
197
-
198
-
199
-
200
 |
 |
