Yamaha MU100R MU100R Owners Manual - Page 67
Using the Assignable Controller - Setting Up
 |
View all Yamaha MU100R manuals
Add to My Manuals
Save this manual to your list of manuals |
Page 67 highlights
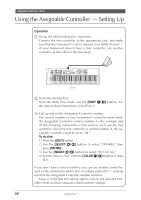
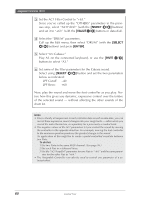
Assignable Controller (AC1) Using the Assignable Controller - Setting Up Operation 1 Set up the MIDI keyboard or instrument. Connect the foot controller to the appropriate jack, and make sure that the instrument is set to transmit over MIDI channel 1. (If your instrument doesn't have a foot controller, use another controller as described in the next step.) 56 VOLUME 2 MW/FC 1 SCENE PHONES L/MONO R OUTPUT DC IN POWER FOOT FOOT FOOT VOLUME CONTROLLER SWITCH TO HOST HOST SELECT IN OUT MIDI THRU AMP EG ATTACK RELEASE ASSIGN 1/DATA FILTER CUTOFF RESONANCE ASSIGN 2 ARPEGGIO HOLD SHIFT + PART/LAYER/ OCTAVE PRESET USER + PROGRAM PERFORMANCE STORE MULTI UTILITY PRESET USER ARPEGGIATOR VWX 7 MNO 4 DEF 1 ABC 0 YZ' 8 PQR 5 GHI 2 NO/ QUICK PC *& 9 STU 6 JKL 3 SPACE ENTER YES DEMO PERFORMANCE MULTI STORE UTILITY ARPEGGIATOR TYPE TEMPO SUB DIVIDE P BEND MW RANGE PMOD FMOD PERFORM LEVEL CUTOFF TUNE NOTE NOTE DETUNE LIMIT LIMIT SFT LOW HIGH AEG ATK DCY DCY REL TIME TIME LEVEL TIME FEG ATK DCY DCY REL TIME TIME LEVEL TIME BANK PROGRAM VOLUME PAN REV TYPE FMOD LIMIT LOW AMOD INIT LEVEL REV SEND EFECT PERFORM CHO VARI VARI VARI NAME TYPE TYPE PARAM DATA FC PORTA ASSIGN1 CUTOFF VARI SWITCH TIME PARAM EF VEL ASSIGN2 LIMIT OFFSET DEPTH PARAM DATA HIGH LFO PMOD FMOD WAVE SPEED PHASE INIT PEG ATK ATK DCY REL REL TIME LEVEL TIME TIME LEVEL EFFECT FILTER POLY/ CHO VARI CUTOFF REZ MONO SEND SEND COMMON LAYER MASTER SYSTEM KBD VEL VEL TRANS RCV MIDI DEVICE LOCAL BULK ASSIGN CTRL UTILITY TUNE CURVE FIX CH CH NO TRANS DUMP NO PITCH MODULATION CS1X 2 Select the desired Part. From the Multi Play mode, use the [PART -/+] buttons. For the sake of these instructions, select Part 1. 3 Call up and set the Assignable Controller number. The control number of your instrument's controller must match the Assignable Controller control number. In this example and all the following instructions in this section, we'll use the foot controller. Since the foot controller is control number 4, the Assignable Controller must be set to "04." To do this: 1) Press the [EDIT] button. 2) Use the [SELECT ] buttons to select "OTHERS," then press [ENTER]. 3) Use the [SELECT ] buttons to select "AC1 CC No." 4) Set the value to "04" with the [VALUE -/+] buttons or data dial. If you don't have a foot controller, you can use another controller, such as the modulation wheel (01) or volume pedal (07) - making sure that the Assignable Controller number matches. Keep in mind that this setting applies only to the selected Part. Other Parts can have separate control number settings. Guided Tour
-
 1
1 -
2
-
3
-
4
-
5
-
6
-
7
-
8
-
9
-
10
-
11
-
12
-
13
-
14
-
15
-
16
-
17
-
18
-
19
-
20
-
21
-
22
-
23
-
24
-
25
-
26
-
27
-
28
-
29
-
30
-
31
-
32
-
33
-
34
-
35
-
36
-
37
-
38
-
39
-
40
-
41
-
42
-
43
-
44
-
45
-
46
-
47
-
48
-
49
-
50
-
51
-
52
-
53
-
54
-
55
-
56
-
57
-
58
-
59
-
60
-
61
-
 62
62 -
 63
63 -
 64
64 -
 65
65 -
 66
66 -
 67
67 -
 68
68 -
 69
69 -
 70
70 -
 71
71 -
 72
72 -
73
-
74
-
75
-
76
-
77
-
78
-
79
-
80
-
81
-
82
-
83
-
84
-
85
-
86
-
87
-
88
-
89
-
90
-
91
-
92
-
93
-
94
-
95
-
96
-
97
-
98
-
99
-
100
-
101
-
102
-
103
-
104
-
105
-
106
-
107
-
108
-
109
-
110
-
111
-
112
-
113
-
114
-
115
-
116
-
117
-
118
-
119
-
120
-
121
-
122
-
123
-
124
-
125
-
126
-
127
-
128
-
129
-
130
-
131
-
132
-
133
-
134
-
135
-
136
-
137
-
138
-
139
-
140
-
141
-
142
-
143
-
144
-
145
-
146
-
147
-
148
-
149
-
150
-
151
-
152
-
153
-
154
-
155
-
156
-
157
-
158
-
159
-
160
-
161
-
162
-
163
-
164
-
165
-
166
-
167
-
168
-
169
-
170
-
171
-
172
-
173
-
174
-
175
-
176
-
177
-
178
-
179
-
180
-
181
-
182
-
183
-
184
-
185
-
186
-
187
-
188
-
189
-
190
-
191
-
192
-
193
-
194
-
195
-
196
-
197
-
198
-
199
-
200
 |
 |
