ZyXEL NBG6716 User Guide - Page 122
DHCP Server General Screen, DHCP Server Advanced Screen
 |
View all ZyXEL NBG6716 manuals
Add to My Manuals
Save this manual to your list of manuals |
Page 122 highlights
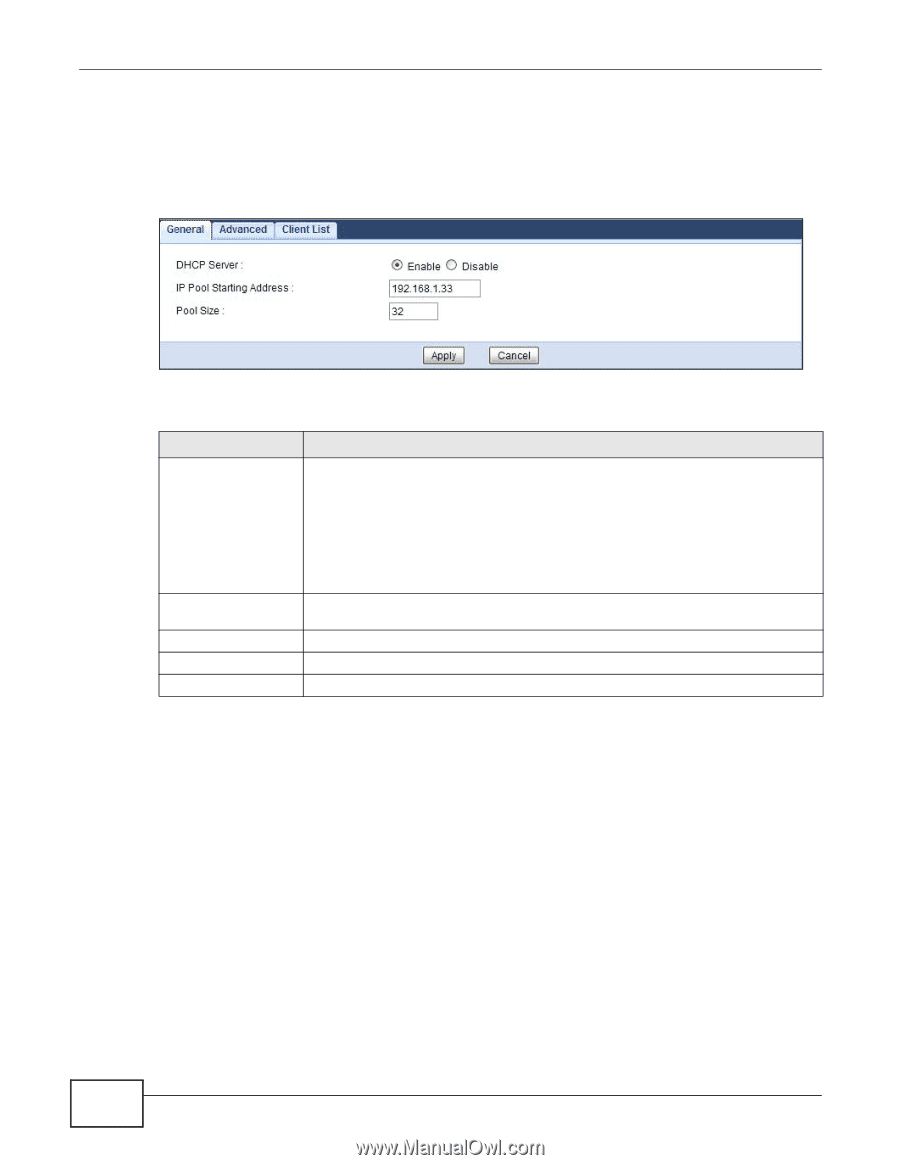
Chapter 13 DHCP Server 13.2 DHCP Server General Screen Use this screen to enable the DHCP server. Click Network > DHCP Server. The following screen displays. Figure 74 Network > DHCP Server > General The following table describes the labels in this screen. Table 46 Network > DHCP Server > General LABEL DHCP Server DESCRIPTION Select Enable to activate DHCP for LAN. IP Pool Starting Address Pool Size Apply Cancel DHCP (Dynamic Host Configuration Protocol, RFC 2131 and RFC 2132) allows individual clients (computers) to obtain TCP/IP configuration at startup from a server. Enable the DHCP server unless your ISP instructs you to do otherwise. Select Disable to stop the NBG6716 acting as a DHCP server. When configured as a server, the NBG6716 provides TCP/IP configuration for the clients. If not, DHCP service is disabled and you must have another DHCP server on your LAN, or else the computers must be manually configured. When set as a server, fill in the following four fields. This field specifies the first of the contiguous addresses in the IP address pool for LAN. This field specifies the size, or count of the IP address pool for LAN. Click Apply to save your changes back to the NBG6716. Click Cancel to begin configuring this screen afresh. 13.3 DHCP Server Advanced Screen This screen allows you to assign IP addresses on the LAN to specific individual computers based on their MAC addresses. You can also use this screen to configure the DNS server information that the NBG6716 sends to the DHCP clients. To change your NBG6716's static DHCP settings, click Network > DHCP Server > Advanced. The following screen displays. 122 NBG6716 User's Guide
-
 1
1 -
2
-
3
-
4
-
5
-
6
-
7
-
8
-
9
-
10
-
11
-
12
-
13
-
14
-
15
-
16
-
17
-
18
-
19
-
20
-
21
-
22
-
23
-
24
-
25
-
26
-
27
-
28
-
29
-
30
-
31
-
32
-
33
-
34
-
35
-
36
-
37
-
38
-
39
-
40
-
41
-
42
-
43
-
44
-
45
-
46
-
47
-
48
-
49
-
50
-
51
-
52
-
53
-
54
-
55
-
56
-
57
-
58
-
59
-
60
-
61
-
62
-
63
-
64
-
65
-
66
-
67
-
68
-
69
-
70
-
71
-
72
-
73
-
74
-
75
-
76
-
77
-
78
-
79
-
80
-
81
-
82
-
83
-
84
-
85
-
86
-
87
-
88
-
89
-
90
-
91
-
92
-
93
-
94
-
95
-
96
-
97
-
98
-
99
-
100
-
101
-
102
-
103
-
104
-
105
-
106
-
107
-
108
-
109
-
110
-
111
-
112
-
113
-
114
-
115
-
116
-
 117
117 -
 118
118 -
 119
119 -
 120
120 -
 121
121 -
 122
122 -
 123
123 -
 124
124 -
 125
125 -
 126
126 -
 127
127 -
128
-
129
-
130
-
131
-
132
-
133
-
134
-
135
-
136
-
137
-
138
-
139
-
140
-
141
-
142
-
143
-
144
-
145
-
146
-
147
-
148
-
149
-
150
-
151
-
152
-
153
-
154
-
155
-
156
-
157
-
158
-
159
-
160
-
161
-
162
-
163
-
164
-
165
-
166
-
167
-
168
-
169
-
170
-
171
-
172
-
173
-
174
-
175
-
176
-
177
-
178
-
179
-
180
-
181
-
182
-
183
-
184
-
185
-
186
-
187
-
188
-
189
-
190
-
191
-
192
-
193
-
194
-
195
-
196
-
197
-
198
-
199
-
200
-
201
-
202
-
203
-
204
-
205
-
206
-
207
-
208
-
209
-
210
-
211
-
212
-
213
-
214
-
215
-
216
-
217
-
218
-
219
-
220
-
221
-
222
-
223
-
224
-
225
-
226
-
227
-
228
-
229
-
230
-
231
-
232
-
233
-
234
-
235
-
236
-
237
-
238
-
239
-
240
-
241
-
242
-
243
-
244
-
245
-
246
-
247
-
248
-
249
-
250
 |
 |