ZyXEL P-202H User Guide - Page 186
Rem IP Addr
 |
View all ZyXEL P-202H manuals
Add to My Manuals
Save this manual to your list of manuals |
Page 186 highlights
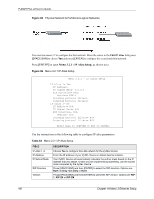
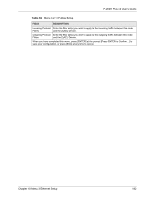
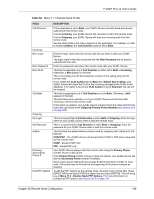
P-202H Plus v2 User's Guide The following table describes the fields in this menu. Table 63 Internet Access Setup FIELD ISP's Name Pri/Sec Phone # My Login My Password My WAN IP Addr DESCRIPTION Enter the name of your Internet Service Provider, e.g., myISP. This information is for identification purposes only. Both the Primary and the Secondary Phone number refer to the number that the ZyXEL Device dials to connect to the ISP. Enter the login name given to you by your ISP. Enter the password associated with the login name above. Some implementations, especially the UNIX derivatives, require the WAN link to have a separate IP network number from the LAN and each end must have a unique address within the WAN network number. If this is the case, enter the IP address assigned to the WAN port of your ZyXEL Device. NAT Address Mapping Set Telco options: Transfer Type Multilink Idle Timeout Note: This is the address assigned to your local router WAN, not the remote router. If the remote router is a router, then this entry determines the local router Rem IP Addr in menu 11.1. Choose from None, Full Feature or SUA Only. When you select Full Feature you must configure at least one address mapping set. See the chapter on NAT for a full discussion of this new feature. A NAT address mapping set is to create the mapping table used to assign global addresses to computers on the LAN. You may enter any address mapping set number up to 8. Set 255 (read only) is used for SUA. This field specifies the type of connection between the ZyXEL Device and this remote node. Select 64K, or Leased. The ZyXEL Device uses the PPP Multilink Protocol (PPP/MP) to bundle multiple links in a single connection to boost the effective throughput between two nodes. This option is only available if the transfer type is 64K. Options for this field are: Off, BOD and Always. This value specifies the number of idle seconds that elapses before the remote node is automatically disconnected. Idle seconds is the period of time when no data is transmitted from your ZyXEL Device. Administrative packets such as RIP are not counted as data. Note: Idle Timeout only applies when the ZyXEL Device initiates the call. When you are finished, press [ENTER] at the prompt "Press ENTER to Confirm..." to save your configuration. At this point, the SMT will ask if you wish to test the Internet connection. If you select Yes, your ZyXEL Device will call the ISP to test the Internet connection. If the test fails, note the error message that you receive on the screen and take the appropriate troubleshooting steps. 185 Chapter 19 Internet Access Setup
-
 1
1 -
2
-
3
-
4
-
5
-
6
-
7
-
8
-
9
-
10
-
11
-
12
-
13
-
14
-
15
-
16
-
17
-
18
-
19
-
20
-
21
-
22
-
23
-
24
-
25
-
26
-
27
-
28
-
29
-
30
-
31
-
32
-
33
-
34
-
35
-
36
-
37
-
38
-
39
-
40
-
41
-
42
-
43
-
44
-
45
-
46
-
47
-
48
-
49
-
50
-
51
-
52
-
53
-
54
-
55
-
56
-
57
-
58
-
59
-
60
-
61
-
62
-
63
-
64
-
65
-
66
-
67
-
68
-
69
-
70
-
71
-
72
-
73
-
74
-
75
-
76
-
77
-
78
-
79
-
80
-
81
-
82
-
83
-
84
-
85
-
86
-
87
-
88
-
89
-
90
-
91
-
92
-
93
-
94
-
95
-
96
-
97
-
98
-
99
-
100
-
101
-
102
-
103
-
104
-
105
-
106
-
107
-
108
-
109
-
110
-
111
-
112
-
113
-
114
-
115
-
116
-
117
-
118
-
119
-
120
-
121
-
122
-
123
-
124
-
125
-
126
-
127
-
128
-
129
-
130
-
131
-
132
-
133
-
134
-
135
-
136
-
137
-
138
-
139
-
140
-
141
-
142
-
143
-
144
-
145
-
146
-
147
-
148
-
149
-
150
-
151
-
152
-
153
-
154
-
155
-
156
-
157
-
158
-
159
-
160
-
161
-
162
-
163
-
164
-
165
-
166
-
167
-
168
-
169
-
170
-
171
-
172
-
173
-
174
-
175
-
176
-
177
-
178
-
179
-
180
-
 181
181 -
 182
182 -
 183
183 -
 184
184 -
 185
185 -
 186
186 -
 187
187 -
 188
188 -
 189
189 -
 190
190 -
 191
191 -
192
-
193
-
194
-
195
-
196
-
197
-
198
-
199
-
200
-
201
-
202
-
203
-
204
-
205
-
206
-
207
-
208
-
209
-
210
-
211
-
212
-
213
-
214
-
215
-
216
-
217
-
218
-
219
-
220
-
221
-
222
-
223
-
224
-
225
-
226
-
227
-
228
-
229
-
230
-
231
-
232
-
233
-
234
-
235
-
236
-
237
-
238
-
239
-
240
-
241
-
242
-
243
-
244
-
245
-
246
-
247
-
248
-
249
-
250
-
251
-
252
-
253
-
254
-
255
-
256
-
257
-
258
-
259
-
260
-
261
-
262
-
263
-
264
-
265
-
266
-
267
-
268
-
269
-
270
-
271
-
272
-
273
-
274
-
275
-
276
-
277
-
278
-
279
-
280
-
281
-
282
-
283
-
284
-
285
-
286
-
287
-
288
-
289
-
290
-
291
-
292
-
293
-
294
-
295
-
296
-
297
-
298
-
299
-
300
-
301
-
302
-
303
-
304
-
305
-
306
-
307
-
308
-
309
-
310
-
311
-
312
-
313
-
314
-
315
-
316
-
317
-
318
-
319
-
320
-
321
-
322
-
323
-
324
-
325
-
326
-
327
-
328
-
329
-
330
-
331
-
332
-
333
-
334
-
335
-
336
-
337
-
338
-
339
-
340
-
341
-
342
-
343
-
344
-
345
-
346
-
347
-
348
-
349
-
350
-
351
-
352
-
353
-
354
-
355
-
356
-
357
-
358
-
359
-
360
-
361
-
362
-
363
-
364
-
365
-
366
-
367
-
368
-
369
-
370
-
371
-
372
-
373
-
374
-
375
 |
 |