ZyXEL P-202H User Guide - Page 188
Table 64
 |
View all ZyXEL P-202H manuals
Add to My Manuals
Save this manual to your list of manuals |
Page 188 highlights
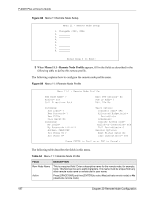
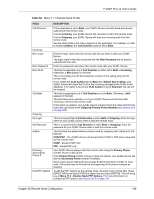
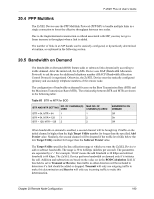
P-202H Plus v2 User's Guide Figure 88 Menu 11 Remote Node Setup Menu 11 - Remote Node Setup 1. ChangeMe (ISP, SUA) 2. ________ 3. ________ 4. ________ 5. ________ 6. ________ 7. ________ 8. ________ Enter Node # to Edit: 3 When Menu 11.1 - Remote Node Profile appears, fill in the fields as described in the following table to define this remote profile. The following explains how to configure the remote node profile menu. Figure 89 Menu 11.1 Remote Node Profile Menu 11.1 - Remote Node Profile Rem Node Name= ? Active= Yes Call Direction= Both Edit PPP Options= No Rem IP Addr= ? Edit IP= No Incoming: Rem Login= ? Rem Password= ? Rem CLID= Call Back= No Outgoing: My Login= My Password= ******** Authen= CHAP/PAP Pri Phone #= ? Sec Phone #= Telco Option: Transfer Type= 64K Allocated Budget(min)= Period(hr)= Schedules= Carrier Access Code= Nailed-Up Connection= N/A Toll Period(sec)= 0 Session Options: Edit Filter Sets= No Idle Timeout(sec)= 300 Press ENTER to Confirm or ESC to Cancel: The following table describes the fields in this menu. Table 64 Menu 11.1 Remote Node Profile FIELD Rem Node Name Active DESCRIPTION This is a required field. Enter a descriptive name for the remote node, for example, Corp. This field can be up to eight characters. This name must be unique from any other remote node name or remote dial-in user name. Press [SPACE BAR] and then [ENTER] to select Yes (activate remote node) or No (deactivate remote node). 187 Chapter 20 Remote Node Configuration
-
 1
1 -
2
-
3
-
4
-
5
-
6
-
7
-
8
-
9
-
10
-
11
-
12
-
13
-
14
-
15
-
16
-
17
-
18
-
19
-
20
-
21
-
22
-
23
-
24
-
25
-
26
-
27
-
28
-
29
-
30
-
31
-
32
-
33
-
34
-
35
-
36
-
37
-
38
-
39
-
40
-
41
-
42
-
43
-
44
-
45
-
46
-
47
-
48
-
49
-
50
-
51
-
52
-
53
-
54
-
55
-
56
-
57
-
58
-
59
-
60
-
61
-
62
-
63
-
64
-
65
-
66
-
67
-
68
-
69
-
70
-
71
-
72
-
73
-
74
-
75
-
76
-
77
-
78
-
79
-
80
-
81
-
82
-
83
-
84
-
85
-
86
-
87
-
88
-
89
-
90
-
91
-
92
-
93
-
94
-
95
-
96
-
97
-
98
-
99
-
100
-
101
-
102
-
103
-
104
-
105
-
106
-
107
-
108
-
109
-
110
-
111
-
112
-
113
-
114
-
115
-
116
-
117
-
118
-
119
-
120
-
121
-
122
-
123
-
124
-
125
-
126
-
127
-
128
-
129
-
130
-
131
-
132
-
133
-
134
-
135
-
136
-
137
-
138
-
139
-
140
-
141
-
142
-
143
-
144
-
145
-
146
-
147
-
148
-
149
-
150
-
151
-
152
-
153
-
154
-
155
-
156
-
157
-
158
-
159
-
160
-
161
-
162
-
163
-
164
-
165
-
166
-
167
-
168
-
169
-
170
-
171
-
172
-
173
-
174
-
175
-
176
-
177
-
178
-
179
-
180
-
181
-
182
-
 183
183 -
 184
184 -
 185
185 -
 186
186 -
 187
187 -
 188
188 -
 189
189 -
 190
190 -
 191
191 -
 192
192 -
 193
193 -
194
-
195
-
196
-
197
-
198
-
199
-
200
-
201
-
202
-
203
-
204
-
205
-
206
-
207
-
208
-
209
-
210
-
211
-
212
-
213
-
214
-
215
-
216
-
217
-
218
-
219
-
220
-
221
-
222
-
223
-
224
-
225
-
226
-
227
-
228
-
229
-
230
-
231
-
232
-
233
-
234
-
235
-
236
-
237
-
238
-
239
-
240
-
241
-
242
-
243
-
244
-
245
-
246
-
247
-
248
-
249
-
250
-
251
-
252
-
253
-
254
-
255
-
256
-
257
-
258
-
259
-
260
-
261
-
262
-
263
-
264
-
265
-
266
-
267
-
268
-
269
-
270
-
271
-
272
-
273
-
274
-
275
-
276
-
277
-
278
-
279
-
280
-
281
-
282
-
283
-
284
-
285
-
286
-
287
-
288
-
289
-
290
-
291
-
292
-
293
-
294
-
295
-
296
-
297
-
298
-
299
-
300
-
301
-
302
-
303
-
304
-
305
-
306
-
307
-
308
-
309
-
310
-
311
-
312
-
313
-
314
-
315
-
316
-
317
-
318
-
319
-
320
-
321
-
322
-
323
-
324
-
325
-
326
-
327
-
328
-
329
-
330
-
331
-
332
-
333
-
334
-
335
-
336
-
337
-
338
-
339
-
340
-
341
-
342
-
343
-
344
-
345
-
346
-
347
-
348
-
349
-
350
-
351
-
352
-
353
-
354
-
355
-
356
-
357
-
358
-
359
-
360
-
361
-
362
-
363
-
364
-
365
-
366
-
367
-
368
-
369
-
370
-
371
-
372
-
373
-
374
-
375
 |
 |