Brother International PC-8500 Users Manual - English - Page 121
remove the fabric from the frame without loosening
 |
View all Brother International PC-8500 manuals
Add to My Manuals
Save this manual to your list of manuals |
Page 121 highlights
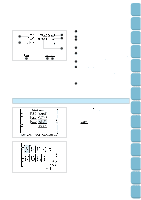
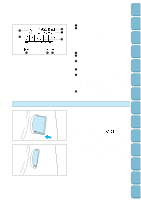
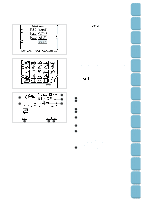
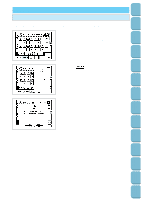
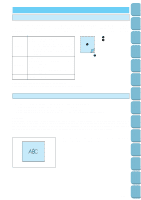
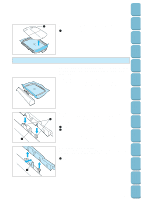
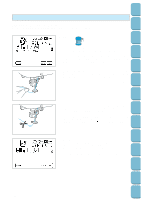
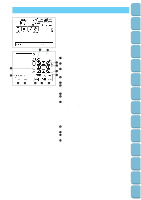
1 2 1 118 4 3 1 2. Loosen the adjusting screw and separate the inner and outer frames. Lay the fabric on top of the outer frame and secure it between the inner and outer frame, and tighten the adjusting screw just enough to secure the fabric. Gently remove the fabric from the frame without loosening the adjusting screw. 1 Inner frame 2 Outer frame 3 Adjusting screw 4 Loosen * This precautionary step will help reduce pattern distortion while embroidering. * Be sure to align the v mark on the inner frame with the w mark on the outer frame. 1 Tighten 3. Place the embroidery sheet into the inner frame, while 2 matching lines on the sheet with mark on fabric. * For best results lay the outer frame on a flat table surface and lay the fabric on top of it. 1 Inner frame 2 Standard line 4. Press down into the outer frame so that the mark doesn't move out of place. 1 Outer frame 2 Inner frame 1 3 Surface of fabric 2 3 * Press down firmly until the outer frame and inner frame are at the same height. 5. After the fabric is clamped between the inner and outer frame tighten the adjusting screw by hand. 1 Tighten * To avoid stripping the screw, do not use a screwdriver to 1 tighten. Patterns (Memory Card) Patterns (Programmed in Machine) Sewing Chart Trouble shooting Error Maintenance Messages My Custom Stitch TM Retrieving Editing Embroidery Patterns Embroidering Characters and Decorative Stitches Utility Stitches Sewing Setting Up
-
 1
1 -
2
-
3
-
4
-
5
-
6
-
7
-
8
-
9
-
10
-
11
-
12
-
13
-
14
-
15
-
16
-
17
-
18
-
19
-
20
-
21
-
22
-
23
-
24
-
25
-
26
-
27
-
28
-
29
-
30
-
31
-
32
-
33
-
34
-
35
-
36
-
37
-
38
-
39
-
40
-
41
-
42
-
43
-
44
-
45
-
46
-
47
-
48
-
49
-
50
-
51
-
52
-
53
-
54
-
55
-
56
-
57
-
58
-
59
-
60
-
61
-
62
-
63
-
64
-
65
-
66
-
67
-
68
-
69
-
70
-
71
-
72
-
73
-
74
-
75
-
76
-
77
-
78
-
79
-
80
-
81
-
82
-
83
-
84
-
85
-
86
-
87
-
88
-
89
-
90
-
91
-
92
-
93
-
94
-
95
-
96
-
97
-
98
-
99
-
100
-
101
-
102
-
103
-
104
-
105
-
106
-
107
-
108
-
109
-
110
-
111
-
112
-
113
-
114
-
115
-
 116
116 -
 117
117 -
 118
118 -
 119
119 -
 120
120 -
 121
121 -
 122
122 -
 123
123 -
 124
124 -
 125
125 -
 126
126 -
127
-
128
-
129
-
130
-
131
-
132
-
133
-
134
-
135
-
136
-
137
-
138
-
139
-
140
-
141
-
142
-
143
-
144
-
145
-
146
-
147
-
148
-
149
-
150
-
151
-
152
-
153
-
154
-
155
-
156
-
157
-
158
-
159
-
160
-
161
-
162
-
163
-
164
-
165
-
166
-
167
-
168
-
169
-
170
-
171
-
172
-
173
-
174
-
175
-
176
-
177
-
178
-
179
-
180
-
181
-
182
-
183
-
184
-
185
-
186
-
187
-
188
-
189
-
190
-
191
-
192
-
193
-
194
-
195
-
196
 |
 |
