Brother International PC-8500 Users Manual - English - Page 57
Buttonhole Stitches, diameter + thickness of button.
 |
View all Brother International PC-8500 manuals
Add to My Manuals
Save this manual to your list of manuals |
Page 57 highlights
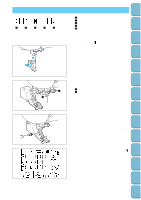
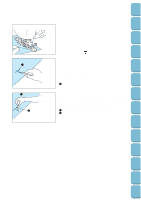
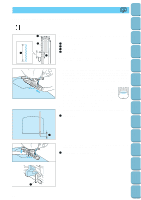
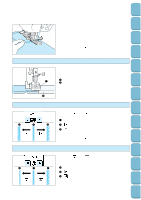
Setting Up Sewing Utility Stitches Characters and Decorative Stitches BUTTONHOLE STITCHES A 1 Suits, overcoat 7 Thin and medium fabric 2 Jeans, trousers (for horizontal holes) 3 Thick coats 8 Jeans, trousers 4 Thin or medium fabric 9 Thick coats 1 2 3 4 5 5 Stretch fabric with coarse 0 The first step in making a weaves bound buttonhole. 6 Stretch fabric 6 7 8 9 0 1. Mark the positions of the buttonholes on the fabric. * The maximum buttonhole length is 3 cm (1-3/16") (total of diameter + thickness of button). * Thick thread (#30) cannot be used in with the " " and " " patterns. 3 2. Draw out the button holder plate and insert the button. 5 1 Button holder plate Embroidering Editing Embroidery Patterns Retrieving My Custom Stitch TM Error Maintenance Messages Trouble shooting 1 5 A 3 5 3. Raise the presser foot and adjust the fabric so that the red mark on the foot is over the starting mark of your buttonhole. Lower the presser foot into position. 1 Mark on fabric for buttonhole position 2 Red mark on presser foot * After the presser foot lever has been lowered, set the presser foot so that there is no gap behind the section marked with an "A", otherwise the size of the stitch will not be correct. To do A this, push the presser foot towards the back of the machine as shown in the left figure. * Pass the thread underneath the presser foot. 4. Lower the buttonhole lever and position it behind the metal bracket on the buttonhole foot. 1 Metal bracket on the buttonhole foot 1 54 Sewing Chart Patterns (Programmed in Machine) Patterns (Memory Card)
-
 1
1 -
2
-
3
-
4
-
5
-
6
-
7
-
8
-
9
-
10
-
11
-
12
-
13
-
14
-
15
-
16
-
17
-
18
-
19
-
20
-
21
-
22
-
23
-
24
-
25
-
26
-
27
-
28
-
29
-
30
-
31
-
32
-
33
-
34
-
35
-
36
-
37
-
38
-
39
-
40
-
41
-
42
-
43
-
44
-
45
-
46
-
47
-
48
-
49
-
50
-
51
-
 52
52 -
 53
53 -
 54
54 -
 55
55 -
 56
56 -
 57
57 -
 58
58 -
 59
59 -
 60
60 -
 61
61 -
 62
62 -
63
-
64
-
65
-
66
-
67
-
68
-
69
-
70
-
71
-
72
-
73
-
74
-
75
-
76
-
77
-
78
-
79
-
80
-
81
-
82
-
83
-
84
-
85
-
86
-
87
-
88
-
89
-
90
-
91
-
92
-
93
-
94
-
95
-
96
-
97
-
98
-
99
-
100
-
101
-
102
-
103
-
104
-
105
-
106
-
107
-
108
-
109
-
110
-
111
-
112
-
113
-
114
-
115
-
116
-
117
-
118
-
119
-
120
-
121
-
122
-
123
-
124
-
125
-
126
-
127
-
128
-
129
-
130
-
131
-
132
-
133
-
134
-
135
-
136
-
137
-
138
-
139
-
140
-
141
-
142
-
143
-
144
-
145
-
146
-
147
-
148
-
149
-
150
-
151
-
152
-
153
-
154
-
155
-
156
-
157
-
158
-
159
-
160
-
161
-
162
-
163
-
164
-
165
-
166
-
167
-
168
-
169
-
170
-
171
-
172
-
173
-
174
-
175
-
176
-
177
-
178
-
179
-
180
-
181
-
182
-
183
-
184
-
185
-
186
-
187
-
188
-
189
-
190
-
191
-
192
-
193
-
194
-
195
-
196
 |
 |
