Brother International PC-8500 Users Manual - English - Page 52
Overcasting, When using, stitches - machine does not start
 |
View all Brother International PC-8500 manuals
Add to My Manuals
Save this manual to your list of manuals |
Page 52 highlights
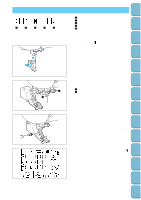
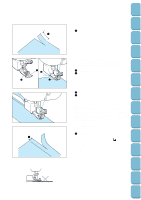
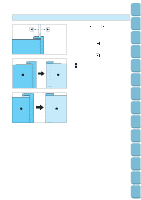
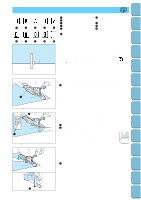
Setting Up Sewing Utility Stitches Characters and Decorative Stitches Embroidering OVERCASTING 1 2 3 4 5 6 G J 1 Thin and medium fabrics 2 Thick fabric 3 Thick and medium stretch fabric 4 Medium stretch fabric 5 Stretch fabric 6 Stretch fabric When using , or stitches Sew the fabric while placing fabric edge against the guide of 5 presser foot "G". 1 Guide * When the automatic thread cutting and automatic reinforcement stitch are preset, a reinforcement stitch will be sewn automatically at the start of sewing. Press the "REVERSE STITCH" button to sew a reinforcement stitch and trim the thread automatically at the finish of sewing. CAUTION After the stitch width has been adjusted, turn the balance wheel by hand and check that the needle does not touch the presser G foot. If it does touch, the needle may break and injury could result. When using , or stitches Attach presser foot "J" and let the needle drop slightly past the edge of the fabric before starting to sew. * When the automatic thread cutting and automatic reinforcement stitch are preset, a reinforcement stitch will be sewn automatically at the start of sewing. Press the "REVERSE STITCH" button to sew a reinforcement stitch and trim the thread automatically at the finish of sewing. Editing Embroidery Patterns Retrieving My Custom Stitch TM Error Maintenance Messages Trouble shooting Sewing Chart Patterns (Programmed in Machine) Patterns (Memory Card) 49
-
 1
1 -
2
-
3
-
4
-
5
-
6
-
7
-
8
-
9
-
10
-
11
-
12
-
13
-
14
-
15
-
16
-
17
-
18
-
19
-
20
-
21
-
22
-
23
-
24
-
25
-
26
-
27
-
28
-
29
-
30
-
31
-
32
-
33
-
34
-
35
-
36
-
37
-
38
-
39
-
40
-
41
-
42
-
43
-
44
-
45
-
46
-
 47
47 -
 48
48 -
 49
49 -
 50
50 -
 51
51 -
 52
52 -
 53
53 -
 54
54 -
 55
55 -
 56
56 -
 57
57 -
58
-
59
-
60
-
61
-
62
-
63
-
64
-
65
-
66
-
67
-
68
-
69
-
70
-
71
-
72
-
73
-
74
-
75
-
76
-
77
-
78
-
79
-
80
-
81
-
82
-
83
-
84
-
85
-
86
-
87
-
88
-
89
-
90
-
91
-
92
-
93
-
94
-
95
-
96
-
97
-
98
-
99
-
100
-
101
-
102
-
103
-
104
-
105
-
106
-
107
-
108
-
109
-
110
-
111
-
112
-
113
-
114
-
115
-
116
-
117
-
118
-
119
-
120
-
121
-
122
-
123
-
124
-
125
-
126
-
127
-
128
-
129
-
130
-
131
-
132
-
133
-
134
-
135
-
136
-
137
-
138
-
139
-
140
-
141
-
142
-
143
-
144
-
145
-
146
-
147
-
148
-
149
-
150
-
151
-
152
-
153
-
154
-
155
-
156
-
157
-
158
-
159
-
160
-
161
-
162
-
163
-
164
-
165
-
166
-
167
-
168
-
169
-
170
-
171
-
172
-
173
-
174
-
175
-
176
-
177
-
178
-
179
-
180
-
181
-
182
-
183
-
184
-
185
-
186
-
187
-
188
-
189
-
190
-
191
-
192
-
193
-
194
-
195
-
196
 |
 |
