Brother International PC-8500 Users Manual - English - Page 23
Auto-threading device, Guide Large hook - manual
 |
View all Brother International PC-8500 manuals
Add to My Manuals
Save this manual to your list of manuals |
Page 23 highlights
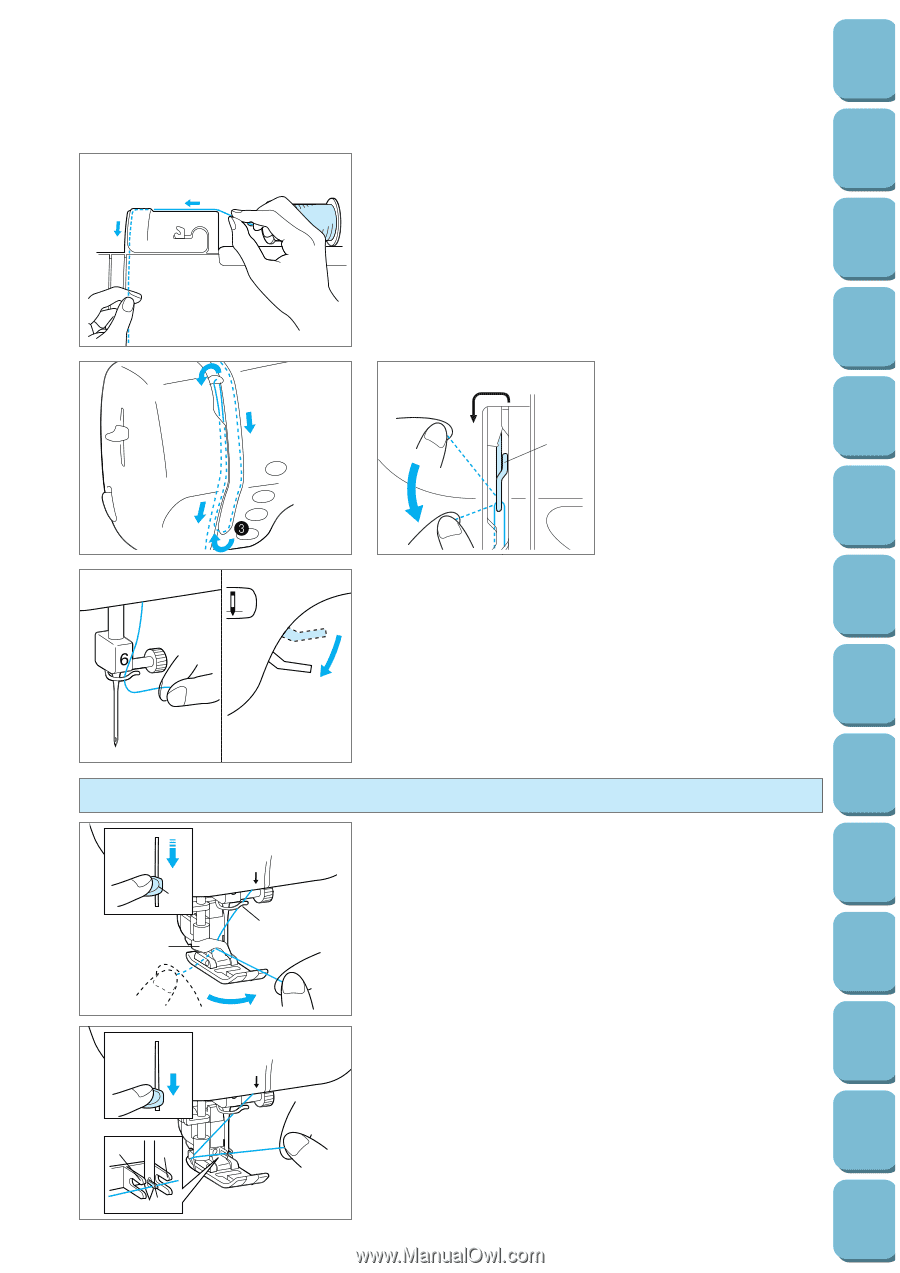
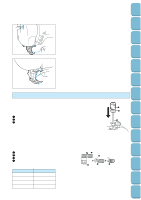
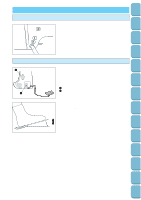
Setting Up Sewing Insert the thread firmly to the bottom of the guide. 1 2 4. Steady the spool thread in your right hand, take the end of the thread in your left hand, and keep it taut while passing it through the guides in the order shown by the numbers. Note Incorrect threading may cause damage. Utility Stitches Characters and Decorative Stitches Embroidering Editing Embroidery Patterns Retrieving My Custom Stitch TM Error Maintenance Messages Threading the take-up lever 1 Thread take-up lever 4 4 1 5 Auto-threading device 5 1 3 2 5 11 2 20 5. Lower the presser foot. 6. Thread the needle manually or using the auto-threading device. * You do not need to pull the bobbin thread up before you start sewing. 7. Pass the thread underneath the presser foot and pull it out from the rear of the machine by about 5 cm. Note Always raise the presser foot before removing the upper thread from the machine or damage may occur to the auto thread tension unit. 1. Guide the thread through the wire loop and gently pull the thread towards you. 1 Needle threader lever 2 Guide (Large hook) 3 Wire loop * Lowering the presser foot will engage the automatic tension and will allow you to grip the thread as you proceed. 2. Lower the needle threader lever all the way down using your left index finger. Check that the thread is held by the guide (large hook) and that the hook on the needle threader has passed through the eye of the needle. 1 Second set of hooks 2 Third hook 3. As you lower the needle threader lever drape the thread to the left and the large hook will catch the thread. When the needle threader lever is in the lowest position, drape the thread across the eye of the needle. Trouble shooting Sewing Chart Patterns (Programmed in Machine) Patterns (Memory Card)
-
 1
1 -
2
-
3
-
4
-
5
-
6
-
7
-
8
-
9
-
10
-
11
-
12
-
13
-
14
-
15
-
16
-
17
-
 18
18 -
 19
19 -
 20
20 -
 21
21 -
 22
22 -
 23
23 -
 24
24 -
 25
25 -
 26
26 -
 27
27 -
 28
28 -
29
-
30
-
31
-
32
-
33
-
34
-
35
-
36
-
37
-
38
-
39
-
40
-
41
-
42
-
43
-
44
-
45
-
46
-
47
-
48
-
49
-
50
-
51
-
52
-
53
-
54
-
55
-
56
-
57
-
58
-
59
-
60
-
61
-
62
-
63
-
64
-
65
-
66
-
67
-
68
-
69
-
70
-
71
-
72
-
73
-
74
-
75
-
76
-
77
-
78
-
79
-
80
-
81
-
82
-
83
-
84
-
85
-
86
-
87
-
88
-
89
-
90
-
91
-
92
-
93
-
94
-
95
-
96
-
97
-
98
-
99
-
100
-
101
-
102
-
103
-
104
-
105
-
106
-
107
-
108
-
109
-
110
-
111
-
112
-
113
-
114
-
115
-
116
-
117
-
118
-
119
-
120
-
121
-
122
-
123
-
124
-
125
-
126
-
127
-
128
-
129
-
130
-
131
-
132
-
133
-
134
-
135
-
136
-
137
-
138
-
139
-
140
-
141
-
142
-
143
-
144
-
145
-
146
-
147
-
148
-
149
-
150
-
151
-
152
-
153
-
154
-
155
-
156
-
157
-
158
-
159
-
160
-
161
-
162
-
163
-
164
-
165
-
166
-
167
-
168
-
169
-
170
-
171
-
172
-
173
-
174
-
175
-
176
-
177
-
178
-
179
-
180
-
181
-
182
-
183
-
184
-
185
-
186
-
187
-
188
-
189
-
190
-
191
-
192
-
193
-
194
-
195
-
196
 |
 |