Brother International PC-8500 Users Manual - English - Page 67
Button Sewing, This stitch is used for attaching buttons.
 |
View all Brother International PC-8500 manuals
Add to My Manuals
Save this manual to your list of manuals |
Page 67 highlights
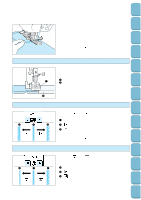
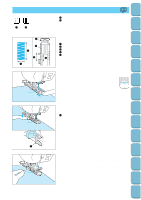
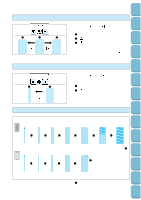
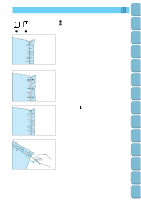
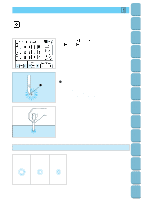
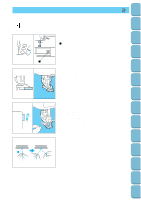
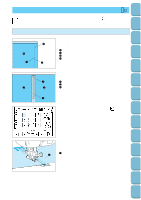
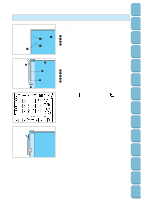
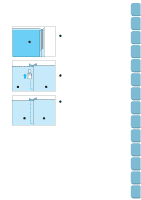
Setting Up M Sewing Utility Stitches Characters and Decorative Stitches Embroidering Editing Embroidery Patterns BUTTON SEWING This stitch is used for attaching buttons. Do not use the automatic thread cutter when attaching buttons, (the threads will become difficult to handle and tying off will not be possible). 1. Raise the presser foot lever and slide the feed dog adjustment lever to the right to lower the feed dog. 1 Feed dog adjustment lever 1 2. Attach button fitting foot "M", place the button into the presser foot and then lower the presser foot. 3. Turn the balance wheel to check that the needle goes into each of the holes in the button correctly, and then start sewing. Once sewing is completed, the machine will stop automatically. * If extra attachment strength is needed, carry out the button 6 sewing operation twice. 4. Once sewing is completed, return the feed dog to its original position, pull the bobbin thread at the sewing end down and pull the upper thread at the sewing end through to the reverse side of the fabric. Then tie the thread ends together and cut the threads at the sewing start. Retrieving My Custom Stitch TM Error Maintenance Messages Trouble shooting Sewing Chart Patterns (Programmed in Machine) Patterns (Memory Card) 64
-
 1
1 -
2
-
3
-
4
-
5
-
6
-
7
-
8
-
9
-
10
-
11
-
12
-
13
-
14
-
15
-
16
-
17
-
18
-
19
-
20
-
21
-
22
-
23
-
24
-
25
-
26
-
27
-
28
-
29
-
30
-
31
-
32
-
33
-
34
-
35
-
36
-
37
-
38
-
39
-
40
-
41
-
42
-
43
-
44
-
45
-
46
-
47
-
48
-
49
-
50
-
51
-
52
-
53
-
54
-
55
-
56
-
57
-
58
-
59
-
60
-
61
-
 62
62 -
 63
63 -
 64
64 -
 65
65 -
 66
66 -
 67
67 -
 68
68 -
 69
69 -
 70
70 -
 71
71 -
 72
72 -
73
-
74
-
75
-
76
-
77
-
78
-
79
-
80
-
81
-
82
-
83
-
84
-
85
-
86
-
87
-
88
-
89
-
90
-
91
-
92
-
93
-
94
-
95
-
96
-
97
-
98
-
99
-
100
-
101
-
102
-
103
-
104
-
105
-
106
-
107
-
108
-
109
-
110
-
111
-
112
-
113
-
114
-
115
-
116
-
117
-
118
-
119
-
120
-
121
-
122
-
123
-
124
-
125
-
126
-
127
-
128
-
129
-
130
-
131
-
132
-
133
-
134
-
135
-
136
-
137
-
138
-
139
-
140
-
141
-
142
-
143
-
144
-
145
-
146
-
147
-
148
-
149
-
150
-
151
-
152
-
153
-
154
-
155
-
156
-
157
-
158
-
159
-
160
-
161
-
162
-
163
-
164
-
165
-
166
-
167
-
168
-
169
-
170
-
171
-
172
-
173
-
174
-
175
-
176
-
177
-
178
-
179
-
180
-
181
-
182
-
183
-
184
-
185
-
186
-
187
-
188
-
189
-
190
-
191
-
192
-
193
-
194
-
195
-
196
 |
 |
