Brother International PC-8500 Users Manual - English - Page 62
Thick fabrics, Changing the bar tack stitch length, thick, touch
 |
View all Brother International PC-8500 manuals
Add to My Manuals
Save this manual to your list of manuals |
Page 62 highlights
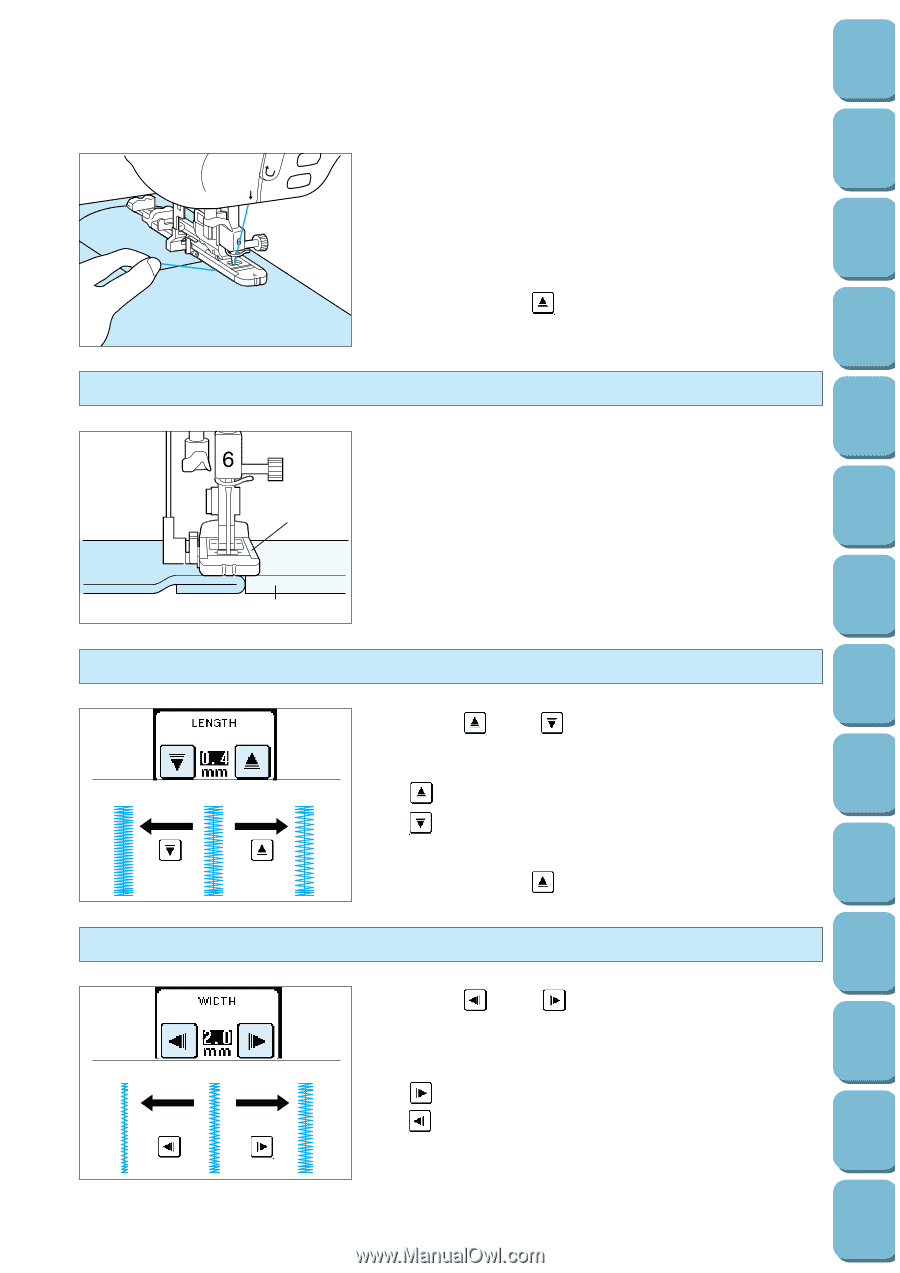
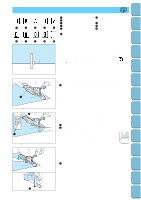
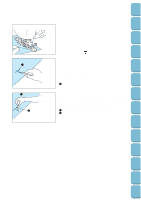
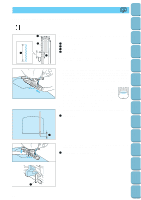
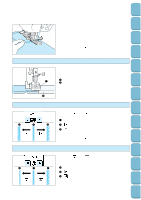
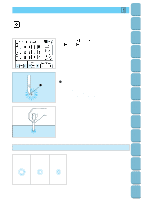
Setting Up Sewing Utility Stitches Characters and Decorative Stitches Embroidering Editing Embroidery Patterns Retrieving 3 5 Thick fabrics 1 5. Start the machine while holding the end of the upper thread. * The machine will sew a reinforcement stitch and stop automatically after sewing is completed. * If you touch the automatic thread cutting key prior to sewing, the machine cuts both threads automatically after sewing is completed. * If the fabric will not feed (for instance, because it is too thick), touch the " " stitch length setting key to increase the stitch length. Place another piece of fabric or cardboard at the back as thick as original. This sets the presser foot to the same height and allows for easier feeding. 1 Presser foot 2 Cardboard 2 Changing the bar tack stitch length Touch the " " and " " stitch length setting keys to adjust the stitch length. 1 "AUTO" length 0.4 mm (1/64") 3 1 2 2 " " : Longer 3 " " : Shorter * If the fabric will not feed (for instance, because it is too thick), touch the " " stitch length setting key to increase the stitch length. Changing the bar tack stitch width Touch the " " and " " stitch width setting keys to adjust the stitch width. 3 1 2 1 "AUTO" width 2.0 mm (1/16") 2 " ": Wider 3 " ": Narrower My Custom Stitch TM Error Maintenance Messages Trouble shooting Sewing Chart Patterns (Programmed in Machine) Patterns (Memory Card) 59
-
 1
1 -
2
-
3
-
4
-
5
-
6
-
7
-
8
-
9
-
10
-
11
-
12
-
13
-
14
-
15
-
16
-
17
-
18
-
19
-
20
-
21
-
22
-
23
-
24
-
25
-
26
-
27
-
28
-
29
-
30
-
31
-
32
-
33
-
34
-
35
-
36
-
37
-
38
-
39
-
40
-
41
-
42
-
43
-
44
-
45
-
46
-
47
-
48
-
49
-
50
-
51
-
52
-
53
-
54
-
55
-
56
-
 57
57 -
 58
58 -
 59
59 -
 60
60 -
 61
61 -
 62
62 -
 63
63 -
 64
64 -
 65
65 -
 66
66 -
 67
67 -
68
-
69
-
70
-
71
-
72
-
73
-
74
-
75
-
76
-
77
-
78
-
79
-
80
-
81
-
82
-
83
-
84
-
85
-
86
-
87
-
88
-
89
-
90
-
91
-
92
-
93
-
94
-
95
-
96
-
97
-
98
-
99
-
100
-
101
-
102
-
103
-
104
-
105
-
106
-
107
-
108
-
109
-
110
-
111
-
112
-
113
-
114
-
115
-
116
-
117
-
118
-
119
-
120
-
121
-
122
-
123
-
124
-
125
-
126
-
127
-
128
-
129
-
130
-
131
-
132
-
133
-
134
-
135
-
136
-
137
-
138
-
139
-
140
-
141
-
142
-
143
-
144
-
145
-
146
-
147
-
148
-
149
-
150
-
151
-
152
-
153
-
154
-
155
-
156
-
157
-
158
-
159
-
160
-
161
-
162
-
163
-
164
-
165
-
166
-
167
-
168
-
169
-
170
-
171
-
172
-
173
-
174
-
175
-
176
-
177
-
178
-
179
-
180
-
181
-
182
-
183
-
184
-
185
-
186
-
187
-
188
-
189
-
190
-
191
-
192
-
193
-
194
-
195
-
196
 |
 |