Brother International PC-8500 Users Manual - English - Page 141
embroidery area., Press this key to delete the pattern being edited. See
 |
View all Brother International PC-8500 manuals
Add to My Manuals
Save this manual to your list of manuals |
Page 141 highlights
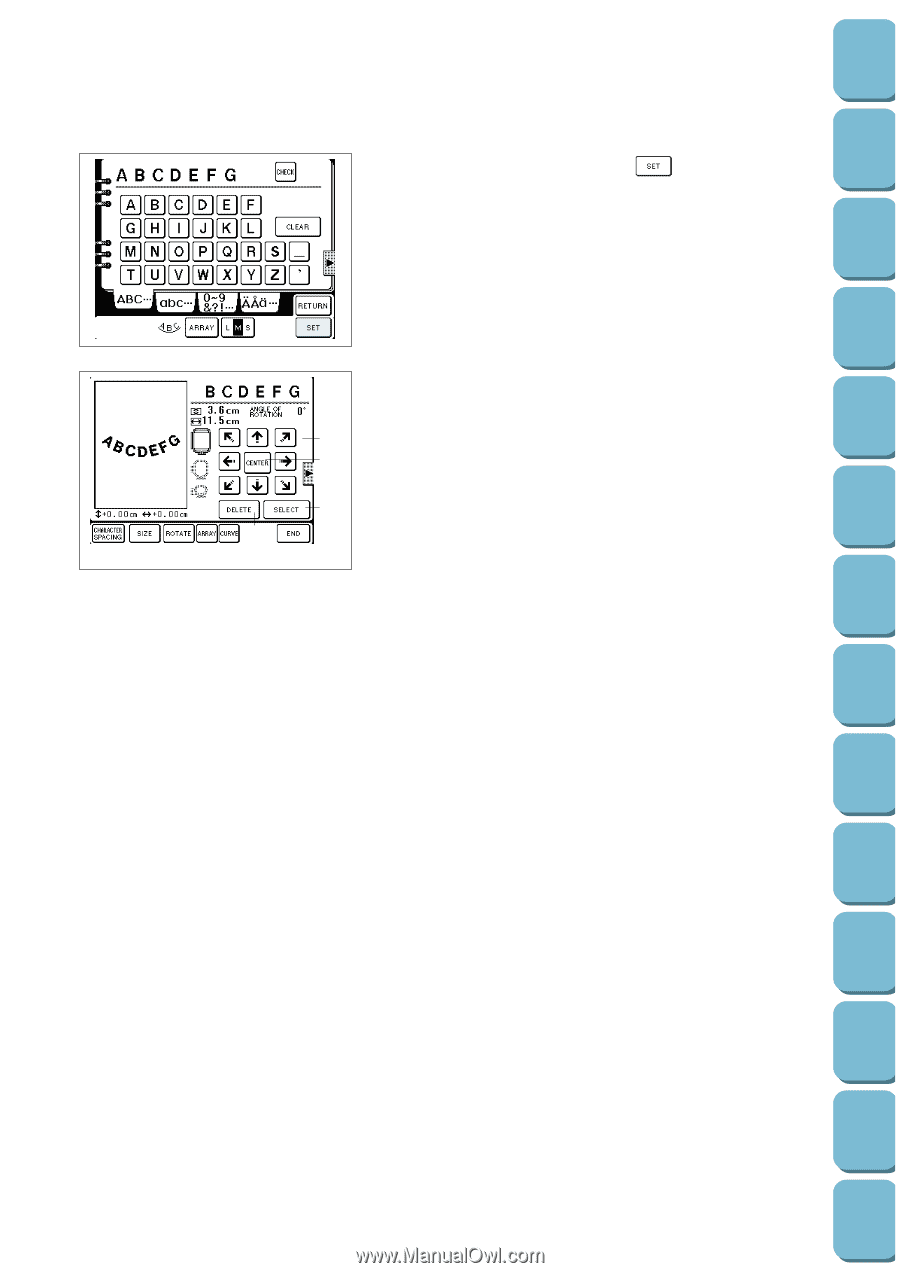
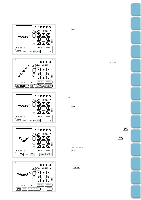
Setting Up Sewing Utility Stitches Characters and Decorative Stitches Embroidering 5. Select character, then press the " " key. 1 2 4 3 5 6 7 89 0 After a while the characters will be displayed. The characters will be laid out in the center of the embroidery area. 1 Press these keys to move patterns in the direction of the arrows. (See page 139 for details.) 2 Press this key to bring the pattern back to the center of the embroidery area. 3 Press this key to delete the pattern being edited. (See page 141 for details.) 4 Use this key to change the pattern to be edited. 5 Use this key to change character spacing. (See page 139 for details.) 6 Use this key to change character size. (See page 140 for details.) 7 Use this key to rotate characters to the right or left in 5- degree steps. (See page 140 for details.) 8 Press this key when you want to change character configuration. (See page 141 for details.) 9 Press this key when you want to change the extent of a curve. (See page 141 for details.) 0 Press this key to move to the next stage. Editing Embroidery Patterns Retrieving My Custom Stitch TM Error Maintenance Messages Trouble shooting Sewing Chart Patterns (Programmed in Machine) Patterns (Memory Card) 138
-
 1
1 -
2
-
3
-
4
-
5
-
6
-
7
-
8
-
9
-
10
-
11
-
12
-
13
-
14
-
15
-
16
-
17
-
18
-
19
-
20
-
21
-
22
-
23
-
24
-
25
-
26
-
27
-
28
-
29
-
30
-
31
-
32
-
33
-
34
-
35
-
36
-
37
-
38
-
39
-
40
-
41
-
42
-
43
-
44
-
45
-
46
-
47
-
48
-
49
-
50
-
51
-
52
-
53
-
54
-
55
-
56
-
57
-
58
-
59
-
60
-
61
-
62
-
63
-
64
-
65
-
66
-
67
-
68
-
69
-
70
-
71
-
72
-
73
-
74
-
75
-
76
-
77
-
78
-
79
-
80
-
81
-
82
-
83
-
84
-
85
-
86
-
87
-
88
-
89
-
90
-
91
-
92
-
93
-
94
-
95
-
96
-
97
-
98
-
99
-
100
-
101
-
102
-
103
-
104
-
105
-
106
-
107
-
108
-
109
-
110
-
111
-
112
-
113
-
114
-
115
-
116
-
117
-
118
-
119
-
120
-
121
-
122
-
123
-
124
-
125
-
126
-
127
-
128
-
129
-
130
-
131
-
132
-
133
-
134
-
135
-
 136
136 -
 137
137 -
 138
138 -
 139
139 -
 140
140 -
 141
141 -
 142
142 -
 143
143 -
 144
144 -
 145
145 -
 146
146 -
147
-
148
-
149
-
150
-
151
-
152
-
153
-
154
-
155
-
156
-
157
-
158
-
159
-
160
-
161
-
162
-
163
-
164
-
165
-
166
-
167
-
168
-
169
-
170
-
171
-
172
-
173
-
174
-
175
-
176
-
177
-
178
-
179
-
180
-
181
-
182
-
183
-
184
-
185
-
186
-
187
-
188
-
189
-
190
-
191
-
192
-
193
-
194
-
195
-
196
 |
 |