Brother International PC-8500 Users Manual - English - Page 168
Moving part or all of a pattern, Inserting new points, Touch the BLOCK MOVE key.
 |
View all Brother International PC-8500 manuals
Add to My Manuals
Save this manual to your list of manuals |
Page 168 highlights
Setting Up Sewing Utility Stitches Characters and Decorative Stitches Embroidering Editing Embroidery Patterns Moving part or all of a pattern 1. Touch the or " " key to move the " " to the start point which you would like to move. 2. Touch the "BLOCK MOVE" key. The points behind the " " will be enclosed by a " ". (This indicates the area which is to be moved.) 3. Touch the " " or " " key to move to the desired position, and then touch the "SET" key. Inserting new points 1. Touch the or " " key to move the " " to the point before the place where you would like to enter a new point. Retrieving My Custom Stitch TM Error Maintenance Messages Trouble shooting Sewing Chart Patterns (Programmed in Machine) Patterns (Memory Card) 165
-
 1
1 -
2
-
3
-
4
-
5
-
6
-
7
-
8
-
9
-
10
-
11
-
12
-
13
-
14
-
15
-
16
-
17
-
18
-
19
-
20
-
21
-
22
-
23
-
24
-
25
-
26
-
27
-
28
-
29
-
30
-
31
-
32
-
33
-
34
-
35
-
36
-
37
-
38
-
39
-
40
-
41
-
42
-
43
-
44
-
45
-
46
-
47
-
48
-
49
-
50
-
51
-
52
-
53
-
54
-
55
-
56
-
57
-
58
-
59
-
60
-
61
-
62
-
63
-
64
-
65
-
66
-
67
-
68
-
69
-
70
-
71
-
72
-
73
-
74
-
75
-
76
-
77
-
78
-
79
-
80
-
81
-
82
-
83
-
84
-
85
-
86
-
87
-
88
-
89
-
90
-
91
-
92
-
93
-
94
-
95
-
96
-
97
-
98
-
99
-
100
-
101
-
102
-
103
-
104
-
105
-
106
-
107
-
108
-
109
-
110
-
111
-
112
-
113
-
114
-
115
-
116
-
117
-
118
-
119
-
120
-
121
-
122
-
123
-
124
-
125
-
126
-
127
-
128
-
129
-
130
-
131
-
132
-
133
-
134
-
135
-
136
-
137
-
138
-
139
-
140
-
141
-
142
-
143
-
144
-
145
-
146
-
147
-
148
-
149
-
150
-
151
-
152
-
153
-
154
-
155
-
156
-
157
-
158
-
159
-
160
-
161
-
162
-
 163
163 -
 164
164 -
 165
165 -
 166
166 -
 167
167 -
 168
168 -
 169
169 -
 170
170 -
 171
171 -
 172
172 -
 173
173 -
174
-
175
-
176
-
177
-
178
-
179
-
180
-
181
-
182
-
183
-
184
-
185
-
186
-
187
-
188
-
189
-
190
-
191
-
192
-
193
-
194
-
195
-
196
 |
 |
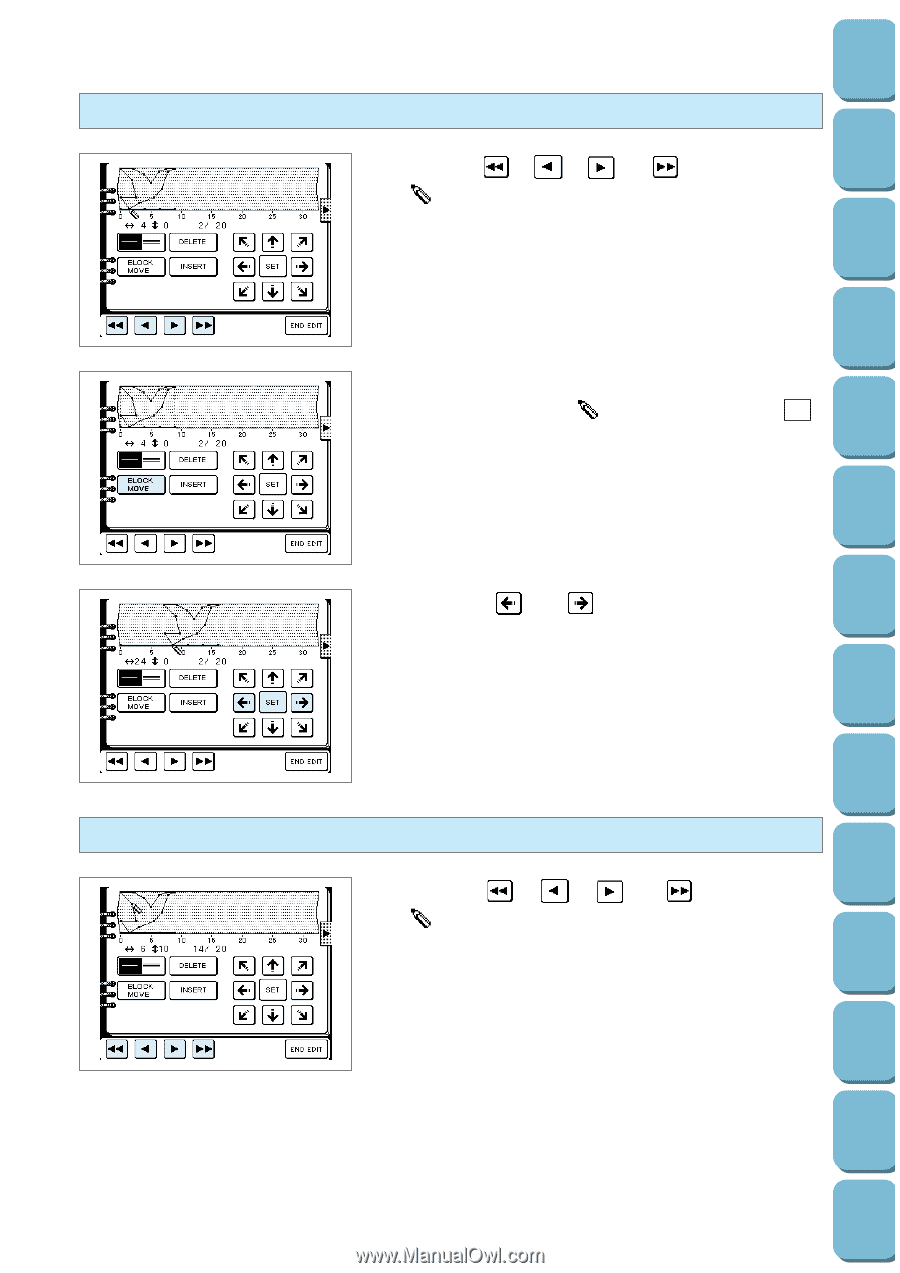
3.
Touch the “
” or “
” key to move to the desired
position, and then touch the “SET” key.
1.
Touch the “
”, “
”, “
” or “
” key to move the
“
” to the start point which you would like to move.
2.
Touch the “BLOCK MOVE” key.
The points behind the “
” will be enclosed by a “
”.
(This indicates the area which is to be moved.)
Moving part or all of a pattern
1.
Touch the “
”, “
”, “
” or “
” key to move the
“
” to the point before the place where you would like to
enter a new point.
Inserting new points
165
Utility
Stitches
Characters
and
Decorative
Stitches
Embroidering
Editing
Embroidery
Patterns
Retrieving
My
Custom
Stitch
TM
Maintenance
Error
Messages
Trouble
shooting
Sewing
Chart
Patterns
(Programmed
in Machine)
Patterns
(Memory
Card)
Sewing
Setting Up