Brother International PC-8500 Users Manual - English - Page 184
Trouble with threads and stitches, Before calling for service
 |
View all Brother International PC-8500 manuals
Add to My Manuals
Save this manual to your list of manuals |
Page 184 highlights
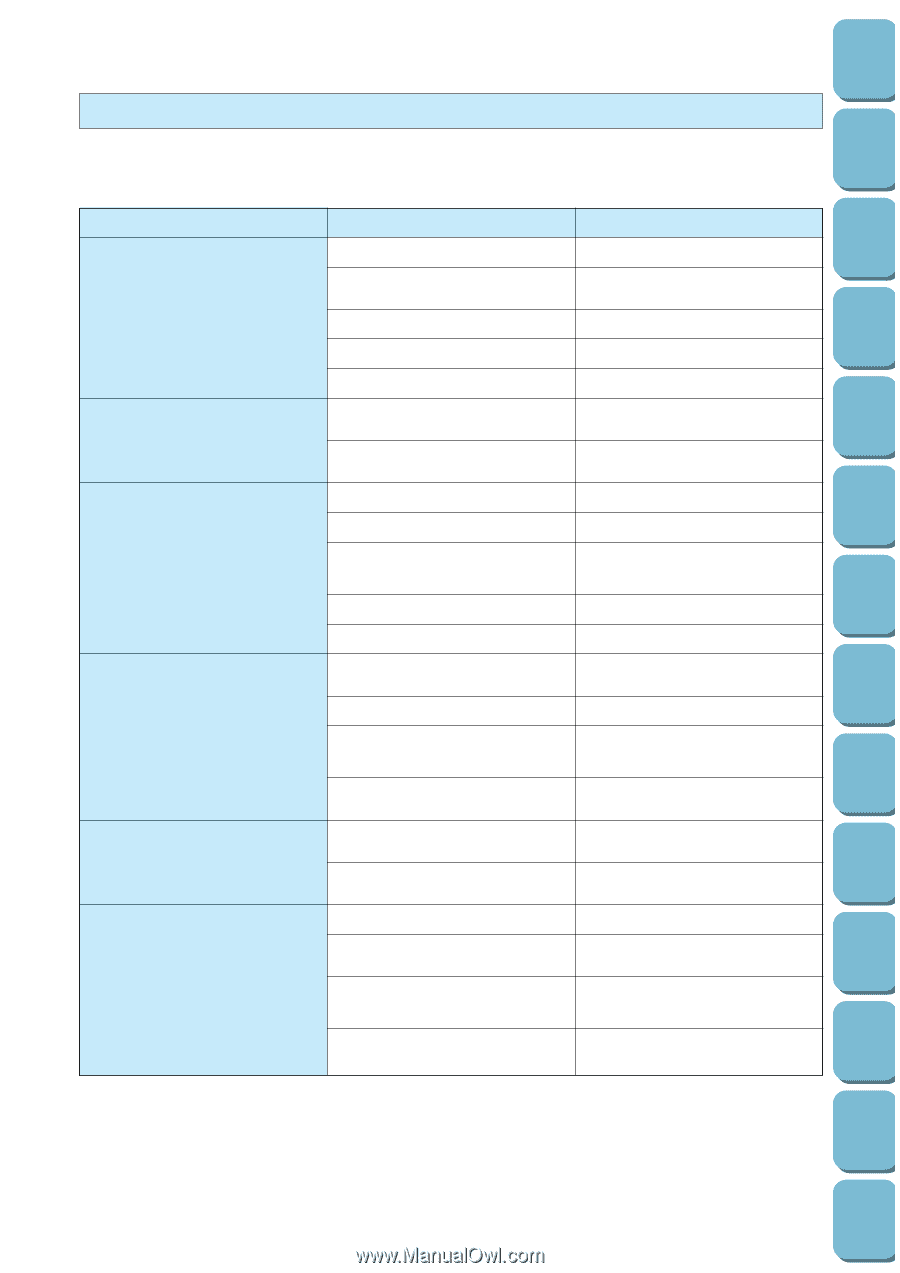
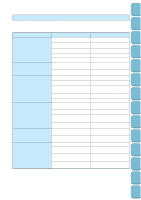
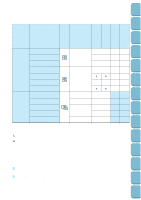
Setting Up Sewing Utility Stitches Characters and Decorative Stitches Embroidering Editing Embroidery Patterns Retrieving Trouble with threads and stitches Before calling for service, check the following items. If the problem still persists, contact the place of purchase or your nearest Brother dealer. Symptom 1. Upper thread breaks 2. Bobbin thread breaks 3. Skipped stitches 4. Fabric puckers 5. Inability to thread needle 6. Inability for thread tension control Probable cause Remedy 1. Upper threading is not correct. 1. Re-thread upper thread. 2. Upper thread is tangled. 2. Remove thread ends in the race or shuttle. 3. Spool of thread is not correctly set. 3. Set spool of thread correctly. 4. Correct needle is not used. 4. Change to proper needle. 5. Shuttle is damaged. 5. Contact service center. 1. Upper thread is tangled. 1. Remove thread ends in the race or inner shuttle or from around spool pin. 2. Bobbin is not threaded properly in the shuttle. 2. Set bobbin properly and pull out the bobbin thread. 1. Needle is not correctly inserted. 1. Insert needle properly. 2. Correct needle is not used. 2. Change to proper needle. 3. The combination of fabric, thread and needle is not correct. 3. Check the "RELATED CHART OF SEWING FABRICS, THREAD AND NEEDLE" on page 172. 4. Dust is clinging under the needle plate. 4. Remove dust by cleaning with a brush. 5. Upper threading is not correct. 5. Re-thread upper thread. 1. Threading is not correct 1. Re-thread upper and bobbin thread correctly. 2. Correct needle is not used. 2. Change to proper needle. 3. Combination of fabric, thread and needle is not correct. 3. Check "RELATED CHART OF SEWING FABRICS, THREAD AND NEEDLE" on page 172. 4. Check if thread tension is set at "AUTO" position, 4. Refer to "THREAD TENSION" on page 29. 1. Needle position is not collect. 1. Set needle at proper position using "NEEDLE POSITION" button. 2. Hook of needle threader does not fit into the eye of the needle. 2. Set needle at proper position using "NEEDLE POSITION" button. 1. Upper threading is not correct. 1. Re-thread upper thread. 2. Set of bobbin thread is not correct. 2. Set bobbin properly and pull out the bobbin thread. 3. Combination of fabric, thread and needle is not correct. 3. Check "RELATED CHART OF SEWING FABRICS, THREAD AND NEEDLE" on page 172. 4. Check if the thread tension is set at "AUTO" position. 4. Refer to "THREAD TENSION" on page 29. My Custom Stitch TM Error Maintenance Messages Trouble shooting Sewing Chart Patterns (Programmed in Machine) Patterns (Memory Card) 181
-
 1
1 -
2
-
3
-
4
-
5
-
6
-
7
-
8
-
9
-
10
-
11
-
12
-
13
-
14
-
15
-
16
-
17
-
18
-
19
-
20
-
21
-
22
-
23
-
24
-
25
-
26
-
27
-
28
-
29
-
30
-
31
-
32
-
33
-
34
-
35
-
36
-
37
-
38
-
39
-
40
-
41
-
42
-
43
-
44
-
45
-
46
-
47
-
48
-
49
-
50
-
51
-
52
-
53
-
54
-
55
-
56
-
57
-
58
-
59
-
60
-
61
-
62
-
63
-
64
-
65
-
66
-
67
-
68
-
69
-
70
-
71
-
72
-
73
-
74
-
75
-
76
-
77
-
78
-
79
-
80
-
81
-
82
-
83
-
84
-
85
-
86
-
87
-
88
-
89
-
90
-
91
-
92
-
93
-
94
-
95
-
96
-
97
-
98
-
99
-
100
-
101
-
102
-
103
-
104
-
105
-
106
-
107
-
108
-
109
-
110
-
111
-
112
-
113
-
114
-
115
-
116
-
117
-
118
-
119
-
120
-
121
-
122
-
123
-
124
-
125
-
126
-
127
-
128
-
129
-
130
-
131
-
132
-
133
-
134
-
135
-
136
-
137
-
138
-
139
-
140
-
141
-
142
-
143
-
144
-
145
-
146
-
147
-
148
-
149
-
150
-
151
-
152
-
153
-
154
-
155
-
156
-
157
-
158
-
159
-
160
-
161
-
162
-
163
-
164
-
165
-
166
-
167
-
168
-
169
-
170
-
171
-
172
-
173
-
174
-
175
-
176
-
177
-
178
-
 179
179 -
 180
180 -
 181
181 -
 182
182 -
 183
183 -
 184
184 -
 185
185 -
 186
186 -
 187
187 -
 188
188 -
 189
189 -
190
-
191
-
192
-
193
-
194
-
195
-
196
 |
 |