Cisco SPA112 Administration Guide - Page 14
Quick Setup for Voice over IP Service - caller id
 |
View all Cisco SPA112 manuals
Add to My Manuals
Save this manual to your list of manuals |
Page 14 highlights
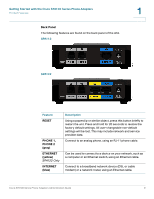
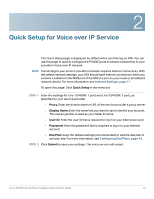
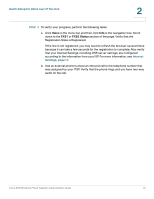
2 Quick Setup for Voice over IP Service The Quick Setup page is displayed by default when you first log on ATA. You can use this page to quickly configure the PHONE ports to ensure connectivity to your provider's Voice over IP network. NOTE Connecting to your service provider's network requires Internet connectivity. With the default network settings, your ATA should have Internet connectivity when you connect a cable from the WAN port of the ATA to a port on your router or broadband network device. For more information, see Internet Settings, page 17. To open this page: Click Quick Setup in the menu bar. STEP 1 Enter the settings for Line 1 (PHONE 1 port) and Line 2 (PHONE 2 port), as specified by your service provider. • Proxy: Enter the domain name or URL of the service provider's proxy server. • Display Name: Enter the name that you want to use to identify your account. This name typically is used as your Caller ID name. • User ID: Enter the user ID that is required to log in to your Internet account. • Password: Enter the password that is required to log in to your Internet account. • Dial Plan: Keep the default settings (recommended) or edit the dial plan to suit your site. For more information, see Configuring Dial Plans, page 42. STEP 2 Click Submit to save your settings. The voice service will restart. Cisco SPA100 Series Phone Adapters Administration Guide 14
-
 1
1 -
2
-
3
-
4
-
5
-
6
-
7
-
8
-
 9
9 -
 10
10 -
 11
11 -
 12
12 -
 13
13 -
 14
14 -
 15
15 -
 16
16 -
 17
17 -
 18
18 -
 19
19 -
20
-
21
-
22
-
23
-
24
-
25
-
26
-
27
-
28
-
29
-
30
-
31
-
32
-
33
-
34
-
35
-
36
-
37
-
38
-
39
-
40
-
41
-
42
-
43
-
44
-
45
-
46
-
47
-
48
-
49
-
50
-
51
-
52
-
53
-
54
-
55
-
56
-
57
-
58
-
59
-
60
-
61
-
62
-
63
-
64
-
65
-
66
-
67
-
68
-
69
-
70
-
71
-
72
-
73
-
74
-
75
-
76
-
77
-
78
-
79
-
80
-
81
-
82
-
83
-
84
-
85
-
86
-
87
-
88
-
89
-
90
-
91
-
92
-
93
-
94
-
95
-
96
-
97
-
98
-
99
-
100
-
101
-
102
-
103
-
104
-
105
-
106
-
107
-
108
-
109
-
110
-
111
-
112
-
113
-
114
-
115
-
116
-
117
-
118
-
119
-
120
-
121
-
122
-
123
-
124
-
125
-
126
-
127
-
128
-
129
-
130
-
131
-
132
-
133
-
134
-
135
-
136
-
137
-
138
-
139
-
140
-
141
-
142
-
143
-
144
-
145
-
146
-
147
 |
 |