Dell PowerVault 56F Dell PowerVault 51F 8-Port Fibre Channel Switch Insta - Page 110
Removing the Power Supply,
 |
View all Dell PowerVault 56F manuals
Add to My Manuals
Save this manual to your list of manuals |
Page 110 highlights
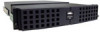
Removing the Power Supply To remove the power supply, you must perform the following steps. CAUTION: There are two models of the PowerVault 51F switch. Model 2401 contains one power supply unit and model 2402 contains two. When replacing a power supply unit on the 2401 switch, you must first turn off the switch's power. You do not need to turn off the power to the good power supply on the 2402 switch. 1. Remove any external cabling attached to the power supply. 2. Pull out and lift up the metal handle from the top of the power supply unit; see Figure 6-1. 3. Gently pull the unit out. handle Figure 6-1. Removing the Power Supply Installing the Power Supply 1. Slide the new power supply unit into its slot until the unit connects to the back panel. 2. Lock the metal handle into the power supply by pushing the handle down and sliding it up into place. 3. Reattach external cabling to the power supply. The switch automatically runs power-on self-test (POST) on a 2401 switch because all the power was off. 4. Check for error messages via Telnet. 6-2 Dell PowerVault 51F 8-Port Fibre Channel Switch Installation and Troubleshooting Guide
-
 1
1 -
2
-
3
-
4
-
5
-
6
-
7
-
8
-
9
-
10
-
11
-
12
-
13
-
14
-
15
-
16
-
17
-
18
-
19
-
20
-
21
-
22
-
23
-
24
-
25
-
26
-
27
-
28
-
29
-
30
-
31
-
32
-
33
-
34
-
35
-
36
-
37
-
38
-
39
-
40
-
41
-
42
-
43
-
44
-
45
-
46
-
47
-
48
-
49
-
50
-
51
-
52
-
53
-
54
-
55
-
56
-
57
-
58
-
59
-
60
-
61
-
62
-
63
-
64
-
65
-
66
-
67
-
68
-
69
-
70
-
71
-
72
-
73
-
74
-
75
-
76
-
77
-
78
-
79
-
80
-
81
-
82
-
83
-
84
-
85
-
86
-
87
-
88
-
89
-
90
-
91
-
92
-
93
-
94
-
95
-
96
-
97
-
98
-
99
-
100
-
101
-
102
-
103
-
104
-
 105
105 -
 106
106 -
 107
107 -
 108
108 -
 109
109 -
 110
110 -
 111
111 -
 112
112 -
 113
113 -
 114
114 -
 115
115 -
116
-
117
-
118
-
119
-
120
-
121
-
122
-
123
-
124
-
125
-
126
-
127
-
128
-
129
-
130
-
131
-
132
-
133
-
134
-
135
-
136
-
137
-
138
-
139
-
140
-
141
-
142
-
143
-
144
-
145
-
146
-
147
-
148
-
149
-
150
-
151
-
152
-
153
-
154
-
155
-
156
 |
 |
