Dell PowerVault 56F Dell PowerVault 51F 8-Port Fibre Channel Switch Insta - Page 38
Installing the Switch in the Rack,
 |
View all Dell PowerVault 56F manuals
Add to My Manuals
Save this manual to your list of manuals |
Page 38 highlights
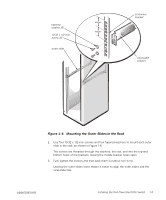
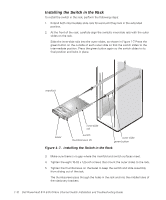
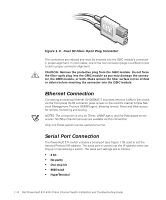
Installing the Switch in the Rack To install the switch in the rack, perform the following steps: 1. Extend both intermediate slide rails forward until they lock in the extended position. 2. At the front of the rack, carefully align the switch's inner-slide rails with the outer slides on the rack. Slide the inner-slide rails into the outer slides, as shown in Figure 1-7. Press the green button on the outside of each outer slide so that the switch slides to the intermediate position. Press the green button again so the switch slides to its final position and locks in place. manifold inner-slide rail bezel switch thumbscrews (2) outer slide green button Figure 1-7. Installing the Switch in the Rack 3. Make sure there is no gap where the manifold and switch surfaces meet. 4. Tighten the eight 10-32 x 1/2-inch screws that mount the outer slides to the rack. 5. Tighten the thumbscrews on the bezel to keep the switch and slide assembly from sliding out of the rack. The thumbscrews pass through the holes in the rack and into the middle holes of the stationary brackets. 1-10 Dell PowerVault 51F 8-Port Fibre Channel Switch Installation and Troubleshooting Guide
-
 1
1 -
2
-
3
-
4
-
5
-
6
-
7
-
8
-
9
-
10
-
11
-
12
-
13
-
14
-
15
-
16
-
17
-
18
-
19
-
20
-
21
-
22
-
23
-
24
-
25
-
26
-
27
-
28
-
29
-
30
-
31
-
32
-
 33
33 -
 34
34 -
 35
35 -
 36
36 -
 37
37 -
 38
38 -
 39
39 -
 40
40 -
 41
41 -
 42
42 -
 43
43 -
44
-
45
-
46
-
47
-
48
-
49
-
50
-
51
-
52
-
53
-
54
-
55
-
56
-
57
-
58
-
59
-
60
-
61
-
62
-
63
-
64
-
65
-
66
-
67
-
68
-
69
-
70
-
71
-
72
-
73
-
74
-
75
-
76
-
77
-
78
-
79
-
80
-
81
-
82
-
83
-
84
-
85
-
86
-
87
-
88
-
89
-
90
-
91
-
92
-
93
-
94
-
95
-
96
-
97
-
98
-
99
-
100
-
101
-
102
-
103
-
104
-
105
-
106
-
107
-
108
-
109
-
110
-
111
-
112
-
113
-
114
-
115
-
116
-
117
-
118
-
119
-
120
-
121
-
122
-
123
-
124
-
125
-
126
-
127
-
128
-
129
-
130
-
131
-
132
-
133
-
134
-
135
-
136
-
137
-
138
-
139
-
140
-
141
-
142
-
143
-
144
-
145
-
146
-
147
-
148
-
149
-
150
-
151
-
152
-
153
-
154
-
155
-
156
 |
 |
