Epson Apex 200 User Manual - Page 131
Removing an Option Card, out of the slot. Then carefully wrap the card, preferably in
 |
View all Epson Apex 200 manuals
Add to My Manuals
Save this manual to your list of manuals |
Page 131 highlights
3. Remove the card from the slot (pull it straight up) and set it on a soft surface with the components facing up. The location of the jumpers is shown below. Change them as needed and then reverse the three steps above to reinstall it. Removing an Option Card If you need to remove an option card, simply reverse the steps you followed to install it. Remove the screw securing the card to the back of the computer and pull the card straight up and out of the slot. Then carefully wrap the card, preferably in the original packing materials, and place it inside its box for safe storage. Cover the end of the empty option slot with the original metal cover and secure it with the retaining screw. Installing Option Cards 5-15
-
 1
1 -
2
-
3
-
4
-
5
-
6
-
7
-
8
-
9
-
10
-
11
-
12
-
13
-
14
-
15
-
16
-
17
-
18
-
19
-
20
-
21
-
22
-
23
-
24
-
25
-
26
-
27
-
28
-
29
-
30
-
31
-
32
-
33
-
34
-
35
-
36
-
37
-
38
-
39
-
40
-
41
-
42
-
43
-
44
-
45
-
46
-
47
-
48
-
49
-
50
-
51
-
52
-
53
-
54
-
55
-
56
-
57
-
58
-
59
-
60
-
61
-
62
-
63
-
64
-
65
-
66
-
67
-
68
-
69
-
70
-
71
-
72
-
73
-
74
-
75
-
76
-
77
-
78
-
79
-
80
-
81
-
82
-
83
-
84
-
85
-
86
-
87
-
88
-
89
-
90
-
91
-
92
-
93
-
94
-
95
-
96
-
97
-
98
-
99
-
100
-
101
-
102
-
103
-
104
-
105
-
106
-
107
-
108
-
109
-
110
-
111
-
112
-
113
-
114
-
115
-
116
-
117
-
118
-
119
-
120
-
121
-
122
-
123
-
124
-
125
-
 126
126 -
 127
127 -
 128
128 -
 129
129 -
 130
130 -
 131
131 -
 132
132 -
 133
133 -
 134
134 -
 135
135 -
 136
136 -
137
-
138
-
139
-
140
-
141
-
142
-
143
-
144
-
145
-
146
-
147
-
148
-
149
-
150
-
151
-
152
-
153
-
154
-
155
-
156
-
157
-
158
-
159
-
160
-
161
-
162
-
163
-
164
-
165
-
166
-
167
-
168
-
169
-
170
-
171
-
172
-
173
-
174
-
175
-
176
-
177
-
178
-
179
-
180
-
181
-
182
-
183
-
184
-
185
-
186
-
187
-
188
-
189
-
190
-
191
-
192
-
193
-
194
-
195
-
196
-
197
-
198
-
199
-
200
-
201
-
202
-
203
-
204
-
205
-
206
-
207
-
208
-
209
-
210
-
211
-
212
-
213
-
214
-
215
-
216
-
217
-
218
-
219
-
220
-
221
-
222
-
223
-
224
-
225
-
226
-
227
-
228
-
229
-
230
-
231
-
232
-
233
-
234
-
235
-
236
-
237
-
238
-
239
-
240
-
241
-
242
-
243
-
244
-
245
-
246
-
247
-
248
-
249
-
250
-
251
 |
 |

3.
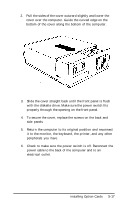
Remove the card from the slot (pull it straight up) and set
it on a soft surface with the components facing up. The
location of the jumpers is shown below. Change them as
needed and then reverse the three steps above to reinstall
it.
Removing an Option Card
If you need to remove an option card, simply reverse the steps
you followed to install it. Remove the screw securing the card
to the back of the computer and pull the card straight up and
out of the slot. Then carefully wrap the card, preferably in the
original packing materials, and place it inside its box for safe
storage. Cover the end of the empty option slot with the
original metal cover and secure it with the retaining screw.
Installing Option Cards
5-15