Epson Apex 200 User Manual - Page 207
Unconditional Format
 |
View all Epson Apex 200 manuals
Add to My Manuals
Save this manual to your list of manuals |
Page 207 highlights
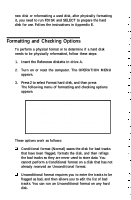
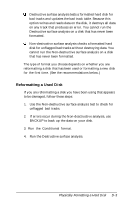
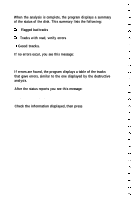
Flagged tracks are identified by xxxx and yy. At this point, press Enter to return to the HARD DISK FORMAT MENU. If there are any tracks with other errors, scanning stops and you see this message: Scanning cancelled. Warning: This drive has an unflagged error(s), or is unformatted. Press ENTER to return to the menu. Press Enter. This may mean that the drive has never been formatted or that an error was not flagged. If you want to format the disk after receiving this message, do the following: 1. If the drive is not formatted, perform the Unconditional format (Option 2) and enter any tracks you know are bad in the Bad Track Table. (See "Unconditional Format" below.) 2. Run the Destructive surface analysis (Option 3) to flag any remaining bad tracks. (See "Destructive Surface Analysis," which appears later in this appendix.) 3. Run the Conditional format again. No errors should occur; if one does, contact the dealer who sold you the disk. Unconditional Format Use this option to format your hard disk when you want to enter the list of bad tracks before formatting begins. The main difference between unconditional and conditional formatting is the way in which bad tracks are identified. With the unconditional format, you must enter the list of bad tracks before formatting begins. The Unconditional format can format a hard disk that has never been formatted or was not formatted properly; the Conditional format works only on a disk that has already been formatted. Physically Formatting a Hard Disk D-7
-
 1
1 -
2
-
3
-
4
-
5
-
6
-
7
-
8
-
9
-
10
-
11
-
12
-
13
-
14
-
15
-
16
-
17
-
18
-
19
-
20
-
21
-
22
-
23
-
24
-
25
-
26
-
27
-
28
-
29
-
30
-
31
-
32
-
33
-
34
-
35
-
36
-
37
-
38
-
39
-
40
-
41
-
42
-
43
-
44
-
45
-
46
-
47
-
48
-
49
-
50
-
51
-
52
-
53
-
54
-
55
-
56
-
57
-
58
-
59
-
60
-
61
-
62
-
63
-
64
-
65
-
66
-
67
-
68
-
69
-
70
-
71
-
72
-
73
-
74
-
75
-
76
-
77
-
78
-
79
-
80
-
81
-
82
-
83
-
84
-
85
-
86
-
87
-
88
-
89
-
90
-
91
-
92
-
93
-
94
-
95
-
96
-
97
-
98
-
99
-
100
-
101
-
102
-
103
-
104
-
105
-
106
-
107
-
108
-
109
-
110
-
111
-
112
-
113
-
114
-
115
-
116
-
117
-
118
-
119
-
120
-
121
-
122
-
123
-
124
-
125
-
126
-
127
-
128
-
129
-
130
-
131
-
132
-
133
-
134
-
135
-
136
-
137
-
138
-
139
-
140
-
141
-
142
-
143
-
144
-
145
-
146
-
147
-
148
-
149
-
150
-
151
-
152
-
153
-
154
-
155
-
156
-
157
-
158
-
159
-
160
-
161
-
162
-
163
-
164
-
165
-
166
-
167
-
168
-
169
-
170
-
171
-
172
-
173
-
174
-
175
-
176
-
177
-
178
-
179
-
180
-
181
-
182
-
183
-
184
-
185
-
186
-
187
-
188
-
189
-
190
-
191
-
192
-
193
-
194
-
195
-
196
-
197
-
198
-
199
-
200
-
201
-
 202
202 -
 203
203 -
 204
204 -
 205
205 -
 206
206 -
 207
207 -
 208
208 -
 209
209 -
 210
210 -
 211
211 -
 212
212 -
213
-
214
-
215
-
216
-
217
-
218
-
219
-
220
-
221
-
222
-
223
-
224
-
225
-
226
-
227
-
228
-
229
-
230
-
231
-
232
-
233
-
234
-
235
-
236
-
237
-
238
-
239
-
240
-
241
-
242
-
243
-
244
-
245
-
246
-
247
-
248
-
249
-
250
-
251
 |
 |
