Epson Apex 200 User Manual - Page 133
it to the monitor, the keyboard, the printer, and any other
 |
View all Epson Apex 200 manuals
Add to My Manuals
Save this manual to your list of manuals |
Page 133 highlights
2. Pull the sides of the cover outward slightly and lower the cover over the computer. Guide the curved edge on the bottom of the cover along the bottom of the computer. 3. Slide the cover straight back until the front panel is flush with the diskette drive. Make sure the power switch fits properly through the opening on the front panel. 4. To secure the cover, replace the screws on the back and side panels. 5. Return the computer to its original position and reconnect it to the monitor, the keyboard, the printer, and any other peripherals you have. 6. Check to make sure the power switch is off. Reconnect the power cable to the back of the computer and to an electrical outlet. Installing Option Cards 5-17
-
 1
1 -
2
-
3
-
4
-
5
-
6
-
7
-
8
-
9
-
10
-
11
-
12
-
13
-
14
-
15
-
16
-
17
-
18
-
19
-
20
-
21
-
22
-
23
-
24
-
25
-
26
-
27
-
28
-
29
-
30
-
31
-
32
-
33
-
34
-
35
-
36
-
37
-
38
-
39
-
40
-
41
-
42
-
43
-
44
-
45
-
46
-
47
-
48
-
49
-
50
-
51
-
52
-
53
-
54
-
55
-
56
-
57
-
58
-
59
-
60
-
61
-
62
-
63
-
64
-
65
-
66
-
67
-
68
-
69
-
70
-
71
-
72
-
73
-
74
-
75
-
76
-
77
-
78
-
79
-
80
-
81
-
82
-
83
-
84
-
85
-
86
-
87
-
88
-
89
-
90
-
91
-
92
-
93
-
94
-
95
-
96
-
97
-
98
-
99
-
100
-
101
-
102
-
103
-
104
-
105
-
106
-
107
-
108
-
109
-
110
-
111
-
112
-
113
-
114
-
115
-
116
-
117
-
118
-
119
-
120
-
121
-
122
-
123
-
124
-
125
-
126
-
127
-
 128
128 -
 129
129 -
 130
130 -
 131
131 -
 132
132 -
 133
133 -
 134
134 -
 135
135 -
 136
136 -
 137
137 -
 138
138 -
139
-
140
-
141
-
142
-
143
-
144
-
145
-
146
-
147
-
148
-
149
-
150
-
151
-
152
-
153
-
154
-
155
-
156
-
157
-
158
-
159
-
160
-
161
-
162
-
163
-
164
-
165
-
166
-
167
-
168
-
169
-
170
-
171
-
172
-
173
-
174
-
175
-
176
-
177
-
178
-
179
-
180
-
181
-
182
-
183
-
184
-
185
-
186
-
187
-
188
-
189
-
190
-
191
-
192
-
193
-
194
-
195
-
196
-
197
-
198
-
199
-
200
-
201
-
202
-
203
-
204
-
205
-
206
-
207
-
208
-
209
-
210
-
211
-
212
-
213
-
214
-
215
-
216
-
217
-
218
-
219
-
220
-
221
-
222
-
223
-
224
-
225
-
226
-
227
-
228
-
229
-
230
-
231
-
232
-
233
-
234
-
235
-
236
-
237
-
238
-
239
-
240
-
241
-
242
-
243
-
244
-
245
-
246
-
247
-
248
-
249
-
250
-
251
 |
 |

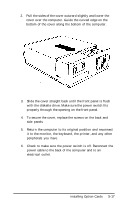
2.
Pull the sides of the cover outward slightly and lower the
cover over the computer. Guide the curved edge on the
bottom of the cover along the bottom of the computer.
3.
Slide the cover straight back until the front panel is flush
with the diskette drive. Make sure the power switch fits
properly through the opening on the front panel.
4.
To secure the cover, replace the screws on the back and
side panels.
5.
Return the computer to its original position and reconnect
it to the monitor, the keyboard, the printer, and any other
peripherals you have.
6.
Check to make sure the power switch is off. Reconnect the
power cable to the back of the computer and to an
electrical outlet.
Installing Option Cards
5-17