HP 3310 User Guide - Page 103
Load postcards, Hagaki cards, or HP Panorama photo paper, Photo Tray, Photo, Copy Menu, Photo Menu - cartridges
 |
UPC - 829160970424
View all HP 3310 manuals
Add to My Manuals
Save this manual to your list of manuals |
Page 103 highlights
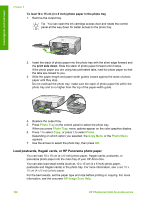
Load originals and load paper Chapter 5 To load 10 x 15 cm (4 x 6 inch) photo paper in the photo tray 1. Remove the output tray. Tip You can open the ink cartridge access door and rotate the control panel all the way down for better access to the photo tray. 2. Insert the stack of photo paper into the photo tray with the short edge forward and the print side down. Slide the stack of photo paper forward until it stops. If the photo paper you are using has perforated tabs, load the photo paper so that the tabs are closest to you. 3. Slide the paper-length and paper-width guides inward against the stack of photo paper until they stop. Do not overload the photo tray; make sure the stack of photo paper fits within the photo tray and is no higher than the top of the paper-width guide. 4. Replace the output tray. 5. Press Photo Tray on the control panel to select the photo tray. When you press Photo Tray, menu options appear on the color graphics display. 6. Press 1 to select Copy, or press 2 to select Photo. Depending on which option you selected, the Copy Menu or the Photo Menu appears. 7. Use the arrows to select the photo tray, then press OK. Load postcards, Hagaki cards, or HP Panorama photo paper You can load 10 x 15 cm (4 x 6 inch) photo paper, Hagaki cards, postcards, or panorama photo paper into the main tray of your HP All-in-One. You can also load small media (such as 10 x 15 cm (4 x 6 inch) photo paper, postcards and Hagaki cards) in the photo tray. For more information, see Load 10 x 15 cm (4 x 6 inch) photo paper. For the best results, set the paper type and size before printing or copying. For more information, see the onscreen HP Image Zone Help. 100 HP Photosmart 3300 All-in-One series
-
 1
1 -
2
-
3
-
4
-
5
-
6
-
7
-
8
-
9
-
10
-
11
-
12
-
13
-
14
-
15
-
16
-
17
-
18
-
19
-
20
-
21
-
22
-
23
-
24
-
25
-
26
-
27
-
28
-
29
-
30
-
31
-
32
-
33
-
34
-
35
-
36
-
37
-
38
-
39
-
40
-
41
-
42
-
43
-
44
-
45
-
46
-
47
-
48
-
49
-
50
-
51
-
52
-
53
-
54
-
55
-
56
-
57
-
58
-
59
-
60
-
61
-
62
-
63
-
64
-
65
-
66
-
67
-
68
-
69
-
70
-
71
-
72
-
73
-
74
-
75
-
76
-
77
-
78
-
79
-
80
-
81
-
82
-
83
-
84
-
85
-
86
-
87
-
88
-
89
-
90
-
91
-
92
-
93
-
94
-
95
-
96
-
97
-
 98
98 -
 99
99 -
 100
100 -
 101
101 -
 102
102 -
 103
103 -
 104
104 -
 105
105 -
 106
106 -
 107
107 -
 108
108 -
109
-
110
-
111
-
112
-
113
-
114
-
115
-
116
-
117
-
118
-
119
-
120
-
121
-
122
-
123
-
124
-
125
-
126
-
127
-
128
-
129
-
130
-
131
-
132
-
133
-
134
-
135
-
136
-
137
-
138
-
139
-
140
-
141
-
142
-
143
-
144
-
145
-
146
-
147
-
148
-
149
-
150
-
151
-
152
-
153
-
154
-
155
-
156
-
157
-
158
-
159
-
160
-
161
-
162
-
163
-
164
-
165
-
166
-
167
-
168
-
169
-
170
-
171
-
172
-
173
-
174
-
175
-
176
-
177
-
178
-
179
-
180
-
181
-
182
-
183
-
184
-
185
-
186
-
187
-
188
-
189
-
190
-
191
-
192
-
193
-
194
-
195
-
196
-
197
-
198
-
199
-
200
-
201
-
202
-
203
-
204
-
205
-
206
-
207
-
208
-
209
-
210
-
211
-
212
 |
 |
