HP 3310 User Guide - Page 71
Wired network setup, Enter a New Network Name SSID, Yes, my network uses WEP encryption, No - photosmart installation software
 |
UPC - 829160970424
View all HP 3310 manuals
Add to My Manuals
Save this manual to your list of manuals |
Page 71 highlights
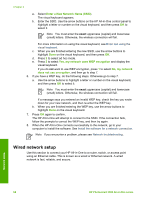
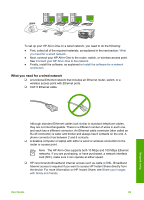
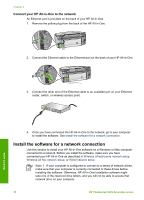
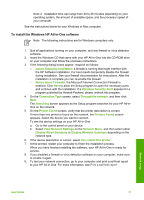
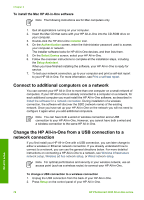
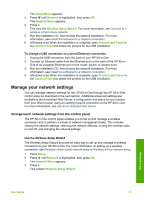
Chapter 4 a. Select Enter a New Network Name (SSID). The visual keyboard appears. b. Enter the SSID. Use the arrow buttons on the HP All-in-One control panel to highlight a letter or number on the visual keyboard, and then press OK to select it. Note You must enter the exact uppercase (capital) and lowercase (small) letters. Otherwise, the wireless connection will fail. For more information on using the visual keyboard, see Enter text using the visual keyboard. c. When you are finished entering the new SSID, use the arrow buttons to highlight Done on the visual keyboard, and then press OK. d. Press 2 to select ad hoc mode. e. Press 2 to select Yes, my network uses WEP encryption and display the visual keyboard. If you do not want to use WEP encryption, press 1 to select No, my network does not use encryption, and then go to step 7. 6. If you have a WEP key, do the following steps. Otherwise go to step 7. a. Use the arrow buttons to highlight a letter or number on the visual keyboard, and then press OK to select it. Note You must enter the exact uppercase (capital) and lowercase (small) letters. Otherwise, the wireless connection will fail. If a message says you entered an invalid WEP key, check the key you wrote down for your new network, and then re-enter the WEP key. b. When you are finished entering the WEP key, use the arrow buttons to highlight Done on the visual keyboard. 7. Press OK again to confirm. The HP All-in-One will attempt to connect to the SSID. If the connection fails, follow the prompts to correct the WEP key, and then try again. 8. When the HP All-in-One connects successfully to the network, go to your computer to install the software. See Install the software for a network connection. Note If you encounter a problem, please see Network troubleshooting. Wired network setup Use this section to connect your HP All-in-One to a router, switch, or access point using an Ethernet cable. This is known as a wired or Ethernet network. A wired network is fast, reliable, and secure. Network setup 68 HP Photosmart 3300 All-in-One series
-
 1
1 -
2
-
3
-
4
-
5
-
6
-
7
-
8
-
9
-
10
-
11
-
12
-
13
-
14
-
15
-
16
-
17
-
18
-
19
-
20
-
21
-
22
-
23
-
24
-
25
-
26
-
27
-
28
-
29
-
30
-
31
-
32
-
33
-
34
-
35
-
36
-
37
-
38
-
39
-
40
-
41
-
42
-
43
-
44
-
45
-
46
-
47
-
48
-
49
-
50
-
51
-
52
-
53
-
54
-
55
-
56
-
57
-
58
-
59
-
60
-
61
-
62
-
63
-
64
-
65
-
 66
66 -
 67
67 -
 68
68 -
 69
69 -
 70
70 -
 71
71 -
 72
72 -
 73
73 -
 74
74 -
 75
75 -
 76
76 -
77
-
78
-
79
-
80
-
81
-
82
-
83
-
84
-
85
-
86
-
87
-
88
-
89
-
90
-
91
-
92
-
93
-
94
-
95
-
96
-
97
-
98
-
99
-
100
-
101
-
102
-
103
-
104
-
105
-
106
-
107
-
108
-
109
-
110
-
111
-
112
-
113
-
114
-
115
-
116
-
117
-
118
-
119
-
120
-
121
-
122
-
123
-
124
-
125
-
126
-
127
-
128
-
129
-
130
-
131
-
132
-
133
-
134
-
135
-
136
-
137
-
138
-
139
-
140
-
141
-
142
-
143
-
144
-
145
-
146
-
147
-
148
-
149
-
150
-
151
-
152
-
153
-
154
-
155
-
156
-
157
-
158
-
159
-
160
-
161
-
162
-
163
-
164
-
165
-
166
-
167
-
168
-
169
-
170
-
171
-
172
-
173
-
174
-
175
-
176
-
177
-
178
-
179
-
180
-
181
-
182
-
183
-
184
-
185
-
186
-
187
-
188
-
189
-
190
-
191
-
192
-
193
-
194
-
195
-
196
-
197
-
198
-
199
-
200
-
201
-
202
-
203
-
204
-
205
-
206
-
207
-
208
-
209
-
210
-
211
-
212
 |
 |
