HP 4215 HP Officejet 4200 series all-in-one - (English) User Guide - Page 135
case C: shared voice/fax line, hp officejet 4210 series (with no handset)
 |
UPC - 829160155845
View all HP 4215 manuals
Add to My Manuals
Save this manual to your list of manuals |
Page 135 highlights
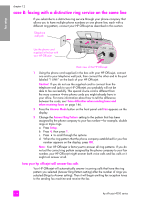
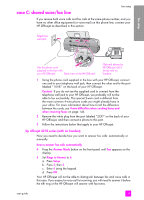
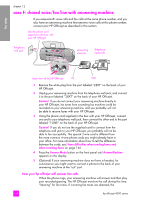
fax setup fax setup case C: shared voice/fax line If you receive both voice calls and fax calls at the same phone number, and you have no other office equipment (or voice mail) on this phone line, connect your HP Officejet as described in this section. Telephone wall jack Use the phone cord supplied in the box with your HP Officejet Back view of the HP Officejet Optional phone for HP Officejet 4210 Series with no handset. 1 Using the phone cord supplied in the box with your HP Officejet, connect one end to your telephone wall jack, then connect the other end to the port labeled "1-LINE" on the back of your HP Officejet. Caution! If you do not use the supplied cord to connect from the telephone wall jack to your HP Officejet, you probably will not be able to fax successfully. This special 2-wire cord is different from the more common 4-wire phone cords you might already have in your office. For more information about how to tell the difference between the cords, see I have difficulties when sending faxes and when receiving faxes on page 146. 2 Remove the white plug from the port labeled "2-EXT" on the back of your HP Officejet, and then connect a phone to this port. 3 Follow the instructions below that apply to your HP Officejet. hp officejet 4210 series (with no handset) Now you need to decide how you want to answer fax calls: automatically or manually. how to answer fax calls automatically 4 Press the Answer Mode button on the front panel until Fax appears on the display. 5 Set Rings to Answer to 6. a. Press Setup. b. Press 3, then 3. c. Enter 6 using the keypad. d. Press OK. Your HP Officejet will not be able to distinguish between fax and voice calls in this case. If you suspect a voice call is incoming, you will need to answer it before the 6th ring or the HP Officejet will answer with fax tones. user guide 125
-
 1
1 -
2
-
3
-
4
-
5
-
6
-
7
-
8
-
9
-
10
-
11
-
12
-
13
-
14
-
15
-
16
-
17
-
18
-
19
-
20
-
21
-
22
-
23
-
24
-
25
-
26
-
27
-
28
-
29
-
30
-
31
-
32
-
33
-
34
-
35
-
36
-
37
-
38
-
39
-
40
-
41
-
42
-
43
-
44
-
45
-
46
-
47
-
48
-
49
-
50
-
51
-
52
-
53
-
54
-
55
-
56
-
57
-
58
-
59
-
60
-
61
-
62
-
63
-
64
-
65
-
66
-
67
-
68
-
69
-
70
-
71
-
72
-
73
-
74
-
75
-
76
-
77
-
78
-
79
-
80
-
81
-
82
-
83
-
84
-
85
-
86
-
87
-
88
-
89
-
90
-
91
-
92
-
93
-
94
-
95
-
96
-
97
-
98
-
99
-
100
-
101
-
102
-
103
-
104
-
105
-
106
-
107
-
108
-
109
-
110
-
111
-
112
-
113
-
114
-
115
-
116
-
117
-
118
-
119
-
120
-
121
-
122
-
123
-
124
-
125
-
126
-
127
-
128
-
129
-
 130
130 -
 131
131 -
 132
132 -
 133
133 -
 134
134 -
 135
135 -
 136
136 -
 137
137 -
 138
138 -
 139
139 -
 140
140 -
141
-
142
-
143
-
144
-
145
-
146
-
147
-
148
-
149
-
150
-
151
-
152
-
153
-
154
-
155
-
156
-
157
-
158
-
159
-
160
-
161
-
162
-
163
-
164
-
165
-
166
 |
 |
