HP 4215 HP Officejet 4200 series all-in-one - (English) User Guide - Page 63
print reports, generate reports automatically
 |
UPC - 829160155845
View all HP 4215 manuals
Add to My Manuals
Save this manual to your list of manuals |
Page 63 highlights
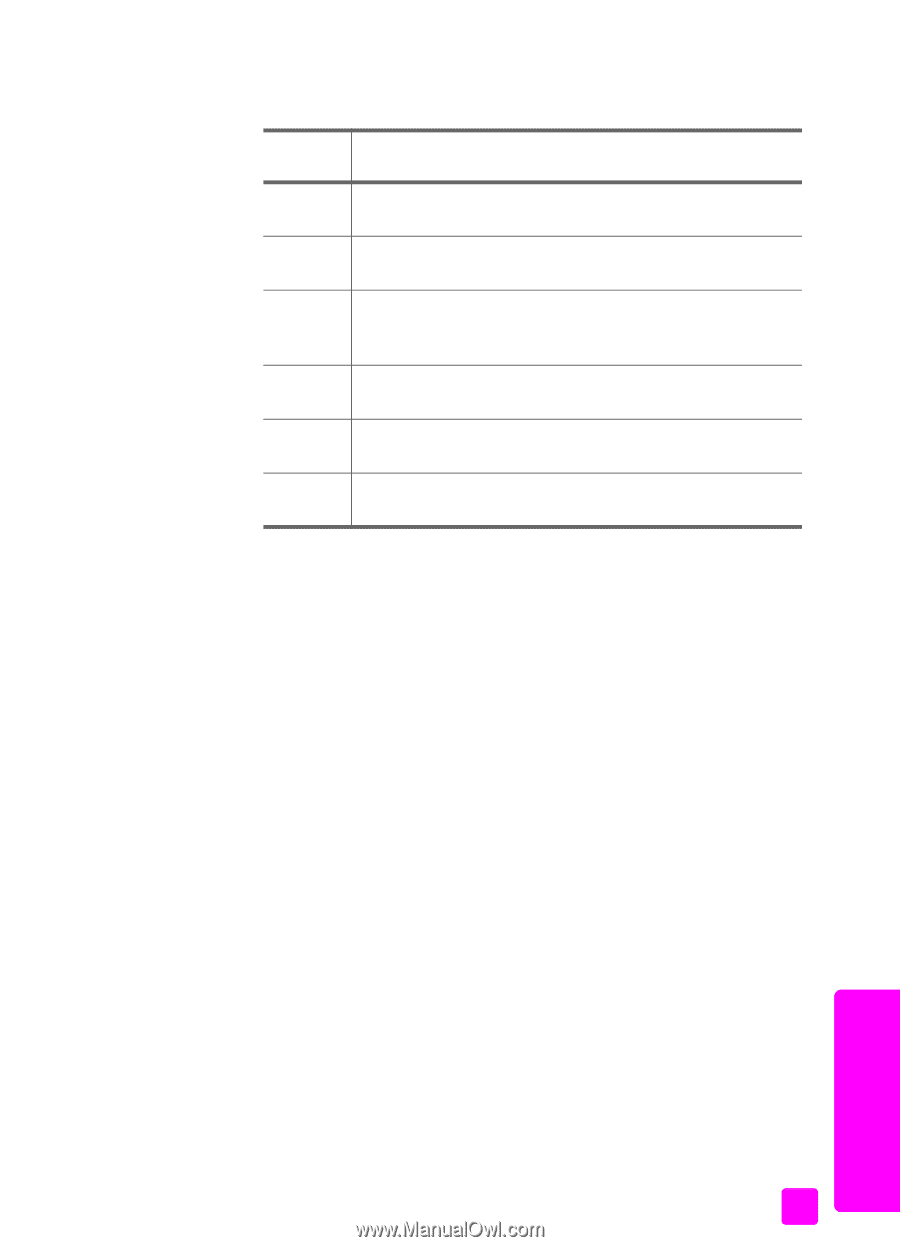
use the fax features • To enter a symbol, such as *, press Symbols (*) repeatedly to scroll through the list of symbols. The following table represents the available symbols. available description: symbols: * Provides the Dual Tone Multiple-Frequency (DTMF) tones assigned to the asterisk character. - When auto-dialing, the HP Officejet enters a three-second pause in the number sequence. ( ) Displays a left or right parenthesis to visually separate numbers, such as area codes, for easier reading. These symbols do not affect dialing. W When auto-dialing, W causes the HP Officejet to wait for a dial tone before continuing to dial. R During auto-dialing, the R functions the same as the Flash button. + Displays a plus symbol in the fax header. This symbol does not affect dialing • If you make a mistake, press " to clear it, and then make the correct entry. • After you are done entering text, press OK to store your entries. print reports You can set up your HP Officejet to automatically print error reports and confirmation reports for each fax you send and receive. You can also manually print system reports as you need them; these reports provide useful system information about your HP Officejet. By default, your HP Officejet is set to print a report only if there is a problem with sending or receiving a fax. A confirmation message that indicates whether a fax was successfully sent appears briefly on the front panel display after each transaction. This section contains the following topics: • generate reports automatically on page 53 • generate reports manually on page 54 generate reports automatically This setting lets you configure your HP Officejet so that it automatically prints error and confirmation reports. Note: If you need printed confirmation each time your faxes are successfully sent, follow these instructions before sending any faxes. 1 Press Setup. 2 Press 1, then press 1. This selects Print Report and then selects Automatic Reports Setup. fax user guide 53
-
 1
1 -
2
-
3
-
4
-
5
-
6
-
7
-
8
-
9
-
10
-
11
-
12
-
13
-
14
-
15
-
16
-
17
-
18
-
19
-
20
-
21
-
22
-
23
-
24
-
25
-
26
-
27
-
28
-
29
-
30
-
31
-
32
-
33
-
34
-
35
-
36
-
37
-
38
-
39
-
40
-
41
-
42
-
43
-
44
-
45
-
46
-
47
-
48
-
49
-
50
-
51
-
52
-
53
-
54
-
55
-
56
-
57
-
 58
58 -
 59
59 -
 60
60 -
 61
61 -
 62
62 -
 63
63 -
 64
64 -
 65
65 -
 66
66 -
 67
67 -
 68
68 -
69
-
70
-
71
-
72
-
73
-
74
-
75
-
76
-
77
-
78
-
79
-
80
-
81
-
82
-
83
-
84
-
85
-
86
-
87
-
88
-
89
-
90
-
91
-
92
-
93
-
94
-
95
-
96
-
97
-
98
-
99
-
100
-
101
-
102
-
103
-
104
-
105
-
106
-
107
-
108
-
109
-
110
-
111
-
112
-
113
-
114
-
115
-
116
-
117
-
118
-
119
-
120
-
121
-
122
-
123
-
124
-
125
-
126
-
127
-
128
-
129
-
130
-
131
-
132
-
133
-
134
-
135
-
136
-
137
-
138
-
139
-
140
-
141
-
142
-
143
-
144
-
145
-
146
-
147
-
148
-
149
-
150
-
151
-
152
-
153
-
154
-
155
-
156
-
157
-
158
-
159
-
160
-
161
-
162
-
163
-
164
-
165
-
166
 |
 |